I have a cherished memory of my first attempt at an apple crisp. It was a picturesque fall afternoon, and the comforting aroma of cinnamon and baked apples wafted through my kitchen. I was a novice baker, filled with a mix of excitement and apprehension, unsure if I could successfully replicate the comforting dessert I so dearly loved. But as I meticulously layered the thinly sliced apples and generously sprinkled the crisp topping, a sense of calm washed over me, replacing my initial nervousness with a quiet confidence. The result was a warm, sweet, and utterly satisfying treat that was surprisingly easy to make, even for a beginner like myself. These Apple Crisp Bars take that comforting experience and make it even more accessible for those new to the world of baking. The pre-made crust and simple filling make this recipe perfect for individuals who are just beginning their culinary journey. You’ll learn how to create a crumbly shortbread crust, mix a flavorful apple filling that captures the essence of autumn, and prepare a crisp topping that adds a delightful textural contrast, all while enjoying the warm and inviting flavors of the season. Plus, these bars are a fantastic way to utilize seasonal apples and create a dessert that’s both comforting and easy to share with friends and family.

Apple Crisp Bars: A Beginner’s Delight for Autumn Flavors
Indulge in the sweet and spiced flavors of these bars. Apples, cinnamon, and a crisp topping make a perfect fall treat.
- Total Time: 1 hour 15 minutes
- Yield: 16 bars 1x
Ingredients
- Butter (½ cup)
- Vanilla (½ tsp)
- Flour (1 ¼ cup)
- Granulated sugar (2 tbsp)
- Brown sugar (2 tbsp)
- Salt (¼ tsp)
- Apples (3)
- Brown sugar (4 tbsp)
- Flour (2 tbsp)
- Nutmeg (¼ tsp)
- Cinnamon (½ tsp)
- Butter (6 tbsp)
- Brown sugar (½ cup)
- Salt (½ tsp)
- Oats (¼ cup)
- Cinnamon (1 tsp)
Instructions
-
- Prepare the Crust (The Crust Creation): Preheat the oven to 350°F (175°C). Line an 8×8-inch baking pan with parchment paper, allowing the parchment paper to overhang on two sides for easy removal of the bars. This prevents the bars from sticking to the pan and makes cleanup easier.
-
- Cream the Butter and Sugars (The Sugar Sweetening): In a large bowl, using an electric mixer, beat the softened salted butter, granulated sugar, and light brown sugar until light and fluffy, approximately 2-3 minutes. This incorporates air into the dough, resulting in a tender and light crust.
-
- Add Vanilla (The Vanilla Variation): Add the vanilla extract to the creamed mixture and beat until well combined.
-
- Add Dry Ingredients (The Dry Mixture): In the same bowl, fold in the all-purpose flour and salt, continuing to mix at low speed until you achieve a crumbly dough. Avoid overmixing, as this can develop the gluten in the flour and result in a tough crust.
-
- Press the Crust (The Crust Compaction): Press the crumbly dough evenly into the bottom of the prepared baking pan, creating a smooth and even layer.
-
- Bake the Crust (The Crust Cooking): Bake the crust in the preheated oven for 12-14 minutes, or until it is lightly golden brown. Remove the pan from the oven and set it aside.
-
- Prepare the Apple Filling (The Filling Formation): While the crust is baking, peel the apples and thinly slice them. Thin slices ensure even cooking and a tender filling.
-
- Mix the Filling (The Filling Fusion): In a medium bowl, combine the thinly sliced apples with the light brown sugar, all-purpose flour, ground nutmeg, and ground cinnamon. Mix well to coat the apples evenly with the sugar and spices.
-
- Assemble the Bars (The Bar Building): Once the crust is ready, remove it from the oven (keep the oven at 350°F). Spread the apple filling evenly over the baked shortbread crust, ensuring an even layer of apples.
-
- Prepare the Crisp Topping (The Topping Tempering): In a separate bowl, combine the all-purpose flour, cold butter cut into cubes, light brown sugar, salt, rolled oats, and ground cinnamon.
-
- Cut in the Butter (The Butter Blending): Using a pastry cutter, two forks, or your fingertips, cut in the cold butter until the mixture becomes crumbly, with small pea-sized pieces of butter remaining. This creates a crumbly texture in the topping.
-
- Spread the Topping (The Topping Transfer): Spread the crisp topping evenly over the apple filling, ensuring the entire surface is covered. .
-
- Bake the Bars (The Bar Baking): Bake the bars in the preheated oven for approximately 45 minutes, or until the topping turns golden brown and the apples are tender.
-
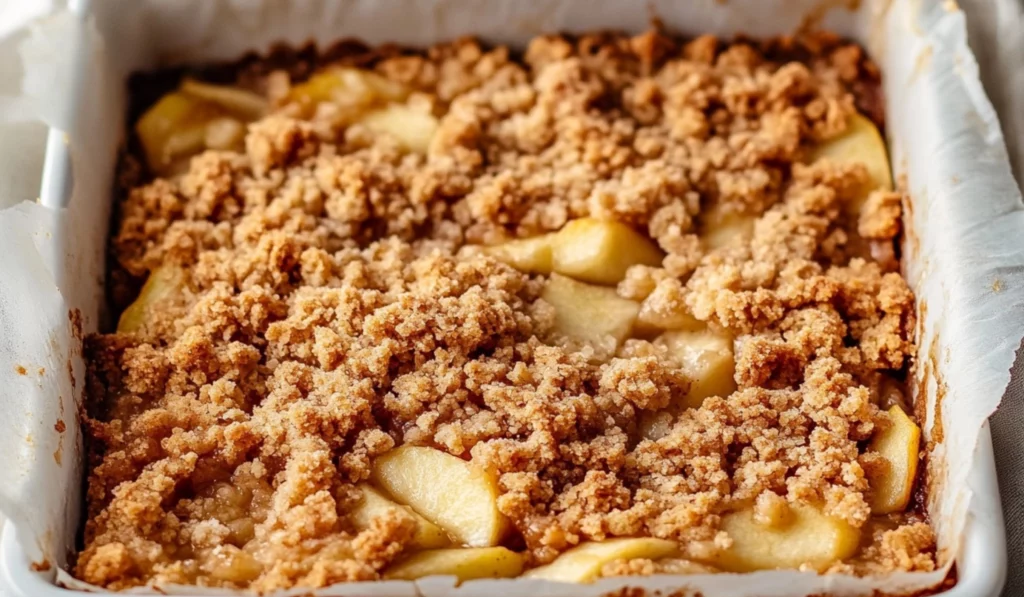
- Cool and Cut (The Cooling Conclusion): Allow the bars to cool completely in the pan before removing them using the parchment paper overhang and cutting them into squares. Cooling completely ensures the bars hold their shape when cut.
Notes
- Use firm apples.
- Cut butter into cubes for topping.
- Cool completely before slicing.
- Prep Time: 15 minutes
- Cook Time: 1 hour
- Category: Dessert
- Method: Baking, Mixing, Crumb Topping
- Cuisine: American
- Diet: Vegetarian
This Apple Crisp Bars recipe is meticulously designed to be beginner-friendly, breaking down the entire baking process into clear, manageable, numbered steps. We’ll start by preparing the shortbread crust, a simple base that provides a sturdy and delicious foundation for the bars. Then, we’ll mix the apple filling, combining the sweet and spiced flavors of fall with perfectly sliced apples. Finally, we’ll prepare the crisp topping, a crumbly mixture that adds a delightful texture contrast and a touch of sweetness. This recipe is a fantastic way to learn some essential baking techniques, such as making a shortbread crust, preparing a fruit filling, creating a crisp topping, and understanding the importance of layering flavors and textures, while creating a batch of delicious and shareable bars that are perfect for any occasion.
Ingredients and Preparation (A Detailed Guide to Apple Crisp Perfection)
This recipe yields 16 bars, making it perfect for sharing with friends and family, bringing to a potluck or gathering, or enjoying throughout the week as a sweet treat. You can easily adjust the ingredient amounts to make more or fewer bars, depending on your needs. This recipe is easily doubled or tripled for larger gatherings or to have extra bars for later enjoyment.
Ingredients (The Stars of the Show):
SHORTBREAD CRUST (The Solid Base):
- 1/2 cup salted butter, softened Salted butter adds a rich, buttery flavor to the crust and provides a tender texture. You can use unsalted butter, but add 1/4 teaspoon of salt to the crust ingredients.
- 1/2 teaspoon vanilla extract Vanilla extract adds a warm and aromatic flavor to the crust. You can use vanilla bean paste or another extract like almond extract for a different flavor profile.
- 1 1/4 cup all-purpose flour All-purpose flour provides the structure for the crust, resulting in a crumbly and tender texture. You can use whole wheat flour for a nuttier flavor or a 1:1 gluten-free baking flour for a gluten-free version.
- 2 tablespoons granulated sugar Granulated sugar adds sweetness to the crust and contributes to its tender texture.
- 2 tablespoons light brown sugar Light brown sugar adds a subtle caramel flavor and a chewy texture to the crust.
- 1/4 teaspoon salt Salt enhances the flavors of the other ingredients and balances the sweetness of the crust.
APPLE FILLING (The Fruity Heart):
- 3 large apples, peeled and thinly sliced Large, firm apples provide a sweet and slightly tart filling that holds its shape during baking. You can use any variety of apples, such as Granny Smith, Honeycrisp, or Gala. Ensure they are ripe but still firm.
- 4 tablespoons light brown sugar Light brown sugar adds a rich, caramel-like sweetness to the filling and enhances the apple flavor.
- 2 tablespoons all-purpose flour All-purpose flour thickens the filling and prevents it from becoming too runny during baking.
- 1/4 teaspoon ground nutmeg Ground nutmeg adds a warm, spicy flavor that complements the apples and cinnamon.
- 1/2 teaspoon ground cinnamon Ground cinnamon adds a sweet and spicy flavor that enhances the apple filling.
CRISP TOPPING (The Crunchy Crown):
- 3/4 cup all-purpose flour All-purpose flour provides the structure for the crisp topping, resulting in a crumbly and golden texture.
- 6 tablespoons butter, cut into cubes Cold butter creates a crumbly texture in the topping.
- 1/2 cup light brown sugar Light brown sugar adds sweetness and a caramel flavor to the topping.
- 1/2 teaspoon salt Salt enhances the flavors of the other ingredients and balances the sweetness of the topping.
- 1/4 cup rolled oats Rolled oats add a chewy texture and a nutty flavor to the topping. You can use quick oats or omit them entirely. You can also use other grains like quinoa flakes.
- 1 teaspoon ground cinnamon Ground cinnamon adds a warm, spicy flavor that complements the apples and nutmeg.
Alternatives and Flexibility (Making it Your Own Culinary Creation):
- Butter Options (The Butter Balance): You can use unsalted butter for both the crust and topping, but add 1/4 teaspoon of salt to each. You can also use ghee or a dairy-free butter substitute.
- Extract Variations (The Extract Exploration): You can use vanilla bean paste, almond extract, lemon extract, orange extract, or other extracts to add different flavors to the crust.
- Flour Substitutes (The Flour Switch): You can use whole wheat flour, pastry flour, or a combination of different flours for the crust and topping. For a gluten-free version, use a 1:1 gluten-free baking flour.
- Sugar Substitutes (The Sugar Switch): You can use granulated sugar, brown sugar, coconut sugar, or sugar substitutes like stevia or erythritol for the crust, filling, and topping, adjusting the amount to your sweetness preference.
- Apple Varieties (The Apple Assortment): You can use any variety of apples, such as Granny Smith, Honeycrisp, Gala, Fuji, or Braeburn. Ensure they are firm and ripe.
- Spice Substitutes (The Spice Spectrum): You can use other spices like ginger, cloves, cardamom, allspice, or a blend of spices like apple pie spice or pumpkin pie spice for the filling and topping.
- Oat Options (The Oat Alternatives): You can use quick oats, steel-cut oats, or other grains like quinoa flakes for the topping. You can also omit the oats entirely for a purely crumbly topping.
Step-by-Step Instructions (Easy Steps to Apple Crisp Bars)
- Prepare the Crust (The Crust Creation): Preheat the oven to 350°F (175°C). Line an 8×8-inch baking pan with parchment paper, allowing the parchment paper to overhang on two sides for easy removal of the bars. This prevents the bars from sticking to the pan and makes cleanup easier.
- Cream the Butter and Sugars (The Sugar Sweetening): In a large bowl, using an electric mixer, beat the softened salted butter, granulated sugar, and light brown sugar until light and fluffy, approximately 2-3 minutes. This incorporates air into the dough, resulting in a tender and light crust.
- Add Vanilla (The Vanilla Variation): Add the vanilla extract to the creamed mixture and beat until well combined.
- Add Dry Ingredients (The Dry Mixture): In the same bowl, fold in the all-purpose flour and salt, continuing to mix at low speed until you achieve a crumbly dough. Avoid overmixing, as this can develop the gluten in the flour and result in a tough crust.
- Press the Crust (The Crust Compaction): Press the crumbly dough evenly into the bottom of the prepared baking pan, creating a smooth and even layer.
- Bake the Crust (The Crust Cooking): Bake the crust in the preheated oven for 12-14 minutes, or until it is lightly golden brown. Remove the pan from the oven and set it aside.
- Prepare the Apple Filling (The Filling Formation): While the crust is baking, peel the apples and thinly slice them. Thin slices ensure even cooking and a tender filling.
- Mix the Filling (The Filling Fusion): In a medium bowl, combine the thinly sliced apples with the light brown sugar, all-purpose flour, ground nutmeg, and ground cinnamon. Mix well to coat the apples evenly with the sugar and spices.
- Assemble the Bars (The Bar Building): Once the crust is ready, remove it from the oven (keep the oven at 350°F). Spread the apple filling evenly over the baked shortbread crust, ensuring an even layer of apples.
- Prepare the Crisp Topping (The Topping Tempering): In a separate bowl, combine the all-purpose flour, cold butter cut into cubes, light brown sugar, salt, rolled oats, and ground cinnamon.
- Cut in the Butter (The Butter Blending): Using a pastry cutter, two forks, or your fingertips, cut in the cold butter until the mixture becomes crumbly, with small pea-sized pieces of butter remaining. This creates a crumbly texture in the topping.
- Spread the Topping (The Topping Transfer): Spread the crisp topping evenly over the apple filling, ensuring the entire surface is covered. .
- Bake the Bars (The Bar Baking): Bake the bars in the preheated oven for approximately 45 minutes, or until the topping turns golden brown and the apples are tender.
- Cool and Cut (The Cooling Conclusion): Allow the bars to cool completely in the pan before removing them using the parchment paper overhang and cutting them into squares. Cooling completely ensures the bars hold their shape when cut.
Beginner Tips and Notes (Troubleshooting and Helpful Hints)
- Softened Butter (The Butter Basics): Ensure the butter is softened to room temperature for easy creaming with the sugars. If the butter is too cold, it won’t cream properly, resulting in a dense crust.
- Even Crust (The Crust Consistency): Press the crust dough evenly into the pan using your fingers or the back of a spoon for consistent baking and an even thickness.
- Thin Apple Slices (The Apple Arrangement): Thinly slice the apples for even cooking and a tender filling. Thicker slices may not cook through completely.
- Pastry Cutter Alternatives (The Tool Trade): If you don’t have a pastry cutter, use two forks or your fingertips to cut in the butter for the crisp topping. Work quickly to prevent the butter from melting.
Serving Suggestions (Enhancing Your Apple Crisp Experience)
These Apple Crisp Bars are delicious on their own, offering a warm and comforting treat. However, they can be further elevated with some complementary sides and toppings to create a more indulgent dessert experience.
Complementary Sides (The Delicious Additions):
- Vanilla Ice Cream (The Ice Cream Indulgence): Serve with a scoop of vanilla ice cream for a classic and comforting pairing. The cold ice cream complements the warm bars.
- Whipped Cream (The Creamy Cloud): Top with homemade whipped cream for a light and airy addition that adds a touch of elegance.
- Caramel Sauce (The Caramel Crown): Drizzle with caramel sauce, either homemade or store-bought, for an extra touch of sweetness and a rich, caramel flavor.
- Cinnamon Sugar (The Sugar Sprinkle): Sprinkle with cinnamon sugar for a warm and spicy flavor that enhances the apple and cinnamon notes.
- Maple Syrup (The Syrup Sweetness): Drizzle with maple syrup for a rich, sweet flavor that complements the apple and cinnamon.
- Fruit Compote (The Compote Complement): Serve with a warm or cold fruit compote, such as berry compote or apple compote, for a fruity and flavorful side.
Storage Tips (Keeping Your Bars Fresh and Flavorful):
- Store leftover bars in an airtight container at room temperature for up to 3 days.
- Refrigerate for longer storage, up to 5 days.
- Warm the bars slightly in the microwave or oven before serving for a more comforting and warm experience.
- If storing bars with ice cream or whipped cream, add those toppings just before serving to maintain their freshness.
- If storing bars with a caramel or chocolate drizzle, store them in a single layer to prevent the toppings from sticking together.

Conclusion (Inviting You to Create and Share)
These Apple Crisp Bars are a perfect example of how combining simple ingredients and techniques can create a truly comforting and delicious dessert that’s perfect for any occasion, from casual gatherings to holiday celebrations. They’re a fantastic option for beginner bakers who want to learn some essential baking skills and create a batch of irresistible bars. Don’t be afraid to experiment with the recipe and add your own personal touch. Try different apple varieties, spices, extracts, or toppings to create your own unique version. And most importantly, have fun in the kitchen! Baking should be an enjoyable and creative experience, not a chore.
Now, I encourage you to try this recipe – you won’t be disappointed! Share your culinary creations and any variations you come up with in the comments below – I’d love to hear about your Apple Crisp Bars adventures! Did you try a different apple variety? Did you add any special ingredients to the topping? What did your family or friends think? Let me know! Happy baking, and may your kitchen be filled with the warm, sweet aroma of apple crisp and the anticipation of a truly satisfying treat! These Apple Crisp Bars are more than just a dessert; they’re a celebration of seasonal flavors, simple pleasures, and the joy of sharing homemade treats with loved ones. Enjoy every flavorful bite! And who knows? Maybe this will become your new go-to recipe for a cozy fall dessert or a sweet treat to share with friends and family. You might even find yourself making a double or triple batch because they’re just that good. So, go ahead, embrace the simplicity of this recipe, unleash your culinary creativity, and prepare to be amazed by just how delicious and impressive these Apple Crisp Bars are. They’re a guaranteed crowd-pleaser that will have everyone coming back for more. Bon appétit!