I distinctly remember the first time I ventured into making cheese breadsticks. It was a spontaneous culinary decision on a Friday evening, a determined attempt to elevate a straightforward pasta dinner into something truly special. I happened to have some leftover pizza dough nestled in the refrigerator, and the alluring prospect of warm, cheesy breadsticks proved too irresistible to ignore. What ensued was a delightful flurry of activity – stretching the dough with eager hands, brushing it generously with a fragrant garlic butter mixture, and liberally sprinkling it with a mountain of cheese. The intoxicating aroma that permeated my kitchen as they baked was nothing short of magical, a testament to the simple joys of home cooking. And when I finally took that first glorious bite, the exquisite combination of a crispy, golden crust, gooey, melted cheese, and fragrant, aromatic herbs was pure, unadulterated heaven. These Cheese Breadsticks are a revelation for beginner cooks, a culinary gateway into the world of baking. They are remarkably easy to prepare, require a minimal list of ingredients, and deliver a restaurant-quality side dish in a mere 30 minutes. Plus, they’re a fantastic way to utilize leftover pizza dough, transforming it into something extraordinary, and add a comforting touch of warmth to any meal, turning an ordinary dinner into an extraordinary occasion.


Cheese Breadsticks: A Beginner’s Delight for Italian Nights
Enjoy warm, cheesy breadsticks perfect for any Italian meal. This easy recipe uses simple ingredients and is great for beginner cooks. Imagine golden breadsticks topped with melted cheese and fragrant herbs, ready to be dipped into your favorite sauce. It’s a quick, delicious, and crowd-pleasing side.
- Total Time: 30 minutes
- Yield: 16 breadsticks 1x
Ingredients
- 1 pound (454g) pizza dough (homemade or store-bought)
- 2 tablespoons butter, melted
- 1 teaspoon garlic powder
- 2 cups (225g) shredded mozzarella cheese
- ⅓ cup (40g) grated Parmesan cheese
- ½ teaspoon dried basil
- ¼ teaspoon dried oregano
- ¼ teaspoon salt, optional
Instructions
- Preheat the Oven (The Oven Operation): Preheat your oven to 425°F (220°C), ensuring it reaches the optimal temperature for baking. Lightly grease a baking sheet, pizza stone, or pizza pan, ensuring the breadsticks don’t stick during baking. Set it aside, preparing for the next step.
- Prepare the Dough (The Dough Dynamics): Roll or stretch the 1 pound (454g) pizza dough into a 12×10 inch rectangle, ensuring it’s evenly spread. Don’t worry about it being perfectly shaped; a rustic look is part of the charm, adding a touch of homemade authenticity.
- Make the Garlic Butter (The Butter Blend): Combine the 2 tablespoons melted butter and 1 teaspoon garlic powder in a small bowl, mixing thoroughly to create a fragrant and flavorful mixture.
- Brush the Dough (The Butter Brush): Brush the garlic butter mixture evenly over the shaped dough, ensuring every part is coated with the aromatic blend.
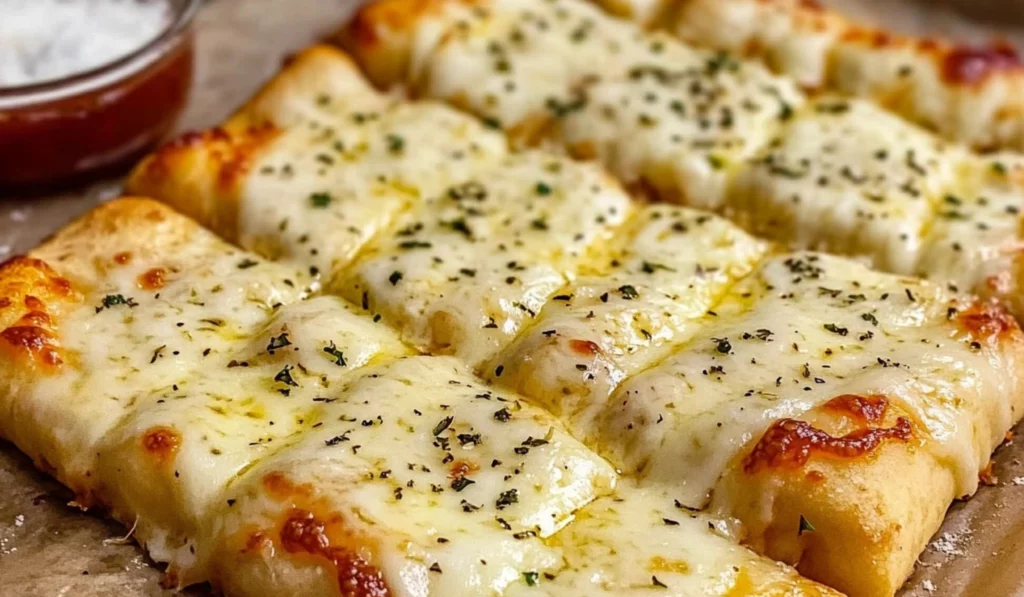
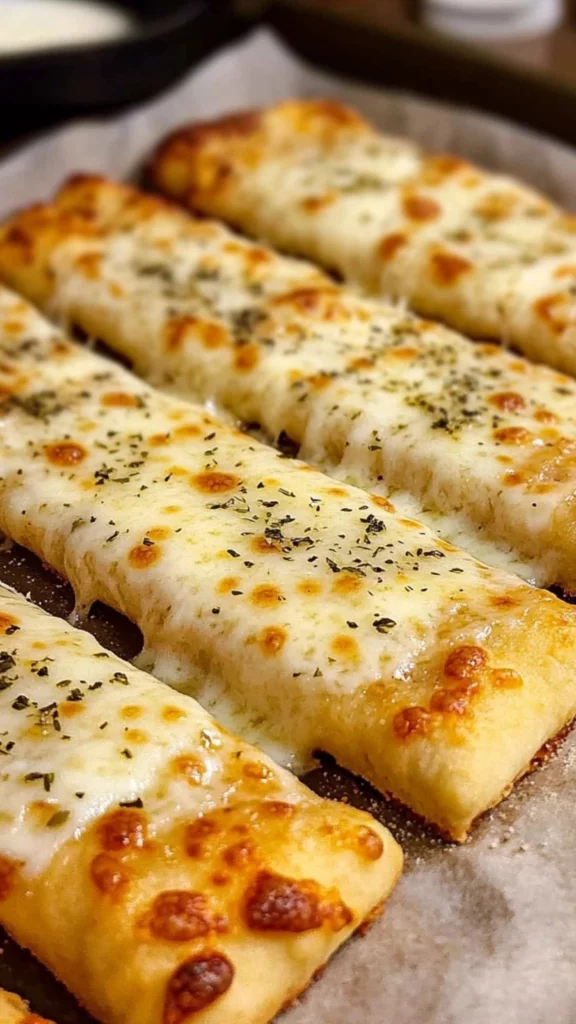
- Add the Cheese and Herbs (The Topping Triumph): Top the dough with 2 cups (225g) shredded mozzarella cheese, ⅓ cup (40g) grated Parmesan cheese, ½ teaspoon dried basil, ¼ teaspoon dried oregano, and ¼ teaspoon salt (if using), creating a cheesy and herbaceous topping.
- Bake the Breadsticks (The Baking Brilliance): Bake for 12-15 minutes, or until the crust is golden brown and the cheese is melted and bubbly, ensuring the breadsticks are cooked to perfection.
- Slice and Serve (The Serving Sensation): Remove the baking sheet from the oven and let it cool slightly, allowing the cheese to set. Slice the breadsticks into strips and serve them warm with pizza sauce, marinara sauce, or your favorite dipping sauce, creating a delightful culinary experience.
Notes
- Lightly flour surfaces to prevent dough sticking.
- Rotate baking sheet for even baking.
- Use a pizza stone for a crispier crust.
- Let cool slightly before slicing.
- Prep Time: 15 minutes
- Cook Time: 15 minutes
- Category: Appetizer
- Method: Baking
- Cuisine: Italian-American
- Diet: Vegetarian
This Cheese Breadsticks recipe is meticulously designed with the beginner cook in mind, breaking down the baking process into clear, manageable steps. We’ll start with either store-bought or homemade pizza dough, ensuring accessibility for everyone, regardless of their prior baking experience. Then, we’ll brush it generously with a flavorful garlic butter mixture, a symphony of melted butter and fragrant garlic powder, top it with a generous amount of shredded mozzarella and grated Parmesan cheese, along with a sprinkle of dried basil and oregano, and bake it to golden perfection. This recipe is a fantastic way to learn the fundamental principles of baking while creating a warm, comforting side dish that’s guaranteed to be a hit with family and friends, transforming any meal into a memorable experience.
Ingredients and Preparation (A Detailed Guide to Cheesy Breadstick Perfection)
This recipe yields approximately 16 generously sized breadsticks, making it ideal for a family dinner, a casual gathering with friends, or a potluck contribution. You can easily adjust the ingredient quantities to make more or fewer breadsticks, depending on your specific needs, ensuring you have the perfect amount for any occasion.
Ingredients (The Stars of the Show):
- 1 pound (454g) pizza dough (homemade or store-bought) Pizza dough forms the base of the breadsticks, providing a chewy and satisfying texture. You can use your favorite homemade recipe or opt for a convenient store-bought version.
- 2 tablespoons butter, melted Melted butter adds richness and moisture to the dough, creating a tender and flavorful crust. You can use unsalted or salted butter, depending on your preference.
- 1 teaspoon garlic powder Garlic powder adds a pungent and aromatic flavor to the butter mixture, enhancing the overall taste of the breadsticks.
- 2 cups (225g) shredded mozzarella cheese Shredded mozzarella cheese adds a gooey and melty texture, creating a cheesy and satisfying topping.
- ⅓ cup (40g) grated Parmesan cheese Grated Parmesan cheese adds a salty and savory flavor, complementing the mozzarella and enhancing the overall taste.
- ½ teaspoon dried basil Dried basil adds a subtle herbaceous flavor, enhancing the aroma and taste of the breadsticks.
- ¼ teaspoon dried oregano Dried oregano adds a warm and earthy flavor, complementing the basil and enhancing the overall taste.
- ¼ teaspoon salt, optional Salt adds a touch of seasoning, enhancing the flavors of the other ingredients. You can omit the salt or adjust the amount to your liking.
Alternatives and Flexibility (Making it Your Own Culinary Creation):
- Dough Variations (The Dough Delights): You can use whole wheat pizza dough, gluten-free pizza dough, or even a pre-made crescent roll dough for a sweeter variation, catering to different dietary needs and preferences.
- Butter Alternatives (The Butter Bonanza): You can use olive oil, a plant-based butter substitute, or even a combination of butter and olive oil for a dairy-free or healthier option.
- Garlic Options (The Garlic Galaxy): You can use fresh minced garlic (about 2 cloves) sautéed in the melted butter for a more intense garlic flavor, adding a fresh and vibrant touch.
- Cheese Choices (The Cheese Collection): You can use cheddar cheese, provolone cheese, a blend of Italian cheeses, or even a vegan cheese alternative for a variety of flavors and textures.
- Herb Substitutes (The Herb Harmony): You can use fresh herbs, such as basil, oregano, rosemary, thyme, or parsley, finely chopped, for a more vibrant and aromatic flavor.
- Salt Substitutes (The Salt Solution): You can use garlic salt, onion salt, or even a seasoned salt for a different flavor profile, adding complexity and depth.
Step-by-Step Instructions (Easy Steps to Cheesy Breadsticks)
- Preheat the Oven (The Oven Operation): Preheat your oven to 425°F (220°C), ensuring it reaches the optimal temperature for baking. Lightly grease a baking sheet, pizza stone, or pizza pan, ensuring the breadsticks don’t stick during baking. Set it aside, preparing for the next step.
- Prepare the Dough (The Dough Dynamics): Roll or stretch the 1 pound (454g) pizza dough into a 12×10 inch rectangle, ensuring it’s evenly spread. Don’t worry about it being perfectly shaped; a rustic look is part of the charm, adding a touch of homemade authenticity.
- Make the Garlic Butter (The Butter Blend): Combine the 2 tablespoons melted butter and 1 teaspoon garlic powder in a small bowl, mixing thoroughly to create a fragrant and flavorful mixture.
- Brush the Dough (The Butter Brush): Brush the garlic butter mixture evenly over the shaped dough, ensuring every part is coated with the aromatic blend.
- Add the Cheese and Herbs (The Topping Triumph): Top the dough with 2 cups (225g) shredded mozzarella cheese, ⅓ cup (40g) grated Parmesan cheese, ½ teaspoon dried basil, ¼ teaspoon dried oregano, and ¼ teaspoon salt (if using), creating a cheesy and herbaceous topping.
- Bake the Breadsticks (The Baking Brilliance): Bake for 12-15 minutes, or until the crust is golden brown and the cheese is melted and bubbly, ensuring the breadsticks are cooked to perfection.
- Slice and Serve (The Serving Sensation): Remove the baking sheet from the oven and let it cool slightly, allowing the cheese to set. Slice the breadsticks into strips and serve them warm with pizza sauce, marinara sauce, or your favorite dipping sauce, creating a delightful culinary experience.
Beginner Tips and Notes (Troubleshooting and Helpful Hints)
- Dough Handling (The Dough Dexterity): If the dough is sticky, lightly flour your hands and the work surface, preventing it from sticking and ensuring easy handling.
- Even Baking (The Baking Balance): To ensure even baking, rotate the baking sheet halfway through the baking time, ensuring all breadsticks are cooked uniformly.
- Cheese Browning (The Browning Balance): If the cheese is browning too quickly, cover the breadsticks loosely with aluminum foil for the remaining baking time, preventing them from burning.
- Dough Thickness (The Thickness Triumph): For thinner, crispier breadsticks, roll the dough out thinner. For thicker, softer breadsticks, roll the dough out thicker, catering to your preferred texture.
- Prepping (The Prep Protocol): You can prepare the garlic butter mixture and shred the cheese ahead of time to save time during meal preparation, streamlining the process.
Storage Tips (Keeping Your Cheesy Breadsticks Fresh and Flavorful):
- Store leftover breadsticks in an airtight container at room temperature for up to 2 days, maintaining their crispiness.
- Store leftover breadsticks in an airtight container in the refrigerator for up to 5 days, prolonging their freshness.
- Reheat leftover breadsticks in the oven or toaster oven at 350°F (175°C) for a few minutes until warm and crispy, restoring their original texture and flavor.
- If storing leftover breadsticks with dipping sauces, store them separately to prevent them from becoming soggy, maintaining their quality.
Conclusion (Inviting You to Create and Share)
These Cheese Breadsticks are a perfect example of how simple ingredients and beginner-friendly techniques can culminate in a truly delicious and satisfying dish that’s perfect for any occasion. They’re a fantastic option for beginner cooks who want to learn some basic baking skills while creating a crowd-pleasing appetizer or side dish. Don’t be afraid to experiment with the recipe and add your own personal touch. Try different cheeses, herbs, or toppings to create your own unique version. And most importantly, have fun in the kitchen! Cooking should be an enjoyable and creative experience, not a chore.
Now, I encourage you to try this recipe – you won’t be disappointed! Share your culinary creations and any variations you come up with in the comments below – I’d love to hear about your cheesy breadstick adventures! Did you try a different cheese? Did you add any special toppings? What did your family or friends think? Let me know! Happy baking, and may your kitchen be filled with the fragrant aroma of warm, cheesy breadsticks and the anticipation of a truly satisfying meal! This can easily be part of an “easy sheet pan dinner” by serving it alongside a simple salad or roasted vegetables, creating a complete and balanced meal.