Classic Cherry Delight: A Nostalgic Dessert for All Occasions
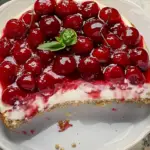
There’s something magical about desserts that manage to strike the perfect balance between simplicity and indulgence, and Classic Cherry Delight is one of those rare treats. With its layers of buttery graham cracker crust, velvety cream cheese filling, and sweet-tart cherry topping, this no-bake dessert delivers big on flavor while keeping preparation effortless.
- Prep Time: 30 minutes
- Cook Time: No cook
- Total Time: 30 minutes
- Yield: 9 servings
- Category: Dessert
- Method: Refrigerate
- Cuisine: American
- Diet: Vegetarian
Ingredients
Crust
- Unsalted Butter (7 tablespoons)
- Acts as the binder for the graham cracker crumbs, providing a rich, buttery flavor.
- Graham Cracker Crumbs (1 ½ cups)
- The base layer that offers a sweet, slightly nutty crunch to balance the creamy filling.
- Granulated Sugar (3 tablespoons)
- Adds just the right amount of sweetness to the crust without overpowering the dish.
Filling
- Cream Cheese (8 ounces, softened)
- The star of the filling, giving it a creamy texture and tangy flavor reminiscent of cheesecake.
- Powdered Sugar (1 cup)
- Sweetens the filling while maintaining a smooth consistency.
- Pure Vanilla Extract (1 teaspoon)
- A hint of vanilla enhances the flavor profile, adding warmth and depth.
- Cool Whip (8 ounces)
- Lightens the filling, giving it a fluffy, airy texture.
Topping
- Cherry Pie Filling (21 ounces)
- Provides a sweet and tangy fruit layer, creating a vibrant finish that ties the dessert together.
Instructions
1. Crafting the Perfect Crust
The crust is the foundation of this dessert, and it’s essential to get it right.
- Melt the Butter: Start by placing the butter in a microwave-safe bowl and heating it for about 30 seconds or until fully melted.
- Combine Ingredients: Add the graham cracker crumbs and sugar to the melted butter. Stir until all the crumbs are evenly coated, forming a slightly sticky mixture.
- Press into Pan: Transfer the mixture into an 8×8-inch baking dish. Use the back of a spoon or the bottom of a measuring cup to firmly press the crumbs into an even layer. Set aside while you prepare the filling.
2. Creating the Creamy Filling
The filling is where the magic happens, combining tangy, sweet, and fluffy elements for a perfectly balanced layer.
- Mix the Cream Cheese: In a large mixing bowl, beat the softened cream cheese with a hand or stand mixer until smooth and free of lumps.
- Add Sweetness and Flavor: Mix in the powdered sugar and vanilla extract, ensuring everything is fully incorporated.
- Fold in the Cool Whip: Gently fold the Cool Whip into the cream cheese mixture. Avoid overmixing to maintain the light, airy texture of the filling.
3. Assembling the Layers
Now it’s time to bring everything together.
- Spread the Filling: Using a spatula, evenly spread the cream cheese mixture over the prepared crust. Take your time to create a smooth layer.
- Top with Cherry Pie Filling: Carefully spoon the cherry pie filling over the cream cheese layer. Spread it out evenly, ensuring every bite will have that delicious cherry goodness.
4. Chill to Perfection
Refrigeration is key to allowing the layers to set and meld together. Place the dessert in the refrigerator for at least 2 hours, or preferably overnight, before serving.
Notes
- Soften the Cream Cheese: Ensure the cream cheese is at room temperature to prevent lumps in the filling.
- Pack the Crust Firmly: Use a flat utensil to press the crust firmly into the pan, preventing it from crumbling when cut.
- Allow Ample Chill Time: The longer the dessert chills, the better the flavors meld. Overnight refrigeration is ideal.
- Clean Slicing: Use a sharp knife dipped in warm water for clean, precise cuts.