Ingredients
For the Graham Cracker Crust:
- 1 ½ cups graham cracker crumbs (about 12–14 graham cracker sheets)
- 2 tbsp granulated sugar
- ½ cup unsalted butter, melted
For the Coconut Cheesecake Layer:
- 16 oz cream cheese, softened (2-8 ounce blocks)
- 1 cup powdered sugar
- 1 tsp coconut extract
- 8 oz Cool Whip, thawed
For the Coconut Pudding Layer:
- 2 (3.4 oz) boxes of instant coconut cream pudding mix (or 1 box of 6.8 oz)
- 3 cups half-and-half (or whole milk)
For the Topping:
- 8 oz Cool Whip
- 1 cup sweetened shredded coconut, toasted
Instructions
1. Toast the Shredded Coconut
Start by preheating your oven to 350°F (175°C). Spread 1 cup of sweetened shredded coconut evenly on a baking sheet. Toast the coconut in the oven for about 8–10 minutes, stirring halfway through. The goal is to achieve a golden brown color, which adds a nutty flavor and a delightful texture to the topping. Keep a close eye on the coconut—because it can burn quickly once it reaches the right color. After toasting, remove the coconut from the oven and set it aside to cool.
2. Prepare the Graham Cracker Crust
In a medium-sized bowl, combine the graham cracker crumbs, granulated sugar, and melted butter. Stir until the mixture is well combined, and all of the crumbs are coated in butter. The butter helps the crust stick together, so it’s essential to get this part right. Once mixed, press the graham cracker mixture firmly into the base of your 9×13-inch baking pan. Use the back of a spoon or your fingers to make sure the crust is even and tightly packed. Then, place the pan in the freezer while you prepare the next layer. Freezing the crust will help it set up nicely and stay firm.
3. Make the Coconut Cheesecake Layer
In a large mixing bowl, beat the softened cream cheese, powdered sugar, and coconut extract together until smooth and fully combined. The cream cheese should be soft so that it blends smoothly without lumps. If your cream cheese is too cold, it might take longer to smooth out, so let it sit at room temperature for a bit before mixing. Once the mixture is smooth, gently fold in the thawed Cool Whip. The Cool Whip adds lightness and a fluffy texture to this layer, making it perfect for the creamy coconut cheesecake flavor. Spread this mixture evenly over the graham cracker crust, making sure to cover it all the way to the edges. Return the pan to the freezer to set while you prepare the next layer.
4. Prepare the Coconut Pudding Layer
In another large bowl, whisk the instant coconut cream pudding mix with the half-and-half (or whole milk). Whisk for about 2 minutes until the pudding begins to thicken. If you notice any lumps, continue whisking until the mixture becomes smooth and fully thickened. Once the pudding has thickened, spread it evenly over the coconut cheesecake layer. It’s important to spread this layer all the way to the edges to ensure a uniform dessert.
5. Add the Topping
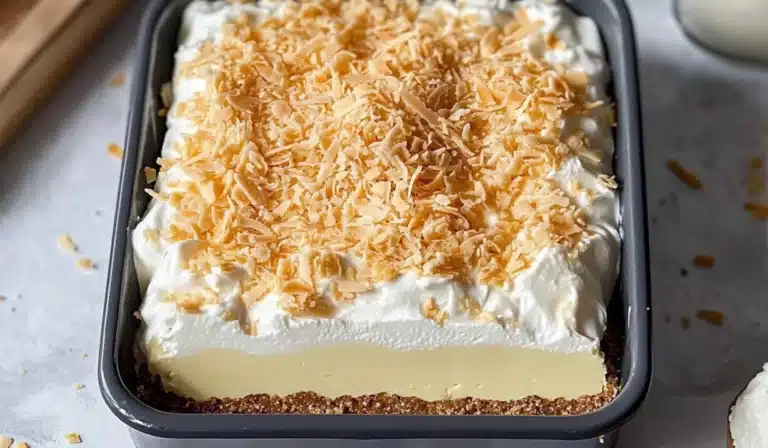
Once the pudding layer is in place, spread the remaining container of Cool Whip evenly over the top. Use a spatula to smooth it out. The Cool Whip will act as a creamy and fluffy topping that contrasts beautifully with the rich coconut flavors below. Finally, sprinkle the toasted coconut generously over the top. The toasted coconut not only adds flavor but also gives the dessert a delightful crunch. It’s the perfect finishing touch!
6. Chill the Dessert
Cover the pan with plastic wrap or aluminum foil and refrigerate the dessert for at least 6 hours, or preferably overnight. This allows the layers to set and gives the flavors time to meld together. While it may be tempting to dig in right away, the coconut cream lush tastes best when it has had time to chill and firm up. If you’re in a hurry, you can place the pan in the freezer for a faster chill time, but be sure to give it at least a couple of hours to firm up.
Notes
- Ensure the Cream Cheese Is Softened: For smooth, lump-free filling, make sure the cream cheese is softened to room temperature before you begin mixing. Cold cream cheese can result in a bumpy texture, so give it time to warm up.
- Don’t Skip Freezing Between Layers: Freezing the layers, especially the crust and cheesecake layer, ensures that they hold together nicely when you slice into the dessert. This is especially important when you’re working with no-bake desserts that need time to set.
- Toast the Coconut Carefully: Coconut can burn quickly, so keep an eye on it while toasting. Stirring it halfway through ensures it toasts evenly without burning.
- Let It Chill: For the best results, allow the dessert to chill for at least 6 hours, though overnight is even better. The longer it chills, the firmer and more cohesive the layers will be.
- Storage: If you have leftovers, store the Coconut Cream Lush in an airtight container in the refrigerator. It should stay fresh for up to 3 days. If you want to make it ahead of time, this dessert is perfect for making the day before you need it.
- Prep Time: 25 minutes
- Cook Time: 10 minutes (for toasting coconut)
- Category: Dessert
- Method: No-bake
- Cuisine: American
- Diet: Vegetarian