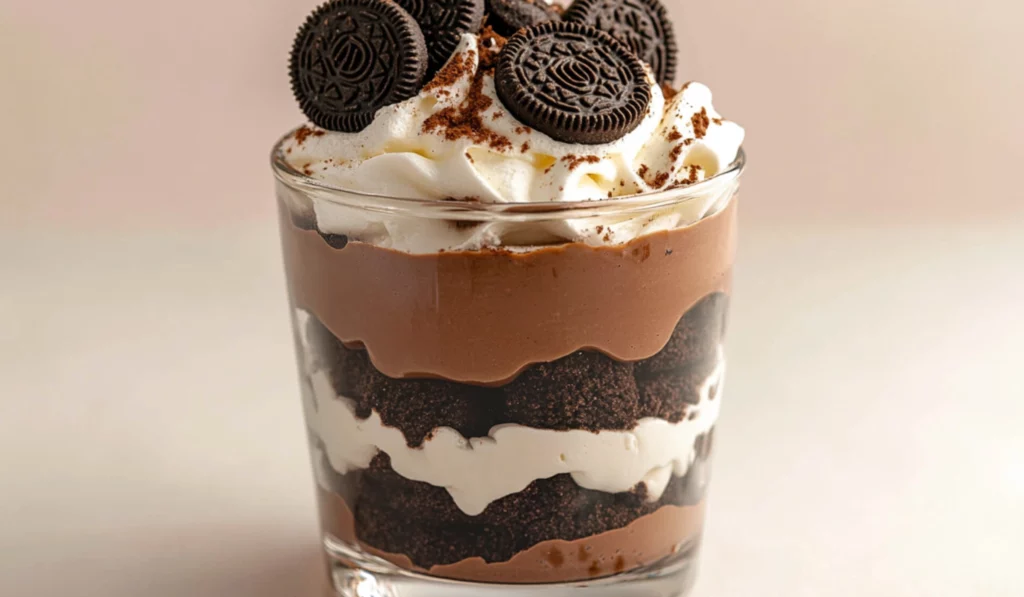
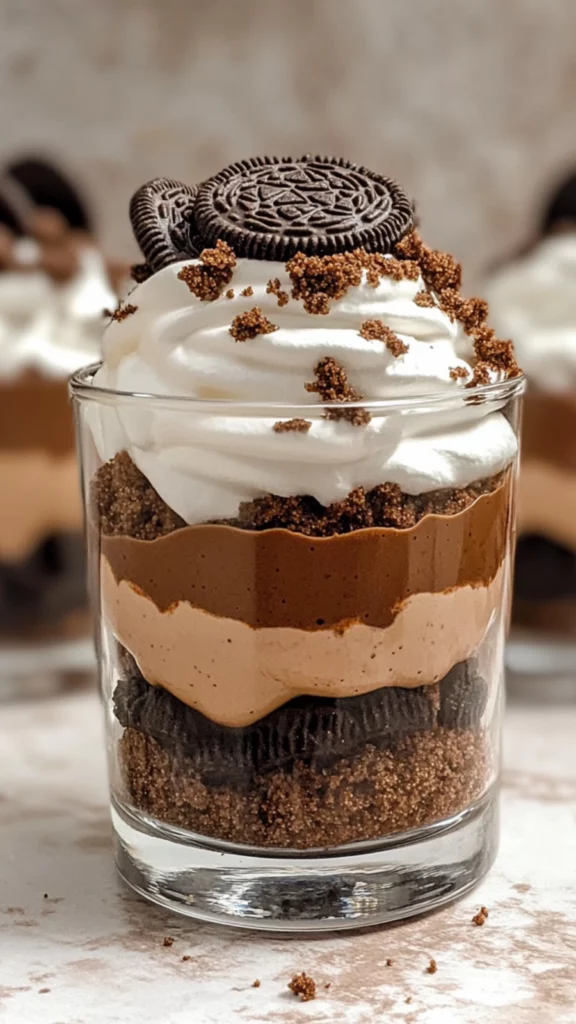
There’s a special magic in desserts that effortlessly combine indulgent flavors and simple preparation. This creamy chocolate parfait, with its layers of smooth chocolate mousse, fluffy whipped cream, and crunchy Oreo crumbs, is the perfect example of how a no-bake treat can be a game-changer for beginner cooks. No baking skills? No problem! This dessert is easy to assemble, requires minimal equipment, and delivers a luxurious result that will make you feel like a professional pastry chef.

Creamy Chocolate Parfait (No Bake) Recipe: A Beginner’s Guide to Indulgence
Craving a deliciously rich dessert that’s easy to make? This creamy chocolate parfait is the answer! With layers of smooth chocolate mousse, airy whipped cream, and crunchy Oreo crumbs, it’s a no-bake treat that’s perfect for beginners. I remember making this for the first time—it’s quick, simple, and always a hit. Whether for a special occasion or a casual treat, this dessert will satisfy every chocolate lover’s craving!
- Total Time: 3 hours 30 minutes
- Yield: 10 servings
Ingredients
For the Oreo Crust:
- 25 Oreos (crushed)
For the Chocolate Mousse:
- 7 oz dark chocolate
- ½ cup heavy cream (for melting with chocolate)
- 1 ½ cups heavy cream (for the mousse)
- ¼ cup cocoa powder (sifted)
- 2 tablespoons powdered sugar
- 1 teaspoon vanilla extract
For the Whipped Cream:
- 1 ⅓ cups heavy cream (cold)
- 1 teaspoon vanilla extract
- ¼ cup powdered sugar
Instructions
Step 1: Prepare the Oreo Crust
Start by crushing the Oreos. You can do this by placing the cookies in a plastic bag and rolling over them with a rolling pin or by using a food processor. The goal is to get fine crumbs, but larger pieces can add a bit of texture to the crust, which is perfectly fine! Once the cookies are crushed, set them aside.
Step 2: Make the Chocolate Mousse
Begin by melting the dark chocolate. You can do this in the microwave in short bursts (20-30 seconds at a time) or use the bain-marie method. The bain-marie method involves placing a heatproof bowl over a pot of simmering water, allowing the chocolate to gently melt. Stir the chocolate frequently to prevent it from burning. Once the chocolate is melted and smooth, set it aside to cool slightly.
Next, in a large mixing bowl, combine the heavy cream, sifted cocoa powder, powdered sugar, and vanilla extract. Use an electric hand mixer to whip this mixture on high speed until stiff peaks form. This step is crucial because it gives the mousse its airy and light texture. The whipped cream should form peaks that stand upright when you lift the mixer.
Once the whipped cream is ready, gently fold in the melted chocolate with a spatula. This ensures the mousse remains light and fluffy while incorporating the rich chocolate flavor. Continue mixing until fully combined.
Step 3: Make the Whipped Cream
In a separate bowl, combine the heavy cream, powdered sugar, and vanilla extract. Using your electric hand mixer, whip until stiff peaks form. This process usually takes only a couple of minutes, but be careful not to overwhip, or your cream may become too stiff and turn into butter.
Step 4: Assemble the Parfaits
Now it’s time to layer your parfaits! Begin by adding a tablespoon of crushed Oreos to the bottom of each glass or serving dish. Use a spoon or your hands to lightly press the crumbs into the base, forming a solid foundation.
Next, pipe or spoon a layer of chocolate mousse over the Oreo crumbs. Follow this with a layer of whipped cream, and then repeat the layers: more Oreo crumbs, followed by mousse and whipped cream. For the final layer, top with extra Oreo crumbs for decoration and texture.
Once all the parfaits are assembled, cover each glass with plastic wrap and refrigerate for at least 3 hours, or until the mousse has set and the layers are firm. The chilling time allows the flavors to meld together and ensures the parfaits have a smooth, creamy texture.
Notes
- Chocolate Melting Tips: If you’re using the microwave, be sure to stir the chocolate after each pulse to prevent it from seizing or burning. If you’re unfamiliar with melting chocolate, you can use the bain-marie method to melt it more gently.
- Whipping Cream Tips: Make sure your mixing bowl and beaters are clean and dry. Cold heavy cream will whip faster and better than cream at room temperature. If your cream isn’t whipping properly, it might be too warm or old—start over with fresh cream!
- Avoid Over-Mixing: When combining the chocolate and the whipped cream, be gentle! Over-mixing can cause the mousse to lose its light, airy texture.
- Alternative Layering: If you prefer to serve this dessert in a single large dish rather than individual glasses, simply layer the mousse, whipped cream, and Oreo crumbs in a trifle dish or another deep serving bowl.
- Prep Time: 30 minutes
- Cook Time: 0 minutes
- Category: Dessert
- Method: No-Bake
- Cuisine: American
- Diet: Vegetarian
When I first tried making this chocolate parfait, I was instantly hooked. I had been craving something rich but didn’t want to spend hours in the kitchen. I loved the idea of layering flavors and textures, and the no-bake aspect was perfect for me. What surprised me even more was how simple the process was. As a beginner cook at the time, I could have easily been intimidated by a recipe that involved whipping, melting, and assembling. But with a few basic ingredients and a few simple steps, I had a dessert that I could proudly serve to guests. It was a true “wow” moment!
Why This Recipe is Perfect for Beginners
For those who are new to cooking or just looking for a quick and easy dessert to make, this creamy chocolate parfait is a dream. The recipe uses ingredients that are easy to find at your local grocery store and requires no advanced kitchen skills. If you can whip cream and melt chocolate, you’re already halfway there!
This dessert is ideal for beginners because it’s all about layering and assembling, rather than complex techniques. The steps are simple, and the result is visually striking—making you look like an expert in the kitchen, even if it’s your first time making dessert. You can easily adapt the recipe to your taste by adjusting the chocolate or using different cookie crumbs. And because it’s a no-bake recipe, there’s no need to worry about ovens, temperatures, or baking times. Plus, the 3-hour chill time lets you prepare it ahead of time, freeing up your schedule for other tasks.
Why You’ll Love This Recipe
- Minimal effort, maximum reward: No baking, no fuss! Just layer, chill, and enjoy.
- Indulgent, but not too rich: The combination of chocolate mousse, whipped cream, and Oreo crumbs balances out the flavors and textures, so it’s sweet without being overwhelming.
- Perfect for any occasion: Whether it’s a casual family meal, a celebration, or a dinner party, this dessert will impress.
- Customizable: You can tweak the recipe based on your preferences, dietary needs, or what you have on hand.
- Beginner-friendly: If you’re just starting out in the kitchen, this is an excellent recipe to build your confidence and impress yourself and others.
Ingredients and Preparation
Before diving into the actual preparation, let’s make sure you’re equipped with the right ingredients for this decadent dessert. Here’s everything you’ll need to get started:
For the Oreo Crust:
- 25 Oreos (crushed)
For the Chocolate Mousse:
- 7 oz dark chocolate
- ½ cup heavy cream (for melting with chocolate)
- 1 ½ cups heavy cream (for the mousse)
- ¼ cup cocoa powder (sifted)
- 2 tablespoons powdered sugar
- 1 teaspoon vanilla extract
For the Whipped Cream:
- 1 ⅓ cups heavy cream (cold)
- 1 teaspoon vanilla extract
- ¼ cup powdered sugar
Step-by-Step Breakdown of the Ingredients:
- Oreos: The crushed Oreos form the base layer of the parfait. The rich, chocolaty flavor of the cookies pairs beautifully with the chocolate mousse and whipped cream. You could also use any chocolate cookie you like, or even graham crackers for a different taste. If you’re making this dessert gluten-free, you could opt for gluten-free Oreos.
- Dark Chocolate: Dark chocolate is a key component of the chocolate mousse. You don’t need to go for a super expensive brand, but choose something with a cocoa content of at least 60%. This ensures a good balance of sweetness and depth of flavor.
- Heavy Cream: You’ll be using heavy cream multiple times throughout the recipe—both for the mousse and for the whipped cream. The heavy cream’s high fat content is what allows it to whip up to soft peaks and form that rich, airy texture we all love in mousse and whipped cream.
- Cocoa Powder: For extra depth in the mousse, sifted cocoa powder is mixed in with the whipped cream to give the mousse its rich chocolatey taste. The sifting step ensures that the cocoa powder mixes in smoothly without clumping.
- Powdered Sugar: Both the mousse and whipped cream need powdered sugar for sweetness and texture. The sugar dissolves quickly into the creams, so it doesn’t weigh them down, making for a lighter, fluffier texture.
Alternative Ingredient Suggestions:
- For the chocolate mousse: If you don’t have dark chocolate or prefer something milder, you can use semi-sweet or milk chocolate. Keep in mind that the mousse will be sweeter with milk chocolate, so adjust the sugar accordingly.
- For the whipped cream: You can substitute regular sugar with flavored sugars, such as vanilla sugar, to add a twist to the flavor profile. You could even add a splash of cinnamon or almond extract for a more distinct flavor.
- For a dairy-free version: If you’re following a dairy-free or vegan diet, try using coconut cream instead of heavy cream. You can also substitute dairy-free chocolate to maintain the chocolatey goodness.
Step-by-Step Instructions
Now that we have the ingredients ready, let’s walk through the process of making the creamy chocolate parfait.
Step 1: Prepare the Oreo Crust
Start by crushing the Oreos. You can do this by placing the cookies in a plastic bag and rolling over them with a rolling pin or by using a food processor. The goal is to get fine crumbs, but larger pieces can add a bit of texture to the crust, which is perfectly fine! Once the cookies are crushed, set them aside.
Step 2: Make the Chocolate Mousse
Begin by melting the dark chocolate. You can do this in the microwave in short bursts (20-30 seconds at a time) or use the bain-marie method. The bain-marie method involves placing a heatproof bowl over a pot of simmering water, allowing the chocolate to gently melt. Stir the chocolate frequently to prevent it from burning. Once the chocolate is melted and smooth, set it aside to cool slightly.
Next, in a large mixing bowl, combine the heavy cream, sifted cocoa powder, powdered sugar, and vanilla extract. Use an electric hand mixer to whip this mixture on high speed until stiff peaks form. This step is crucial because it gives the mousse its airy and light texture. The whipped cream should form peaks that stand upright when you lift the mixer.
Once the whipped cream is ready, gently fold in the melted chocolate with a spatula. This ensures the mousse remains light and fluffy while incorporating the rich chocolate flavor. Continue mixing until fully combined.
Step 3: Make the Whipped Cream
In a separate bowl, combine the heavy cream, powdered sugar, and vanilla extract. Using your electric hand mixer, whip until stiff peaks form. This process usually takes only a couple of minutes, but be careful not to overwhip, or your cream may become too stiff and turn into butter.
Step 4: Assemble the Parfaits
Now it’s time to layer your parfaits! Begin by adding a tablespoon of crushed Oreos to the bottom of each glass or serving dish. Use a spoon or your hands to lightly press the crumbs into the base, forming a solid foundation.
Next, pipe or spoon a layer of chocolate mousse over the Oreo crumbs. Follow this with a layer of whipped cream, and then repeat the layers: more Oreo crumbs, followed by mousse and whipped cream. For the final layer, top with extra Oreo crumbs for decoration and texture.
Once all the parfaits are assembled, cover each glass with plastic wrap and refrigerate for at least 3 hours, or until the mousse has set and the layers are firm. The chilling time allows the flavors to meld together and ensures the parfaits have a smooth, creamy texture.
Beginner Tips and Notes
- Chocolate Melting Tips: If you’re using the microwave, be sure to stir the chocolate after each pulse to prevent it from seizing or burning. If you’re unfamiliar with melting chocolate, you can use the bain-marie method to melt it more gently.
- Whipping Cream Tips: Make sure your mixing bowl and beaters are clean and dry. Cold heavy cream will whip faster and better than cream at room temperature. If your cream isn’t whipping properly, it might be too warm or old—start over with fresh cream!
- Avoid Over-Mixing: When combining the chocolate and the whipped cream, be gentle! Over-mixing can cause the mousse to lose its light, airy texture.
- Alternative Layering: If you prefer to serve this dessert in a single large dish rather than individual glasses, simply layer the mousse, whipped cream, and Oreo crumbs in a trifle dish or another deep serving bowl.
Serving Suggestions
While the creamy chocolate parfait is delicious on its own, you can make it even more decadent by adding a few simple sides or garnishes:
- Fresh Fruit: A few fresh raspberries, strawberries, or blueberries will cut through the richness of the dessert and add a refreshing touch.
- Nuts: Try sprinkling chopped almonds, hazelnuts, or crushed pistachios on top of the parfait for a nutty crunch that complements the creamy texture.
- Caramel Sauce: Drizzling a little homemade or store-bought caramel sauce over the top adds another layer of sweetness and pairs wonderfully with the chocolate.
Storage Tips
This dessert is perfect for making ahead of time, and leftovers store beautifully in the fridge. Simply cover the parfaits with plastic wrap and store them for up to 3 days. The mousse and whipped cream will remain creamy and delicious, and the Oreo crumbs will soften slightly, adding to the texture.
For longer storage, you can freeze the parfaits, though they are best enjoyed within a few days. If you freeze them, make sure to remove them from the freezer about 10 minutes before serving to allow the mousse to soften slightly.

Conclusion:
This no-bake creamy chocolate parfait is an easy, impressive dessert that every beginner cook can tackle with confidence. With minimal effort, you’ll be able to create a dessert that’s perfect for any occasion—whether it’s a weeknight treat or a special celebration. Try it today and let us know how it turns out! Don’t forget to share your experiences and any fun variations you’ve tried in the comments below.