Macarons are one of those desserts that seem intimidating at first glance. Their delicate, airy texture and vibrant colors give them an elegant appeal, making them a perfect gift for any occasion, particularly Valentine’s Day. If you’ve ever wandered the aisles of a French patisserie or scrolled through Instagram, you’ve probably marveled at these colorful confections. But what if I told you that making heart-shaped macarons at home could be both achievable and fun? This recipe for heart-shaped macarons is designed with beginners in mind. While macarons have a reputation for being tricky, this step-by-step guide will help you master the basics and produce delicious, Instagram-worthy treats. Plus, they’re perfect for spreading a little love on Valentine’s Day! Whether you’re baking for your sweetheart or treating yourself, these macarons offer a wonderful balance of crunchy shells and creamy, buttery filling, with just the right touch of sweetness. This recipe emphasizes simplicity, making it an accessible starting point for beginner bakers who want to impress with an elegant dessert.


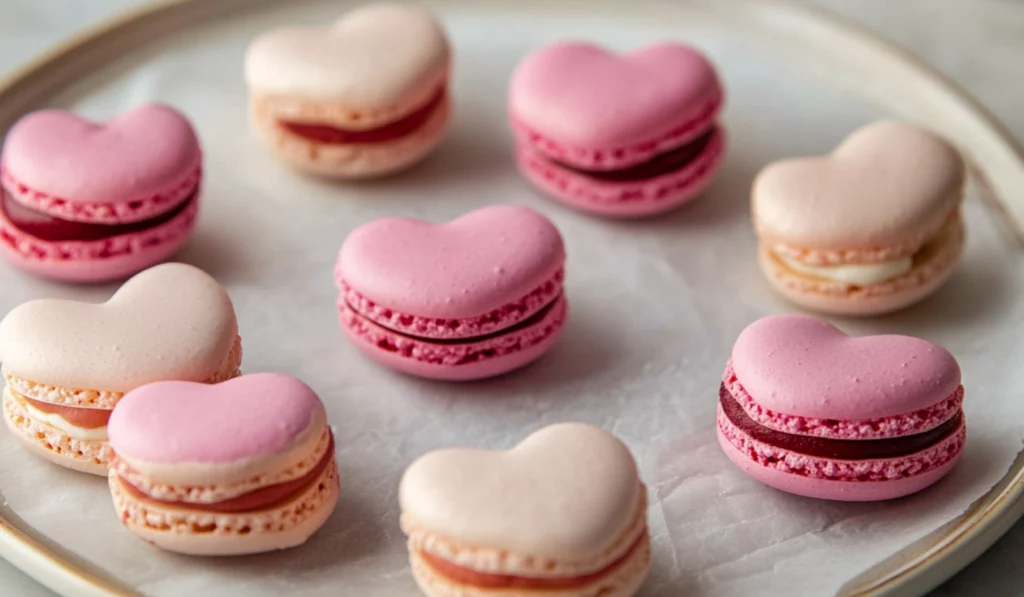
Heart-Shaped Macarons: A Sweet Valentine’s Treat for Beginners
Heart-shaped macarons are a perfect, elegant treat for any occasion, especially Valentine’s Day. While macarons may seem daunting, this beginner-friendly recipe makes it simple to create these delicate, delicious cookies with a soft, buttery filling. With just a few ingredients and clear steps, you’ll be able to impress your loved ones or treat yourself to a sweet homemade delight. Let’s get started and bring some love to your kitchen with these charming heart-shaped macarons!
- Total Time: 1 hour (including resting time for macarons)
- Yield: 12–15 macarons 1x
Ingredients
For the Macaron Shells:
- 1 cup powdered sugar
- 1/2 cup almond flour
- 2 large egg whites at room temperature
- 1/4 cup granulated sugar
- 1/2 teaspoon vanilla extract
- Red or pink food coloring (optional)
For the Buttercream Filling:
- 1/2 cup unsalted butter, softened
- 1 cup powdered sugar
- 1 teaspoon vanilla extract
- 2 tablespoons heavy cream or milk
- Pinch of salt
- Red food coloring (optional)
Instructions
1. Prepare the Macaron Shells:
Start by preheating your oven to 300°F (150°C). Line two baking sheets with parchment paper to prevent the macarons from sticking. This is an important first step since it ensures that your macaron shells will come off the parchment easily once baked.
Next, sift together 1 cup of powdered sugar and 1/2 cup of almond flour into a mixing bowl. This step helps to ensure that your mixture is lump-free and results in a smoother batter. Set this dry mixture aside while you work on the meringue.
2. Whisk the Egg Whites:
In a separate, clean mixing bowl, use a hand mixer or stand mixer to whisk the egg whites. Start on low speed to break up the egg whites and gradually increase to medium-high speed. Continue whisking until soft peaks begin to form. At this point, slowly add 1/4 cup of granulated sugar, continuing to whisk until stiff peaks form. This means that when you pull the whisk out, the egg whites should form peaks that stand upright.
3. Combine Wet and Dry Ingredients:
Once your meringue is ready, carefully fold the sifted almond flour and powdered sugar mixture into the whipped egg whites. Use a spatula and fold gently to avoid deflating the meringue. It’s important to do this slowly to prevent any air from escaping. The batter should eventually have a consistency that flows slowly from the spatula, resembling thick lava. This step is crucial to getting the right texture for your macaron shells.
4. Add Food Coloring:
If you want to add a little color to your macarons, this is the point to do it. Drop in a few drops of red or pink food coloring and continue folding until the color is evenly incorporated.
5. Pipe the Macaron Shells:
Transfer the macaron batter into a piping bag fitted with a round tip. You can either pipe small rounds or draw heart shapes directly onto your baking sheet. To create the heart shape, begin by drawing a “V” shape, and then continue to draw the top of the heart to complete the shape. Try to make each macaron roughly the same size for even baking.
6. Rest the Piped Macarons:
After piping, let the macarons rest at room temperature for 30 minutes to 1 hour. During this time, a skin will form on the surface of the macarons, which is essential for creating the macaron’s characteristic foot—a ruffled edge that forms during baking.
7. Bake the Macarons:
Preheat your oven to 300°F (150°C). Once the macarons have rested and formed their skin, place them in the oven and bake for 18-20 minutes. The macarons should feel firm to the touch and easily lift off the parchment paper. If you notice any cracking or unevenness, it could be due to overmixing or overbaking, so be sure to monitor them closely.
8. Make the Buttercream Filling:
While the shells are cooling, prepare the buttercream filling. In a mixing bowl, beat the softened butter until smooth and creamy. Gradually add 1 cup of powdered sugar, a tablespoon at a time, until fully incorporated. Stir in 1 teaspoon of vanilla extract, a pinch of salt, and 2 tablespoons of heavy cream or milk to achieve a smooth, spreadable consistency. If you’d like, you can add a few drops of red food coloring to match the vibrant color of the shells.
9. Assemble the Macarons:
Once the macaron shells are completely cooled, it’s time to assemble them. Flip each shell over so that the flat side is facing up. Pipe a small amount of buttercream onto one shell and gently sandwich it with another shell. Press down lightly to ensure the filling spreads evenly without squeezing out.
10. Refrigerate the Macarons:
For the best flavor and texture, place the assembled macarons in the refrigerator for at least 24 hours. This resting period allows the buttercream to soften the macaron shells, creating a deliciously chewy texture that’s simply irresistible.
Notes
- Patience is Key: Macarons require some patience, especially when it comes to resting the piped shells. Don’t skip this step, as it helps ensure that your macarons bake with the signature foot.
- Avoid Overmixing: It’s crucial to fold the dry ingredients into the meringue gently to avoid deflating the mixture. Overmixing can lead to flat or cracked macarons.
- Room Temperature Eggs: Make sure your egg whites are at room temperature before you begin. This allows them to whip up to the right texture more easily.
- Troubleshooting Cracked Macarons: If your macarons crack during baking, it could be due to overbaking or undermixing the batter. Try adjusting the baking time or checking your oven temperature.
- Let the Macarons Rest: As tempting as it may be, avoid eating the macarons right after assembly. Letting them rest in the fridge overnight allows the filling to soften the shells and improves the flavor.
- Prep Time: 30 minutes
- Cook Time: 18-20 minutes
- Category: Dessert
- Method: Baking
- Cuisine: French
- Diet: Vegetarian
Why Heart-Shaped Macarons Are Perfect for Beginners
Macarons may seem fancy, but they’re more forgiving than you might think. With the right ingredients, patience, and a little practice, even beginner bakers can succeed in making these delicate treats. The beauty of heart-shaped macarons is that they’re not only visually stunning but also have a straightforward flavor profile: a slightly nutty shell with a rich, buttery center. The recipe ensures that even if you’re a novice baker, you’ll be able to master the key steps of making macaron shells, piping with precision, and preparing a smooth, creamy filling. The best part? You don’t need any advanced baking tools—just a hand mixer, a piping bag, and your love for baking!
Ingredients and Preparation
The key to making perfect macarons lies in using high-quality ingredients and ensuring that each step is followed carefully. Here’s everything you need to make the macarons and their luscious buttercream filling:
For the Macaron Shells:
- 1 cup powdered sugar
- 1/2 cup almond flour
- 2 large egg whites at room temperature
- 1/4 cup granulated sugar
- 1/2 teaspoon vanilla extract
- Red or pink food coloring (optional)
For the Buttercream Filling:
- 1/2 cup unsalted butter, softened
- 1 cup powdered sugar
- 1 teaspoon vanilla extract
- 2 tablespoons heavy cream or milk
- Pinch of salt
- Red food coloring (optional)
Ingredient Substitutions and Tips
If you don’t have almond flour, you can substitute it with finely ground blanched almonds. The powdered sugar helps to provide the smooth texture that macarons are known for, so be sure to sift it to remove any lumps. For a different flavor, you could swap out the vanilla extract in the buttercream with almond extract or even hazelnut extract. The food coloring is optional, but it adds a festive touch, making your macarons perfect for Valentine’s Day. As for the buttercream, if you prefer a dairy-free version, you can try using vegan butter and plant-based milk as replacements.
Step-by-Step Instructions
Making macarons involves some key steps that may seem complex at first, but with this easy-to-follow guide, you’ll have delicious heart-shaped macarons in no time.
1. Prepare the Macaron Shells:
Start by preheating your oven to 300°F (150°C). Line two baking sheets with parchment paper to prevent the macarons from sticking. This is an important first step since it ensures that your macaron shells will come off the parchment easily once baked.
Next, sift together 1 cup of powdered sugar and 1/2 cup of almond flour into a mixing bowl. This step helps to ensure that your mixture is lump-free and results in a smoother batter. Set this dry mixture aside while you work on the meringue.
2. Whisk the Egg Whites:
In a separate, clean mixing bowl, use a hand mixer or stand mixer to whisk the egg whites. Start on low speed to break up the egg whites and gradually increase to medium-high speed. Continue whisking until soft peaks begin to form. At this point, slowly add 1/4 cup of granulated sugar, continuing to whisk until stiff peaks form. This means that when you pull the whisk out, the egg whites should form peaks that stand upright.
3. Combine Wet and Dry Ingredients:
Once your meringue is ready, carefully fold the sifted almond flour and powdered sugar mixture into the whipped egg whites. Use a spatula and fold gently to avoid deflating the meringue. It’s important to do this slowly to prevent any air from escaping. The batter should eventually have a consistency that flows slowly from the spatula, resembling thick lava. This step is crucial to getting the right texture for your macaron shells.
4. Add Food Coloring:
If you want to add a little color to your macarons, this is the point to do it. Drop in a few drops of red or pink food coloring and continue folding until the color is evenly incorporated.
5. Pipe the Macaron Shells:
Transfer the macaron batter into a piping bag fitted with a round tip. You can either pipe small rounds or draw heart shapes directly onto your baking sheet. To create the heart shape, begin by drawing a “V” shape, and then continue to draw the top of the heart to complete the shape. Try to make each macaron roughly the same size for even baking.
6. Rest the Piped Macarons:
After piping, let the macarons rest at room temperature for 30 minutes to 1 hour. During this time, a skin will form on the surface of the macarons, which is essential for creating the macaron’s characteristic foot—a ruffled edge that forms during baking.
7. Bake the Macarons:
Preheat your oven to 300°F (150°C). Once the macarons have rested and formed their skin, place them in the oven and bake for 18-20 minutes. The macarons should feel firm to the touch and easily lift off the parchment paper. If you notice any cracking or unevenness, it could be due to overmixing or overbaking, so be sure to monitor them closely.
8. Make the Buttercream Filling:
While the shells are cooling, prepare the buttercream filling. In a mixing bowl, beat the softened butter until smooth and creamy. Gradually add 1 cup of powdered sugar, a tablespoon at a time, until fully incorporated. Stir in 1 teaspoon of vanilla extract, a pinch of salt, and 2 tablespoons of heavy cream or milk to achieve a smooth, spreadable consistency. If you’d like, you can add a few drops of red food coloring to match the vibrant color of the shells.
9. Assemble the Macarons:
Once the macaron shells are completely cooled, it’s time to assemble them. Flip each shell over so that the flat side is facing up. Pipe a small amount of buttercream onto one shell and gently sandwich it with another shell. Press down lightly to ensure the filling spreads evenly without squeezing out.
10. Refrigerate the Macarons:
For the best flavor and texture, place the assembled macarons in the refrigerator for at least 24 hours. This resting period allows the buttercream to soften the macaron shells, creating a deliciously chewy texture that’s simply irresistible.
Beginner Tips and Notes
- Patience is Key: Macarons require some patience, especially when it comes to resting the piped shells. Don’t skip this step, as it helps ensure that your macarons bake with the signature foot.
- Avoid Overmixing: It’s crucial to fold the dry ingredients into the meringue gently to avoid deflating the mixture. Overmixing can lead to flat or cracked macarons.
- Room Temperature Eggs: Make sure your egg whites are at room temperature before you begin. This allows them to whip up to the right texture more easily.
- Troubleshooting Cracked Macarons: If your macarons crack during baking, it could be due to overbaking or undermixing the batter. Try adjusting the baking time or checking your oven temperature.
- Let the Macarons Rest: As tempting as it may be, avoid eating the macarons right after assembly. Letting them rest in the fridge overnight allows the filling to soften the shells and improves the flavor.
Serving Suggestions
Heart-shaped macarons are delightful on their own, but you can serve them with a cup of coffee or tea for a more indulgent experience. They also make an excellent gift when packaged in a beautiful box or tin. If you’re making them for a special occasion, such as Valentine’s Day, try pairing them with other romantic desserts, such as chocolate-dipped strawberries or a rich chocolate mousse.
Storage Tips
Macarons are best enjoyed within a few days of making them, but they can be stored in an airtight container for up to 5 days. If you’re not planning on eating them right away, you can freeze them for up to 2 months. Just be sure to store them in a single layer, and thaw them at room temperature before serving.

Conclusion
Making heart-shaped macarons may seem like a daunting task at first, but with the right guidance and a bit of practice, you’ll soon be making these delicate treats with ease. Whether you’re preparing them for a romantic gesture or simply indulging in a sweet treat, macarons are sure to impress. Don’t be discouraged if your first batch doesn’t come out perfect—baking is a journey, and every step along the way is a learning experience. So, put on your apron, gather your ingredients, and let your creativity shine. If you try this recipe, be sure to share your thoughts and any tips you have in the comments below. Happy baking!