Valentine’s Day is just around the corner, and what better way to express your love than with a batch of heart-shaped thumbprint cookies? Whether you’re baking for a special someone, your friends, or just treating yourself, these adorable cookies are a beautiful blend of buttery, melt-in-your-mouth texture, and vibrant fruit jam. Easy to make and absolutely delicious, heart-shaped thumbprint cookies are a beginner-friendly dessert that adds a personal touch to any occasion. They’re perfect for beginners because they require minimal ingredients and simple techniques, but the result looks and tastes like you’ve been baking for years. These cookies offer the perfect balance of sweetness and tartness with a rich buttery dough that pairs beautifully with your favorite jam.

Heart-Shaped Thumbprint Cookies: A Beginner’s Guide to Perfectly Sweet Treats
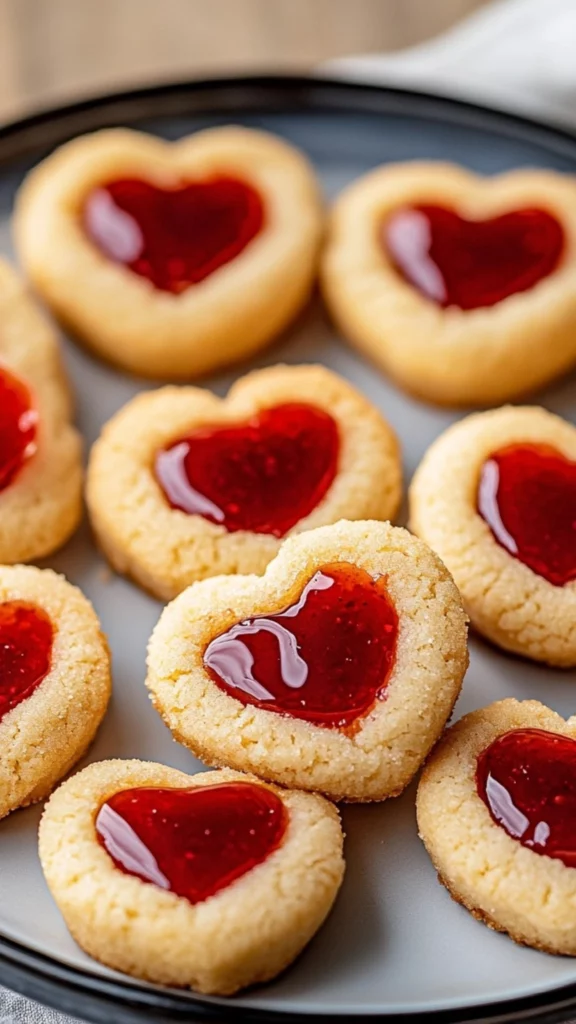
Heart-shaped thumbprint cookies are a fun, beginner-friendly treat that’s as simple as it is delicious. With buttery dough and a fruity jam center, these cookies are perfect for any occasion, especially Valentine’s Day. Just a few basic ingredients and easy steps, and you’ll have a batch of sweet, homemade cookies that are sure to impress!
- Total Time: 30 minutes
- Yield: 24 cookies 1x
Ingredients
Main Ingredients:
- Butter (1 cup / 2 sticks)
Butter is the key to creating that rich, melt-in-your-mouth texture we all love in cookies. Make sure to use unsalted butter, as it allows you to control the amount of salt in the dough. Softened butter works best for creaming, helping it mix smoothly with sugar and giving your cookies a light and airy consistency. Softened butter will ensure it blends more easily into the sugar, allowing you to achieve the desired fluffiness. If you forget to take the butter out ahead of time, simply cut it into smaller pieces and microwave it for a few seconds to soften it. - Granulated Sugar (3/4 cup)
Granulated sugar not only sweetens the cookies but also helps with the structure of the dough. The sweetness is just right—not overpowering—while still giving that comforting, classic cookie flavor. If you like a slightly less sweet taste, feel free to reduce the amount of sugar slightly. However, sugar does contribute to the texture of cookies, so if you make significant changes, it may affect the final outcome. If you’re watching your sugar intake or prefer a less refined sugar, you can use coconut sugar or another sugar substitute as long as it’s the same volume. - All-Purpose Flour (2 cups)
All-purpose flour is the foundation of your cookie dough. This flour will give the cookies the right balance of tenderness and structure. You need about two cups for this recipe, which will form the bulk of your dough. Be sure to measure your flour properly to avoid using too much. One easy way to do this is by spooning the flour into the measuring cup and leveling it off with a knife. Using too much flour could result in dense, dry cookies. If you’re gluten-free or want to experiment, you can try using a 1:1 gluten-free flour blend, although the texture may be slightly different. - Egg Yolks (2 yolks)
Egg yolks add fat and moisture, enriching the dough and helping it bind together. They also contribute to the cookies’ soft, melt-in-your-mouth texture, so don’t skip them! Egg yolks are essential in giving the cookies that tender, slightly chewy center, so they play a major role in how the finished cookies will feel when you bite into them. If you’re trying to avoid egg yolks, you can substitute them with 1/4 cup of applesauce or mashed banana, although this will change the flavor and texture slightly. - Vanilla Extract (1 tsp)
The depth of flavor provided by vanilla extract is irreplaceable. Just a teaspoon will bring out the sweet and buttery flavor of the dough while complementing the fruity jam filling. You can also experiment with different extracts like almond or lemon for a unique twist. Pure vanilla extract is always the best option as it gives a natural and more robust flavor. If you have a vanilla bean on hand, you can scrape the seeds from it for an even richer taste. - Jam (1/2 cup)
This is where you can get creative! Choose your favorite jam or preserves for the thumbprint filling. Raspberry, strawberry, or apricot are classic choices, but feel free to experiment with your favorite flavors. The jam should be thick enough not to spill out when the cookies bake. If you choose a runny jam, it might create a mess while baking. You can also opt for fruit preserves if you prefer a chunkier texture or homemade fruit spreads for a fresher, more vibrant taste.
Optional Ingredient for Garnish:
- Colored Sugar (for sprinkles)
If you’re feeling festive, a sprinkle of colored sugar on top of the thumbprint cookies can add a pop of color, making them even more eye-catching and fun! You can use a variety of colored sugars, or for a more natural approach, sprinkle some coconut flakes or finely chopped nuts for extra texture.
Instructions
Step 1: Creaming Butter and Sugar
Start by preheating your oven to 350°F (175°C). Then, in a large mixing bowl, combine 1 cup of softened unsalted butter and 3/4 cup of granulated sugar. Using an electric mixer, beat the mixture on medium speed for about 2-3 minutes until it becomes light and fluffy. This step is key for incorporating air into the dough, which will help make the cookies tender and light.
After the butter and sugar are well creamed, add 2 egg yolks one at a time, mixing well between each addition. Add 1 teaspoon of vanilla extract, and mix again until everything is fully incorporated. Scrape down the sides of the bowl with a spatula to make sure all the ingredients are evenly combined.
Step 2: Mixing the Dry Ingredients
In a separate bowl, whisk together 2 cups of all-purpose flour and a pinch of salt (1/4 teaspoon). Gradually add the flour mixture into the wet ingredients, mixing on low speed. This prevents the flour from flying everywhere! Continue to mix until the dough just comes together. Be careful not to over-mix, as this could make your cookies tough.
The dough should be soft and slightly sticky. If it’s too sticky to handle, you can add a tablespoon of flour at a time until it reaches a workable consistency. But don’t worry if it’s a little sticky—it will still bake beautifully! You can also chill the dough for about 30 minutes if you want it to be easier to handle, but it’s not necessary.
Step 3: Shaping the Cookies
Now comes the fun part—shaping the cookies! Lightly flour your hands to prevent the dough from sticking. Take small portions of dough (about one tablespoon) and roll them into balls between your palms. Place the dough balls onto an ungreased baking sheet lined with parchment paper, spacing them about two inches apart. This allows room for the cookies to spread slightly while baking.
Next, create the signature “thumbprint” indentation in the center of each dough ball using your thumb or a small tool like the back of a spoon. Be gentle when making the indentations, as you want the cookie to hold its shape without collapsing.
Step 4: Filling with Jam
Now it’s time to fill each cookie with a spoonful of jam! Use about 1/2 teaspoon of jam for each cookie. Carefully spoon the jam into the indentation, making sure not to overfill it. Too much jam can cause it to spill over while baking, making a mess. If desired, you can also add a sprinkle of colored sugar on top of the cookies for a festive touch.
Step 5: Baking the Cookies
Place the baking sheet in the preheated oven and bake for 12-15 minutes, or until the edges of the cookies are lightly golden brown. The centers should remain soft but set, with the jam slightly bubbling. Keep a close eye on them toward the end of the baking time, as oven temperatures can vary.
Once the cookies are done, remove them from the oven and let them cool on the baking sheet for a few minutes. This helps the cookies firm up before transferring them to a wire rack. Once they’re cool enough to handle, transfer the cookies to the rack to cool completely.
Notes
- What to Do If the Dough is Too Sticky
If your dough is too sticky to roll into balls, add flour a tablespoon at a time. However, it’s perfectly fine if the dough is a little sticky—it will still bake perfectly! You can also chill the dough in the fridge for 20 minutes before rolling it out. - Don’t Overfill the Jam
Be careful not to overfill the thumbprint indentations. Too much jam can cause it to spill over while baking. A small spoonful is all you need! - Even Size Matters
Make sure the dough balls are uniform in size to ensure even baking. You can use a tablespoon or cookie scoop to help keep them consistent. - Watch for Browning
Keep an eye on the edges of the cookies as they bake. If they start to brown too quickly, lower the oven temperature by 5-10°F and continue baking. - Use a Cookie Scoop for Consistency
If you want perfectly uniform-sized cookies, use a cookie scoop to portion the dough. It helps keep the cookies the same size, ensuring they bake evenly.
- Prep Time: 15 minutes
- Cook Time: 15 minutes
- Category: Dessert, Baking, Cookies
- Method: Baking
- Cuisine: American
- Diet: Vegetarian
In this article, I’ll walk you through everything you need to know to make these scrumptious heart-shaped thumbprint cookies—from gathering your ingredients to serving them with love. Whether you’re new to baking or just want an easy, time-efficient treat to wow your loved ones, this recipe is the one for you. Let’s dive in!
Ingredients and Preparation
To make the best heart-shaped thumbprint cookies, you’ll need a few key ingredients. Don’t worry if you’re not familiar with baking—each ingredient serves an important role, and I’ll guide you through how they work together to create the perfect cookies.
Main Ingredients:
- Butter (1 cup / 2 sticks)
Butter is the key to creating that rich, melt-in-your-mouth texture we all love in cookies. Make sure to use unsalted butter, as it allows you to control the amount of salt in the dough. Softened butter works best for creaming, helping it mix smoothly with sugar and giving your cookies a light and airy consistency. Softened butter will ensure it blends more easily into the sugar, allowing you to achieve the desired fluffiness. If you forget to take the butter out ahead of time, simply cut it into smaller pieces and microwave it for a few seconds to soften it. - Granulated Sugar (3/4 cup)
Granulated sugar not only sweetens the cookies but also helps with the structure of the dough. The sweetness is just right—not overpowering—while still giving that comforting, classic cookie flavor. If you like a slightly less sweet taste, feel free to reduce the amount of sugar slightly. However, sugar does contribute to the texture of cookies, so if you make significant changes, it may affect the final outcome. If you’re watching your sugar intake or prefer a less refined sugar, you can use coconut sugar or another sugar substitute as long as it’s the same volume. - All-Purpose Flour (2 cups)
All-purpose flour is the foundation of your cookie dough. This flour will give the cookies the right balance of tenderness and structure. You need about two cups for this recipe, which will form the bulk of your dough. Be sure to measure your flour properly to avoid using too much. One easy way to do this is by spooning the flour into the measuring cup and leveling it off with a knife. Using too much flour could result in dense, dry cookies. If you’re gluten-free or want to experiment, you can try using a 1:1 gluten-free flour blend, although the texture may be slightly different. - Egg Yolks (2 yolks)
Egg yolks add fat and moisture, enriching the dough and helping it bind together. They also contribute to the cookies’ soft, melt-in-your-mouth texture, so don’t skip them! Egg yolks are essential in giving the cookies that tender, slightly chewy center, so they play a major role in how the finished cookies will feel when you bite into them. If you’re trying to avoid egg yolks, you can substitute them with 1/4 cup of applesauce or mashed banana, although this will change the flavor and texture slightly. - Vanilla Extract (1 tsp)
The depth of flavor provided by vanilla extract is irreplaceable. Just a teaspoon will bring out the sweet and buttery flavor of the dough while complementing the fruity jam filling. You can also experiment with different extracts like almond or lemon for a unique twist. Pure vanilla extract is always the best option as it gives a natural and more robust flavor. If you have a vanilla bean on hand, you can scrape the seeds from it for an even richer taste. - Jam (1/2 cup)
This is where you can get creative! Choose your favorite jam or preserves for the thumbprint filling. Raspberry, strawberry, or apricot are classic choices, but feel free to experiment with your favorite flavors. The jam should be thick enough not to spill out when the cookies bake. If you choose a runny jam, it might create a mess while baking. You can also opt for fruit preserves if you prefer a chunkier texture or homemade fruit spreads for a fresher, more vibrant taste.
Optional Ingredient for Garnish:
- Colored Sugar (for sprinkles)
If you’re feeling festive, a sprinkle of colored sugar on top of the thumbprint cookies can add a pop of color, making them even more eye-catching and fun! You can use a variety of colored sugars, or for a more natural approach, sprinkle some coconut flakes or finely chopped nuts for extra texture.
Step-by-Step Instructions
Now that we’ve got our ingredients ready, let’s go step-by-step through the process of making these irresistible heart-shaped thumbprint cookies. I’ll guide you through every stage, from creaming the butter to the final cooling process.
Step 1: Creaming Butter and Sugar
Start by preheating your oven to 350°F (175°C). Then, in a large mixing bowl, combine 1 cup of softened unsalted butter and 3/4 cup of granulated sugar. Using an electric mixer, beat the mixture on medium speed for about 2-3 minutes until it becomes light and fluffy. This step is key for incorporating air into the dough, which will help make the cookies tender and light.
After the butter and sugar are well creamed, add 2 egg yolks one at a time, mixing well between each addition. Add 1 teaspoon of vanilla extract, and mix again until everything is fully incorporated. Scrape down the sides of the bowl with a spatula to make sure all the ingredients are evenly combined.
Step 2: Mixing the Dry Ingredients
In a separate bowl, whisk together 2 cups of all-purpose flour and a pinch of salt (1/4 teaspoon). Gradually add the flour mixture into the wet ingredients, mixing on low speed. This prevents the flour from flying everywhere! Continue to mix until the dough just comes together. Be careful not to over-mix, as this could make your cookies tough.
The dough should be soft and slightly sticky. If it’s too sticky to handle, you can add a tablespoon of flour at a time until it reaches a workable consistency. But don’t worry if it’s a little sticky—it will still bake beautifully! You can also chill the dough for about 30 minutes if you want it to be easier to handle, but it’s not necessary.
Step 3: Shaping the Cookies
Now comes the fun part—shaping the cookies! Lightly flour your hands to prevent the dough from sticking. Take small portions of dough (about one tablespoon) and roll them into balls between your palms. Place the dough balls onto an ungreased baking sheet lined with parchment paper, spacing them about two inches apart. This allows room for the cookies to spread slightly while baking.
Next, create the signature “thumbprint” indentation in the center of each dough ball using your thumb or a small tool like the back of a spoon. Be gentle when making the indentations, as you want the cookie to hold its shape without collapsing.
Step 4: Filling with Jam
Now it’s time to fill each cookie with a spoonful of jam! Use about 1/2 teaspoon of jam for each cookie. Carefully spoon the jam into the indentation, making sure not to overfill it. Too much jam can cause it to spill over while baking, making a mess. If desired, you can also add a sprinkle of colored sugar on top of the cookies for a festive touch.
Step 5: Baking the Cookies
Place the baking sheet in the preheated oven and bake for 12-15 minutes, or until the edges of the cookies are lightly golden brown. The centers should remain soft but set, with the jam slightly bubbling. Keep a close eye on them toward the end of the baking time, as oven temperatures can vary.
Once the cookies are done, remove them from the oven and let them cool on the baking sheet for a few minutes. This helps the cookies firm up before transferring them to a wire rack. Once they’re cool enough to handle, transfer the cookies to the rack to cool completely.
Beginner Tips and Notes
- What to Do If the Dough is Too Sticky
If your dough is too sticky to roll into balls, add flour a tablespoon at a time. However, it’s perfectly fine if the dough is a little sticky—it will still bake perfectly! You can also chill the dough in the fridge for 20 minutes before rolling it out. - Don’t Overfill the Jam
Be careful not to overfill the thumbprint indentations. Too much jam can cause it to spill over while baking. A small spoonful is all you need! - Even Size Matters
Make sure the dough balls are uniform in size to ensure even baking. You can use a tablespoon or cookie scoop to help keep them consistent. - Watch for Browning
Keep an eye on the edges of the cookies as they bake. If they start to brown too quickly, lower the oven temperature by 5-10°F and continue baking. - Use a Cookie Scoop for Consistency
If you want perfectly uniform-sized cookies, use a cookie scoop to portion the dough. It helps keep the cookies the same size, ensuring they bake evenly.
Serving Suggestions
Heart-shaped thumbprint cookies are perfect for any occasion, but they shine especially on Valentine’s Day, birthdays, or holiday gatherings. Serve them alongside a cup of tea or coffee for a cozy treat. You can also pair them with a glass of milk for a classic dessert experience.
For a truly special presentation, arrange the cookies on a beautiful plate and dust them with a little powdered sugar or colorful sprinkles. If you’re serving these cookies at a party, they’ll look even more festive when placed in cute cookie boxes or gift bags as a thoughtful homemade gift!
Storage Tips
To keep your heart-shaped thumbprint cookies fresh, store them in an airtight container at room temperature. They should last for about 4-5 days, but be sure to check that the cookies aren’t exposed to humidity, as this can make them soggy. If you’d like to keep them longer, these cookies can also be frozen. Just layer them between parchment paper and store them in a freezer-safe bag or container. They’ll keep for up to 2 months!

Conclusion
These heart-shaped thumbprint cookies are a fun, easy way to show your love this Valentine’s Day (or any time of year!). With their rich buttery texture and fruity jam center, they’re a simple yet stunning treat that anyone can master, no matter their baking experience. So, grab your ingredients, turn on some music, and enjoy the process of creating something truly special from your kitchen. Happy baking, and don’t forget to share these little delights with the ones you love!