Imagine biting into a piece of crispy, golden-brown chicken, glistening with a sticky, sweet, and tangy orange sauce that explodes with flavor, followed by a pleasant, lingering heat. That’s precisely what awaits you with this Hot Orange Chicken recipe, a delicious copycat version inspired by the popular Panda Express dish, but amped up with a generous dose of chili peppers for an extra kick. It’s a symphony of tastes and textures, a perfect balance of sweet, spicy, and savory that will have you craving more. I remember the first time I tasted Panda Express’s orange chicken. The vibrant orange hue and the tantalizing aroma drew me in instantly. The first bite was a revelation – the perfectly crispy chicken, the glistening, tangy sauce, the subtle hint of spice – it was an instant culinary crush. But I always felt it could use a bit more heat, a bolder flavor profile.
Hot Orange Chicken (Panda Express Copycat): A Fiery Feast Made Easy
Craving some spicy and sweet takeout? This Hot Orange Chicken recipe is the answer! Crispy chicken pieces tossed in a tangy, fiery orange sauce make for an irresistible meal. Imagine tender chicken, coated in a crunchy breading, drenched in a glistening, flavorful sauce with a kick of chili peppers. It’s a symphony of textures and tastes, perfect for a weeknight dinner or a fun gathering. This easy recipe is ideal for beginner cooks, requiring minimal ingredients and delivering maximum flavor.
- Total Time: 40 minutes
- Yield: 4 servings
Ingredients
- 2 lbs chicken breasts or thighs, cut into bite-sized pieces
- 1 cup cornstarch
- ½ cup all-purpose flour
- 2 eggs
- 2 tbsp oil (for egg wash)
- 1 tsp salt
- ½ tsp white pepper
- Oil for frying
- 1 cup orange juice
- 1 orange, zest of
- 3 tbsp soy sauce
- 4 tbsp rice wine vinegar
- ½ cup brown sugar
- 2 tsp sesame oil
- 1 tbsp cornstarch (for sauce)
- 1 tbsp green onions, sliced (plus more for garnish)
- 2 tbsp oil (for stir-frying)
- ½ cup dried whole red chili peppers
- 6 tsp red pepper flakes
- 1 tbsp sesame oil (for stir-frying)
- 2 cloves garlic, minced
- 1 tbsp ginger, grated (optional)
Instructions
Make the Orange Sauce:
- In a medium bowl, whisk together all of the ingredients for the sauce: orange juice, orange zest, soy sauce, rice wine vinegar, brown sugar, sesame oil, cornstarch, and sliced green onions. Whisking ensures that all the ingredients are fully incorporated and prevents lumps from forming, especially from the cornstarch.
- Cover the bowl with plastic wrap or a lid and set it aside at room temperature until it’s ready to be used in the final stir-fry step. Preparing the sauce ahead of time allows the flavors to meld together and deepen, resulting in a more complex and flavorful sauce.
Prep and Bread the Chicken:
- Prepare the dredge by adding the cornstarch and all-purpose flour together in a shallow dish, such as a pie dish or a wide, shallow bowl. Whisk in the salt and white pepper to ensure that they are evenly distributed throughout the dredge, seasoning the chicken coating. Using a shallow dish makes it easier to coat the chicken pieces evenly.
- In a medium bowl, whisk together the eggs with 2 tablespoons of canola or vegetable oil. Whisk vigorously until the egg is no longer stringy and the mixture starts to emulsify, becoming slightly thickened and frothy. Emulsifying the eggs helps the breading to adhere to the chicken more effectively, creating a crispier coating.
- Start heating the oil for frying to 375 degrees Fahrenheit in a heavy-bottomed skillet, wok, or deep sauté pan. Attach a thermometer to the side of the pan to best manage the heat and ensure accurate temperature control. Maintaining the correct oil temperature is absolutely crucial for achieving perfectly crispy chicken. If the oil is too cool, the chicken will absorb too much oil and become greasy. If the oil is too hot, the chicken will burn before it’s cooked through.
- While the oil is heating, work in batches, placing the diced chicken pieces into the egg wash. Coat the chicken thoroughly, ensuring that each piece is fully submerged and coated. Then, toss the egg-washed chicken pieces into the dredging flour mixture. Coat the chicken pieces well on all sides, making sure no chicken shows through the breading. Gently press the flour onto the chicken to ensure it adheres. Working in batches prevents the chicken from clumping together and ensures that each piece is evenly coated with the breading.
Fry the Chicken:
- Before frying, dust off any excess flour from the chicken pieces. This will prevent the oil from becoming too cloudy and will help the chicken to brown more evenly.
- Carefully add the breaded chicken pieces to the hot oil in batches, ensuring that you don’t overcrowd the pan. Fry the chicken for about 3 minutes, or until it’s golden brown and crispy. Don’t overcrowd the pan, as this will lower the oil temperature and prevent the chicken from browning properly. It will also result in greasy chicken.
- Be sure to adjust the heat as it will drop once the chicken is added to the oil. Maintain the temperature as close to 375°F as possible for optimal results.
- Once the chicken is cooked through and crispy, remove it from the oil using a slotted spoon or a wire skimmer and place it on a wire rack lined with paper towels to drain off any excess oil. Using a wire rack allows air to circulate around the chicken, helping it to stay crispy.
Stir-Fry in Wok:
- In a clean wok, add 2 tablespoons of canola or vegetable oil and heat over medium-high heat.
- Add the dried whole red chili peppers and red pepper flakes to the hot oil. Heat through for about 15 seconds, stirring constantly. Be careful not to burn the spices. This step releases the aroma and heat from the chili peppers and red pepper flakes, infusing the oil with their flavor.
- Add the minced garlic (and grated ginger, if using) and 1 tablespoon of sesame oil to the wok. Cook for another 15 seconds as you stir, being careful not to burn the garlic. Garlic burns easily, so it’s important to stir it quickly and not overcook it.
- Pour the prepared orange sauce into the wok. The sauce will begin to bubble on the edges and thicken quickly, about 2 minutes. Stir the sauce constantly to prevent it from sticking to the wok. The cornstarch in the sauce will help it to thicken as it heats.
- Add the crispy fried chicken pieces to the wok and toss them multiple times to coat them thoroughly with the orange sauce. Continue to toss the chicken for about 1 minute, allowing it to warm through and absorb the flavors of the sauce. Ensure that all the chicken pieces are evenly coated in the glistening orange sauce.
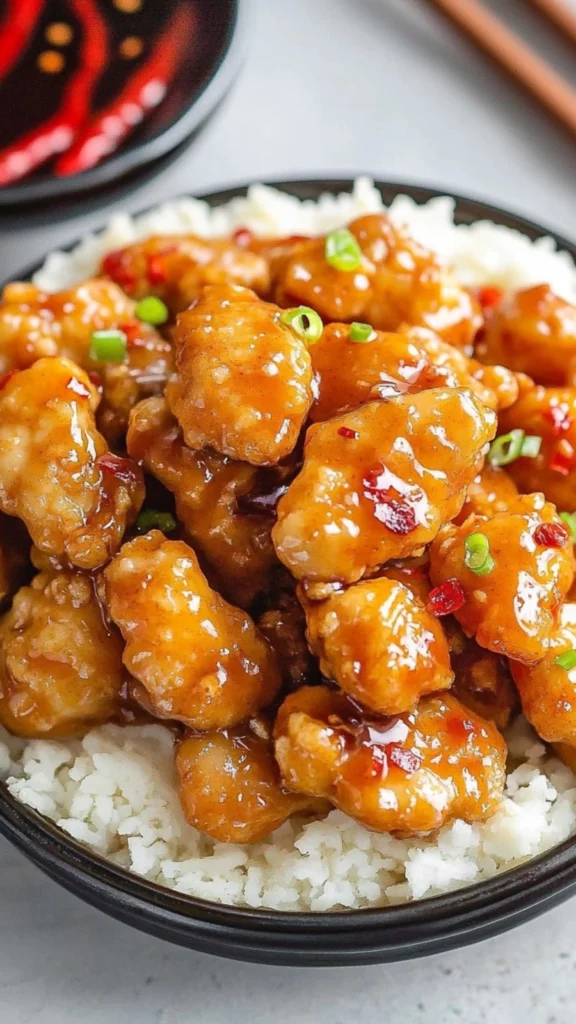
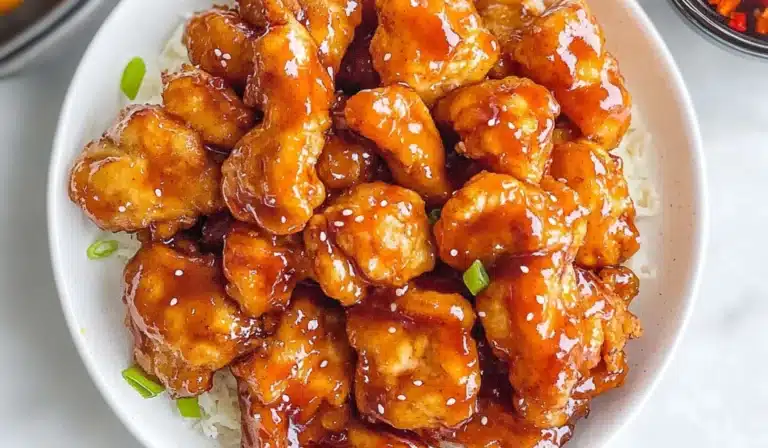
- Serve the Hot Orange Chicken immediately over a bed of freshly cooked rice. Garnish with sliced green onions for added flavor and visual appeal.
Notes
- Maintain oil temperature for crispy chicken.
- Adjust chili peppers for desired spice level.
- Serve immediately for best texture.
- Don’t overcrowd the pan when frying.
- Prep Time: 20 minutes
- Cook Time: 20 minutes
- Category: Dinner, Main Course
- Method: Frying, Stir-frying
- Cuisine: American (inspired by Chinese)
This recipe takes that classic orange chicken experience and elevates it with an abundance of dried chili peppers and red pepper flakes, creating a truly fiery and flavorful dish that you can customize to your preferred level of spiciness. It’s a dish that will satisfy your takeout cravings while allowing you to control the ingredients and avoid any unwanted additives or preservatives. This recipe is surprisingly accessible, even for those just starting their culinary journey. It’s a fantastic introduction to some fundamental cooking techniques, like frying and stir-frying, and it’s a fun and rewarding dish to prepare. Plus, it’s a healthier and more economical alternative to ordering takeout, empowering you to create restaurant-quality meals in the comfort of your own home. This Hot Orange Chicken is a quick and delicious meal that’s perfect for a weeknight dinner, a casual get-together with friends, or any time you’re yearning for a taste of your favorite takeout, but with a personalized spicy twist.
Ingredients and Preparation: The Foundation of Flavor
This Hot Orange Chicken recipe utilizes readily available ingredients, many of which you likely already have in your pantry. The key to achieving the best results lies in meticulous preparation and organization. Having all your ingredients measured, chopped, and prepped before you begin cooking will make the entire process smoother, more efficient, and ultimately more enjoyable.
To Make the Chicken:
- Protein:
- 2 lbs boneless, skinless chicken breasts or thighs, cut into 1-2 inch pieces – Chicken is the star of this dish, providing a lean and versatile protein source that’s ideal for frying. You can use either chicken breasts or thighs, depending on your personal preference. Thighs tend to be more succulent and juicy due to their higher fat content, while breasts are leaner and offer a slightly different texture. Cutting the chicken into bite-sized pieces ensures even cooking and makes it easier to eat.
- Breading:
- 1 cup cornstarch – Cornstarch is essential for creating the signature crispy coating on the chicken. It absorbs moisture from the chicken’s surface, promoting browning and crispiness during frying. It also creates a light and airy texture.
- ½ cup all-purpose flour – All-purpose flour works in synergy with the cornstarch to form a light and crispy breading. It adds structure and helps the coating to adhere to the chicken.
- 2 eggs – Eggs act as a binding agent, helping the breading to adhere to the chicken pieces. They also add moisture and richness to the coating.
- 2 tablespoons oil (canola or vegetable) – Adding oil to the egg wash helps to create a crispier coating by preventing the chicken from sticking together and promoting even browning.
- Seasoning:
- 1 tsp salt – Salt is crucial for enhancing the flavor of the chicken and the breading. It draws out moisture, which helps the chicken to brown, and it also balances the sweetness of the orange sauce.
- ½ tsp white pepper – White pepper adds a subtle warmth and a slightly different flavor profile compared to black pepper. It’s often preferred in Asian cuisine for its delicate flavor and its ability to blend seamlessly into sauces.
- Cooking:
- Oil for frying – You’ll need enough oil for deep frying the chicken. Canola or vegetable oil are good choices because they have a high smoke point, which is important for frying at high temperatures.
To Make the Orange Sauce:
- Orange Flavor:
- 1 cup orange juice (freshly squeezed is best) – Orange juice is the foundation of the sauce, providing its signature sweet and tangy flavor. Freshly squeezed orange juice will have a brighter, more intense flavor than store-bought juice, making a noticeable difference in the final dish.
- 1 orange, zest of – Orange zest, the grated outer peel of the orange, adds a concentrated burst of orange flavor and aroma to the sauce. It’s where all the essential oils and intense orange flavor reside.
- Savory & Sweet:
- 3 tablespoons soy sauce – Soy sauce adds a savory umami flavor to the sauce, balancing the sweetness of the orange juice and adding depth and complexity.
- 4 tablespoons rice wine vinegar – Rice wine vinegar adds a tangy acidity to the sauce, complementing the sweetness and creating a well-rounded and harmonious flavor profile.
- ½ cup brown sugar – Brown sugar adds sweetness and a touch of molasses flavor to the sauce, contributing to its rich and caramel-like taste.
- Texture & Aroma:
- 2 teaspoons sesame oil – Sesame oil adds a nutty aroma and a subtle flavor to the sauce, enhancing its Asian-inspired character.
- 1 tablespoon cornstarch – Cornstarch acts as a thickener, helping the sauce to coat the chicken and create a glossy, appealing finish. It prevents the sauce from being too runny.
- 1 tablespoon green onions, sliced (plus extra for garnish) – Green onions add a fresh, herbaceous note to the sauce and a pop of color, making the dish visually appealing.
To Stir-Fry:
- Spice:
- 2 tablespoons oil (canola or vegetable) – Oil is needed for stir-frying the chili peppers and garlic, ensuring they release their flavors without burning.
- ½ cup dried whole red chili peppers – Dried whole red chili peppers are the key to the heat in this dish. You can adjust the amount to your liking, using more or less depending on your spice tolerance.
- 6 teaspoons red pepper flakes – Red pepper flakes add extra heat and a vibrant red color to the dish, enhancing the visual appeal and the spiciness.
- Flavor Base:
- 1 tablespoon sesame oil – Sesame oil adds a nutty aroma and flavor to the stir-fry, complementing the other Asian-inspired ingredients.
- 2 cloves garlic, minced – Garlic adds a pungent and savory flavor to the dish, creating a robust and aromatic base.
- Optional:
- 1 tablespoon ginger, grated – Freshly grated ginger adds a warm and spicy flavor that complements the other ingredients, adding a layer of complexity and depth.
Step-by-Step Instructions: From Prep to Plate
This recipe is broken down into three main sections: making the orange sauce, preparing and frying the chicken, and the final stir-fry. Each section is further divided into easy-to-follow steps, making the recipe accessible and manageable for beginner cooks.
Make the Orange Sauce:
- In a medium bowl, whisk together all of the ingredients for the sauce: orange juice, orange zest, soy sauce, rice wine vinegar, brown sugar, sesame oil, cornstarch, and sliced green onions. Whisking ensures that all the ingredients are fully incorporated and prevents lumps from forming, especially from the cornstarch.
- Cover the bowl with plastic wrap or a lid and set it aside at room temperature until it’s ready to be used in the final stir-fry step. Preparing the sauce ahead of time allows the flavors to meld together and deepen, resulting in a more complex and flavorful sauce.
Prep and Bread the Chicken:
- Prepare the dredge by adding the cornstarch and all-purpose flour together in a shallow dish, such as a pie dish or a wide, shallow bowl. Whisk in the salt and white pepper to ensure that they are evenly distributed throughout the dredge, seasoning the chicken coating. Using a shallow dish makes it easier to coat the chicken pieces evenly.
- In a medium bowl, whisk together the eggs with 2 tablespoons of canola or vegetable oil. Whisk vigorously until the egg is no longer stringy and the mixture starts to emulsify, becoming slightly thickened and frothy. Emulsifying the eggs helps the breading to adhere to the chicken more effectively, creating a crispier coating.
- Start heating the oil for frying to 375 degrees Fahrenheit in a heavy-bottomed skillet, wok, or deep sauté pan. Attach a thermometer to the side of the pan to best manage the heat and ensure accurate temperature control. Maintaining the correct oil temperature is absolutely crucial for achieving perfectly crispy chicken. If the oil is too cool, the chicken will absorb too much oil and become greasy. If the oil is too hot, the chicken will burn before it’s cooked through.
- While the oil is heating, work in batches, placing the diced chicken pieces into the egg wash. Coat the chicken thoroughly, ensuring that each piece is fully submerged and coated. Then, toss the egg-washed chicken pieces into the dredging flour mixture. Coat the chicken pieces well on all sides, making sure no chicken shows through the breading. Gently press the flour onto the chicken to ensure it adheres. Working in batches prevents the chicken from clumping together and ensures that each piece is evenly coated with the breading.
Fry the Chicken:
- Before frying, dust off any excess flour from the chicken pieces. This will prevent the oil from becoming too cloudy and will help the chicken to brown more evenly.
- Carefully add the breaded chicken pieces to the hot oil in batches, ensuring that you don’t overcrowd the pan. Fry the chicken for about 3 minutes, or until it’s golden brown and crispy. Don’t overcrowd the pan, as this will lower the oil temperature and prevent the chicken from browning properly. It will also result in greasy chicken.
- Be sure to adjust the heat as it will drop once the chicken is added to the oil. Maintain the temperature as close to 375°F as possible for optimal results.
- Once the chicken is cooked through and crispy, remove it from the oil using a slotted spoon or a wire skimmer and place it on a wire rack lined with paper towels to drain off any excess oil. Using a wire rack allows air to circulate around the chicken, helping it to stay crispy.
Stir-Fry in Wok:
- In a clean wok, add 2 tablespoons of canola or vegetable oil and heat over medium-high heat.
- Add the dried whole red chili peppers and red pepper flakes to the hot oil. Heat through for about 15 seconds, stirring constantly. Be careful not to burn the spices. This step releases the aroma and heat from the chili peppers and red pepper flakes, infusing the oil with their flavor.
- Add the minced garlic (and grated ginger, if using) and 1 tablespoon of sesame oil to the wok. Cook for another 15 seconds as you stir, being careful not to burn the garlic. Garlic burns easily, so it’s important to stir it quickly and not overcook it.
- Pour the prepared orange sauce into the wok. The sauce will begin to bubble on the edges and thicken quickly, about 2 minutes. Stir the sauce constantly to prevent it from sticking to the wok. The cornstarch in the sauce will help it to thicken as it heats.
- Add the crispy fried chicken pieces to the wok and toss them multiple times to coat them thoroughly with the orange sauce. Continue to toss the chicken for about 1 minute, allowing it to warm through and absorb the flavors of the sauce. Ensure that all the chicken pieces are evenly coated in the glistening orange sauce.
- Serve the Hot Orange Chicken immediately over a bed of freshly cooked rice. Garnish with sliced green onions for added flavor and visual appeal.
- (continued) toss the egg-washed chicken pieces into the dredging flour mixture. Coat the chicken pieces well on all sides, making sure no chicken shows through the breading. Gently press the flour onto the chicken to ensure it adheres. Working in batches prevents the chicken from clumping together and ensures that each piece is evenly coated with the breading.
Fry the Chicken:
- Before frying, dust off any excess flour from the chicken pieces. This will prevent the oil from becoming too cloudy and will help the chicken to brown more evenly.
- Carefully add the breaded chicken pieces to the hot oil in batches, ensuring that you don’t overcrowd the pan. Fry the chicken for about 3 minutes, or until it’s golden brown and crispy. Don’t overcrowd the pan, as this will lower the oil temperature and prevent the chicken from browning properly. It will also result in greasy chicken.
- Be sure to adjust the heat as it will drop once the chicken is added to the oil. Maintain the temperature as close to 375°F as possible for optimal results.
- Once the chicken is cooked through and crispy, remove it from the oil using a slotted spoon or a wire skimmer and place it on a wire rack lined with paper towels to drain off any excess oil. Using a wire rack allows air to circulate around the chicken, helping it to stay crispy.
Stir-Fry in Wok:
- In a clean wok, add 2 tablespoons of canola or vegetable oil and heat over medium-high heat.
- Add the dried whole red chili peppers and red pepper flakes to the hot oil. Heat through for about 15 seconds, stirring constantly. Be careful not to burn the spices. This step releases the aroma and heat from the chili peppers and red pepper flakes, infusing the oil with their flavor.
- Add the minced garlic (and grated ginger, if using) and 1 tablespoon of sesame oil to the wok. Cook for another 15 seconds as you stir, being careful not to burn the garlic. Garlic burns easily, so it’s important to stir it quickly and not overcook it.
- Pour the prepared orange sauce into the wok. The sauce will begin to bubble on the edges and thicken quickly, about 2 minutes. Stir the sauce constantly to prevent it from sticking to the wok. The cornstarch in the sauce will help it to thicken as it heats.
- Add the crispy fried chicken pieces to the wok and toss them multiple times to coat them thoroughly with the orange sauce. Continue to toss the chicken for about 1 minute, allowing it to warm through and absorb the flavors of the sauce. Ensure that all the chicken pieces are evenly coated in the glistening orange sauce.
- Serve the Hot Orange Chicken immediately over a bed of freshly cooked rice. Garnish with sliced green onions for added flavor and visual appeal.
Beginner Tips and Notes: Your Culinary Companion
Here are some helpful tips and notes for beginner cooks to ensure success with this Hot Orange Chicken recipe:
- Chicken Preparation: Cut the chicken into uniform, bite-sized pieces for even cooking. This will ensure that all the pieces cook at the same rate and prevent some pieces from being overcooked while others are undercooked.
- Breading: Make sure the chicken is fully coated in the breading mixture. This will ensure that the chicken is crispy and that the sauce adheres to it properly.
- Oil Temperature: Maintaining the correct oil temperature is crucial for crispy chicken. Use a thermometer to monitor the temperature and adjust the heat as needed. If the oil is too cool, the chicken will be greasy. If the oil is too hot, the chicken will burn.
- Frying: Don’t overcrowd the pan when frying the chicken. Fry the chicken in batches to ensure even cooking and prevent the oil temperature from dropping too low. Overcrowding the pan will also result in greasy chicken.
- Sauce Consistency: If the sauce is too thick, add a little bit of water or orange juice to thin it out. If the sauce is too thin, you can thicken it by adding a slurry of cornstarch and water (1 tablespoon cornstarch mixed with 2 tablespoons water). Add the slurry gradually and stir constantly until the sauce reaches the desired consistency.
- Spice Level: Adjust the amount of chili peppers and red pepper flakes to control the spice level. If you prefer a milder sauce, use fewer chili peppers and red pepper flakes. If you like it extra spicy, use more.
- Serving: Serve the chicken immediately over rice for the best texture. The chicken will lose its crispiness if it sits in the sauce for too long.
- Ginger: If you don’t have fresh ginger, you can use ground ginger as a substitute. Use about ½ teaspoon of ground ginger for every 1 tablespoon of fresh ginger.
- Garlic: Use fresh garlic for the best flavor. If you don’t have fresh garlic, you can use garlic powder as a substitute. Use about ½ teaspoon of garlic powder for every 2 cloves of fresh garlic.
- Storage: Leftovers can be stored in an airtight container in the refrigerator for up to 3 days. Reheat the chicken in the oven or on the stovetop for the best texture. Reheating in the microwave can make the chicken soggy.
Serving Suggestions: Completing the Meal
This Hot Orange Chicken is traditionally served over rice, but there are other ways you can enjoy this versatile dish:
- Rice: Serve it over white rice, brown rice, jasmine rice, or even quinoa. The rice soaks up the delicious orange sauce and complements the crispy chicken perfectly.
- Noodles: Toss it with your favorite noodles, such as lo mein, chow mein, or even spaghetti. Noodles provide a satisfying and flavorful base for the chicken.
- Vegetables: Serve it with a side of steamed broccoli, stir-fried vegetables (such as bell peppers, onions, and carrots), or a fresh green salad. Adding vegetables to the meal adds nutrients and balances the richness of the chicken.
- Lettuce Wraps: Use the chicken as a filling for lettuce wraps for a lighter and healthier meal option. Lettuce wraps are a fun and interactive way to enjoy the chicken.

Conclusion: Let’s Get Cooking!
This Hot Orange Chicken recipe is a fun and delicious way to enjoy a takeout favorite at home. It’s relatively easy to make, it’s customizable to your spice preference, and it’s guaranteed to impress your family and friends. It’s a great way to satisfy your cravings for Chinese food without having to order takeout. I encourage you to try this recipe and make it your own! Don’t be afraid to experiment with different spice levels, vegetables, and serving suggestions.
Now, I’d love to hear from you! Did you try this recipe? What did you think? Did you make any modifications? Share your photos and experiences in the comments below! Happy cooking!