Red Velvet Cheesecake Brownies Recipe: A Decadent Dessert for Every Occasion
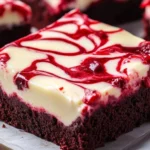
Red Velvet Cheesecake Brownies are the perfect combination of rich, fudgy brownies and creamy cheesecake. I made these for a holiday party, and they were an instant hit! With simple ingredients and easy steps, this dessert is perfect for beginners looking to impress. The vibrant red swirls and creamy texture make these brownies a showstopper for any occasion.
- Prep Time: 15 minutes
- Cook Time: 35 minutes
- Total Time: 50 minutes
- Yield: 16 servings (adjust as desired) 1x
- Category: Dessert
- Method: Baking
- Cuisine: American
- Diet: Vegetarian
Ingredients
For the Red Velvet Brownie Layer:
- 1/2 cup unsalted butter, melted: Butter adds richness to the brownie batter. For a slightly lighter version, you could use vegetable oil or melted coconut oil instead.
- 1 cup granulated sugar: This is the primary sweetener in the brownie layer. If you prefer, you can substitute with brown sugar for a slightly different flavor profile or use a sugar substitute if you’re looking to cut down on sugar.
- 2 large eggs: Eggs help bind the ingredients together and provide structure to the brownies. You can use flax eggs or chia eggs as a substitute if you’re looking for a vegan option.
- 1 teaspoon vanilla extract: Vanilla adds warmth and depth to the flavor of the brownies. You could experiment with almond extract for a different twist.
- 1 tablespoon red food coloring: The red food coloring gives the brownies their signature red velvet color. You can opt for natural food coloring if you prefer a more organic alternative.
- 1 tablespoon cocoa powder: Cocoa powder provides the essential chocolate flavor in the brownies. Make sure to use unsweetened cocoa powder for the best results.
- 3/4 cup all-purpose flour: This is the main dry ingredient in the brownies. If you need a gluten-free option, you can substitute it with a gluten-free all-purpose flour blend.
- 1/4 teaspoon salt: Salt balances out the sweetness of the brownies and enhances the chocolate flavor.
For the Cheesecake Layer:
- 8 oz cream cheese, softened: The cream cheese forms the base of the cheesecake swirl. Make sure to soften it before mixing for a smooth texture. You can use full-fat or reduced-fat cream cheese, depending on your preference.
- 1/4 cup granulated sugar: This sweetens the cheesecake layer. Again, feel free to use a sugar substitute if desired.
- 1 large egg: The egg helps set the cheesecake layer and gives it that creamy, custard-like consistency.
- 1/2 teaspoon vanilla extract: Vanilla extract enhances the flavor of the cheesecake and adds a subtle sweetness.
Instructions
1. Preheat the Oven:
First things first, preheat your oven to 350°F (175°C). This ensures that the oven is at the perfect temperature by the time your batter is ready. While the oven is heating up, line an 8×8-inch baking pan with parchment paper. Leave some overhang on the sides of the pan to make it easier to remove the brownies once they’ve cooled. This step will also prevent the brownies from sticking to the pan, giving you a clean, smooth finish when you cut them.
2. Prepare the Red Velvet Brownie Batter:
In a large mixing bowl, whisk together the melted butter and sugar until the mixture is smooth and combined. You should see a glossy texture after mixing for a couple of minutes. Then, add the eggs, vanilla extract, and red food coloring to the bowl. Stir everything together until it’s well incorporated. The red food coloring will turn the batter a vibrant red, giving your brownies their signature hue.
Once the wet ingredients are mixed, sift in the cocoa powder, flour, and salt. Sifting the dry ingredients ensures that there are no lumps in the batter. Gently fold the dry ingredients into the wet ingredients, being careful not to overmix. Overmixing the batter can result in dense, tough brownies, so stop mixing as soon as everything is incorporated.
3. Make the Cheesecake Layer:
In a separate mixing bowl, beat the softened cream cheese and sugar together until smooth and creamy. If you have an electric mixer, this step will be quick and easy. Add the egg and vanilla extract to the cream cheese mixture and beat until it’s smooth and free of lumps. It’s important to make sure the cream cheese is softened before you start, as cold cream cheese can lead to a lumpy mixture. If your cream cheese is too cold, microwave it for 10-15 seconds to soften it before mixing.
4. Assemble the Brownies:
Now that both the brownie and cheesecake layers are ready, it’s time to assemble the brownies. Pour about three-quarters of the red velvet brownie batter into the prepared baking pan. Use a spatula to spread it evenly over the bottom of the pan. Next, carefully pour the cheesecake layer over the brownie batter. Spread it gently to cover the entire surface. Don’t worry about making it perfectly smooth—imperfections add to the rustic charm of these brownies.
Then, drop spoonfuls of the remaining red velvet batter on top of the cheesecake layer. This is where the fun part begins! Use a knife, toothpick, or skewer to swirl the red velvet batter through the cheesecake layer. This will create the marbled effect that gives the brownies their stunning appearance. The more you swirl, the more pronounced the marbling will be. Just be careful not to over-swirl, or you’ll end up with a solid layer of pink rather than a marbled design.
5. Bake:
Place the pan in the preheated oven and bake the brownies for 30-35 minutes. You’ll know they’re done when the center is set, and a toothpick inserted into the center comes out mostly clean. It’s okay if there are a few moist crumbs on the toothpick—that means the brownies are perfectly fudgy. If the toothpick comes out completely clean, the brownies might be overbaked, so keep an eye on them.
6. Cool:
Once the brownies are done baking, remove them from the oven and let them cool completely in the pan on a wire rack. Cooling the brownies is crucial, as it allows the cheesecake layer to set properly. If you’re in a rush, you can speed up the cooling process by placing the pan in the refrigerator for 30 minutes to an hour. However, for the best results, I recommend letting them cool at room temperature.
7. Serve:
Once your brownies are fully cooled, it’s time to cut them into squares or rectangles. You can serve them as-is, or for an extra indulgent touch, top them with a dollop of whipped cream, a drizzle of chocolate sauce, or a few fresh berries. These brownies are perfect for any occasion and are sure to impress your guests with their rich flavor and beautiful presentation.
Notes
- Don’t overmix the batter: Overmixing can result in dense brownies. Stir until the ingredients are just combined for the best texture.
- Check for doneness early: Keep an eye on the brownies as they bake, as oven temperatures vary. Start checking at the 30-minute mark to prevent overbaking.
- Chill for cleaner cuts: Let the brownies cool completely before cutting them. If you’re in a hurry, you can chill them in the fridge for a bit to make slicing easier.
- Use high-quality ingredients: For the best flavor, use good-quality butter, cream cheese, and cocoa powder.