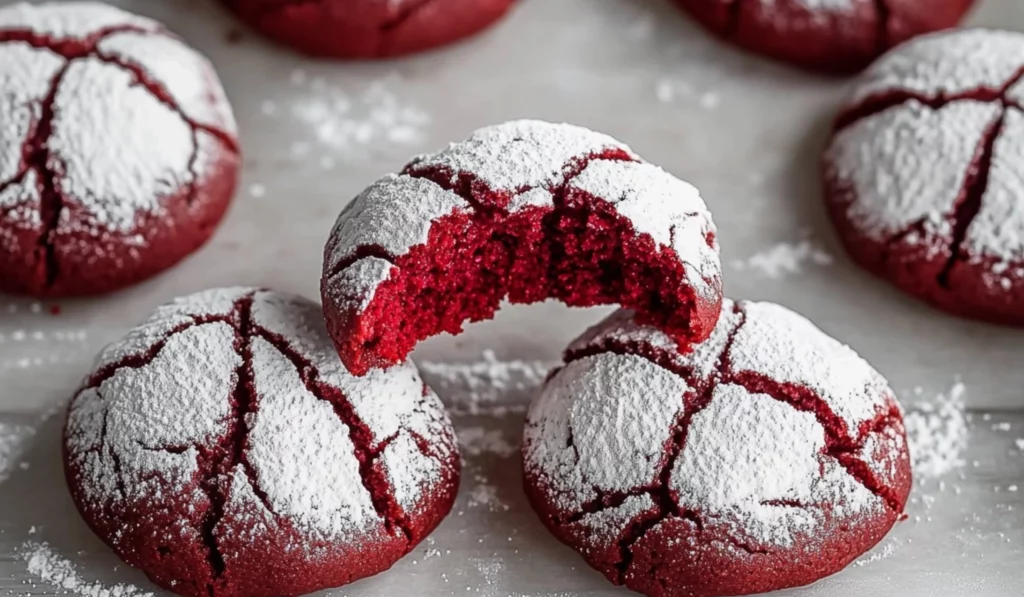
Baking has always been a special way for me to express love and creativity, and there’s no better way to start than with cookies. Red velvet crinkle cookies, in particular, hold a special place in my heart. The beautiful, vibrant red color, the rich chocolate flavor, and the iconic crackled sugar topping make them a treat that never fails to impress. Whether you’re baking for a holiday, a special occasion, or just to treat yourself, these cookies are sure to steal the spotlight.
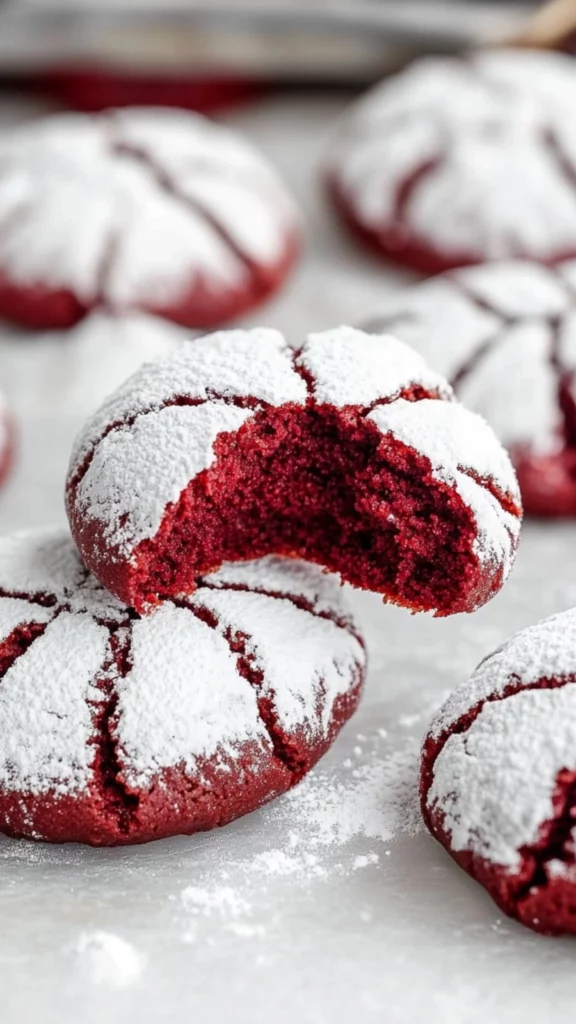
Red Velvet Crinkle Cookies: A Sweet Bite of Comfort
Red velvet crinkle cookies are a fun and delicious treat that’s perfect for beginners. With their vibrant color, crackled sugar coating, and rich cocoa flavor, these cookies are simple to make and always a hit. Whether you’re new to baking or looking for an easy yet impressive recipe, these cookies are a great choice for any occasion. Let’s get started and bake these perfect bite-sized delights!
- Prep Time: 45 minutes
- Cook Time: 10 minutes
- Total Time: 55 minutes
- Yield: 12 servings 1x
- Category: Dessert
- Method: Baking, Mixing, Chilling
- Cuisine: American
- Diet: Vegetarian
Ingredients
- 1 1/2 cups all-purpose flour – This forms the base of the cookie dough, providing structure and stability. Be sure to measure the flour accurately to avoid a dense dough. Use the spoon-and-level method when measuring to ensure the correct amount of flour is used.
- 1/2 cup unsweetened cocoa powder – Unsweetened cocoa powder gives these cookies their rich, chocolatey flavor. It’s essential to use unsweetened cocoa powder, as sweetened cocoa could alter the balance of sweetness in the recipe.
- 1 tsp baking powder – Baking powder is the leavening agent that allows the cookies to rise slightly and gives them a soft, tender texture. It’s crucial for achieving that perfect balance between chewy and cake-like.
- 1/4 tsp salt – Salt is often an underrated ingredient in baking, but it helps enhance and balance the flavors. It cuts the sweetness slightly and deepens the richness of the chocolate.
- 1/2 cup unsalted butter, softened – Butter adds richness and helps create the perfect texture in your cookies. Using unsalted butter allows you to have full control over the amount of salt in the dough.
- 1 cup granulated sugar – Sugar is the sweetener in the dough, and it also contributes to the cookies’ chewy texture. It helps the cookies spread slightly as they bake, which is key to creating those lovely cracks.
- 2 large eggs – Eggs provide moisture and help bind the dough together. They also contribute to the cookies’ structure, helping them hold their shape during baking.
- 1 tsp vanilla extract – Vanilla extract adds depth to the flavor of the cookies, complementing the chocolatey and slightly tangy red velvet profile.
- 1 tbsp red food coloring – Red food coloring is what gives these cookies their signature vibrant hue. Be sure to use gel or paste food coloring instead of liquid, as it will not alter the dough’s consistency.
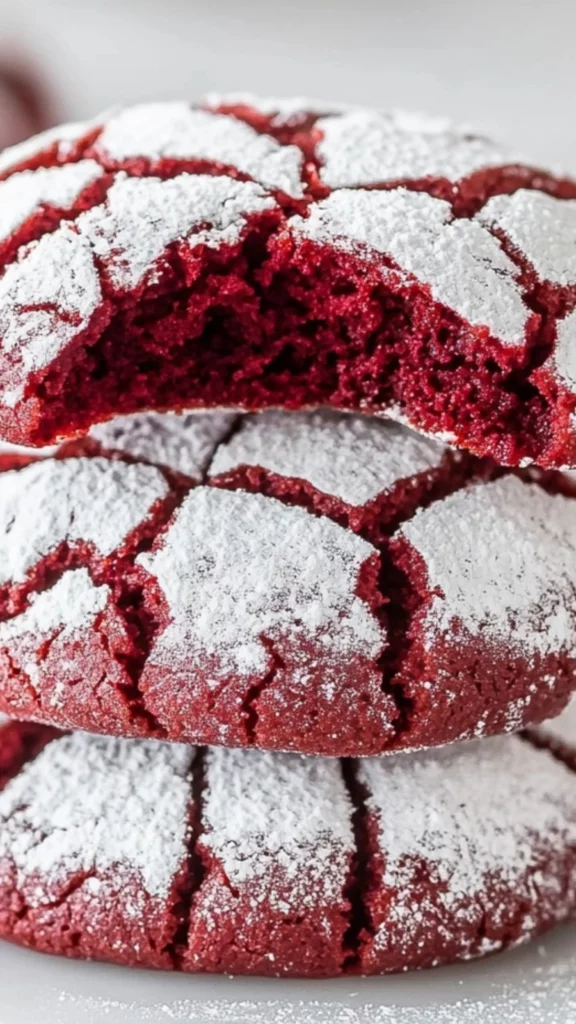
- 1/2 cup powdered sugar (for rolling) – Powdered sugar creates the signature crackled effect as the cookies bake. It’s an essential part of what makes these cookies so visually striking.
Instructions
1. Preheat the Oven and Prepare Your Baking Sheets
Start by preheating your oven to 350°F (175°C). Line two baking sheets with parchment paper or silicone baking mats. This step ensures that the cookies won’t stick to the pans, and the parchment paper makes for easy cleanup.
2. Mix the Dry Ingredients
In a medium-sized bowl, whisk together the all-purpose flour, cocoa powder, baking powder, and salt. Whisking ensures the dry ingredients are evenly distributed and helps to prevent any lumps in the cocoa powder. Set this dry mixture aside while you work on the wet ingredients.
3. Cream the Butter and Sugar
In a large mixing bowl, cream together the softened butter and granulated sugar using an electric mixer on medium speed. Beat for about 2-3 minutes, until the mixture becomes light and fluffy. This process is key to creating the soft, chewy texture of the cookies. The air incorporated into the butter and sugar will give the cookies their lightness.
Once the butter and sugar are well combined, add in the eggs one at a time, beating well after each addition. This will help the eggs emulsify into the butter mixture and ensure that your dough comes together smoothly.
Stir in the vanilla extract and red food coloring. The red coloring will give the dough its beautiful red velvet hue, but be sure to mix it thoroughly so that the color is evenly distributed.
4. Combine Wet and Dry Ingredients
Gradually add the dry flour mixture to the wet ingredients in small batches. Use your mixer on low speed to avoid flour flying out of the bowl. Mix just until combined—do not overmix, as this can cause the cookies to become tough. At this stage, the dough will be soft and a little sticky, which is perfectly fine!
5. Chill the Dough
Cover the dough with plastic wrap or place it in an airtight container, and refrigerate it for at least 30 minutes. Chilling the dough is an important step because it helps the cookies maintain their shape while baking. It also makes the dough easier to handle and less sticky when forming cookie balls.
6. Shape the Cookies
Once the dough is chilled, it’s time to shape the cookies. Using a tablespoon or a cookie scoop, scoop out small portions of dough and roll them into 1-inch balls. The dough should be soft but firm enough to hold its shape. If the dough sticks to your hands, dust them lightly with flour or use parchment paper to handle the dough.
7. Coat the Dough in Powdered Sugar
Place the powdered sugar in a small bowl. Roll each dough ball in the powdered sugar until it is completely coated. This will create the crackled appearance as the cookies bake. Don’t skimp on the sugar coating—this is the key to achieving that perfect crinkle effect.
8. Bake the Cookies
Place the dough balls onto the prepared baking sheets, spacing them about 2 inches apart. The cookies will spread as they bake, so it’s important to leave room between each ball. Bake in the preheated oven for 10-12 minutes, or until the edges are set and the cookies have a beautiful cracked appearance. The centers should still be soft to the touch.
9. Cool and Enjoy
Allow the cookies to cool on the baking sheets for a few minutes before transferring them to a wire rack to cool completely. This prevents them from breaking apart while they’re still warm. Enjoy them as a sweet treat with a cup of coffee, milk, or hot cocoa!
Notes
- Accurate Measuring: Always measure your ingredients accurately. For flour, use the spoon-and-level method to avoid adding too much, which can make your cookies dense.
- Chill the Dough: Don’t skip the chilling step! Chilling helps the dough firm up and prevents the cookies from spreading too much in the oven.
- Proper Baking Time: Be careful not to overbake the cookies. They should be soft in the center when you remove them from the oven. They will continue to cook slightly as they cool.
- Make Even Dough Balls: Use a cookie scoop to ensure all the cookies are the same size, which helps them bake evenly.
- Rolling in Powdered Sugar: Don’t be shy when rolling your dough balls in powdered sugar. A generous coating creates the signature crinkle effect.
If you’re a beginner in the kitchen, don’t let the beauty of these cookies intimidate you. Red velvet crinkle cookies are surprisingly easy to make. The recipe requires simple ingredients, basic tools, and a few easy steps. These cookies are also quite forgiving, which makes them an excellent choice for anyone just starting to experiment with baking. Plus, who doesn’t love the perfect blend of rich cocoa and the beautiful red hue that brings them to life?
In this article, I’ll walk you through everything you need to know to make these delicious red velvet crinkle cookies—from the ingredients to the techniques, tips for success, and everything in between. By the end, you’ll have the knowledge and confidence to bake a batch of these eye-catching cookies that are sure to become a favorite in your baking repertoire.
Ingredients and Preparation
The first step in creating your perfect batch of red velvet crinkle cookies is gathering the ingredients. Fortunately, this recipe uses basic ingredients that you probably already have in your kitchen, with the exception of the red food coloring. Here’s a breakdown of what you’ll need and why each ingredient plays an essential role in creating these cookies.
Main Ingredients
- 1 1/2 cups all-purpose flour – This forms the base of the cookie dough, providing structure and stability. Be sure to measure the flour accurately to avoid a dense dough. Use the spoon-and-level method when measuring to ensure the correct amount of flour is used.
- 1/2 cup unsweetened cocoa powder – Unsweetened cocoa powder gives these cookies their rich, chocolatey flavor. It’s essential to use unsweetened cocoa powder, as sweetened cocoa could alter the balance of sweetness in the recipe.
- 1 tsp baking powder – Baking powder is the leavening agent that allows the cookies to rise slightly and gives them a soft, tender texture. It’s crucial for achieving that perfect balance between chewy and cake-like.
- 1/4 tsp salt – Salt is often an underrated ingredient in baking, but it helps enhance and balance the flavors. It cuts the sweetness slightly and deepens the richness of the chocolate.
- 1/2 cup unsalted butter, softened – Butter adds richness and helps create the perfect texture in your cookies. Using unsalted butter allows you to have full control over the amount of salt in the dough.
- 1 cup granulated sugar – Sugar is the sweetener in the dough, and it also contributes to the cookies’ chewy texture. It helps the cookies spread slightly as they bake, which is key to creating those lovely cracks.
- 2 large eggs – Eggs provide moisture and help bind the dough together. They also contribute to the cookies’ structure, helping them hold their shape during baking.
- 1 tsp vanilla extract – Vanilla extract adds depth to the flavor of the cookies, complementing the chocolatey and slightly tangy red velvet profile.
- 1 tbsp red food coloring – Red food coloring is what gives these cookies their signature vibrant hue. Be sure to use gel or paste food coloring instead of liquid, as it will not alter the dough’s consistency.
- 1/2 cup powdered sugar (for rolling) – Powdered sugar creates the signature crackled effect as the cookies bake. It’s an essential part of what makes these cookies so visually striking.
Ingredient Substitutions and Variations
While the ingredients for these red velvet crinkle cookies are fairly standard, there are some substitutions you can make depending on dietary restrictions or preferences.
- Gluten-Free Version: You can easily make this recipe gluten-free by using a 1:1 gluten-free flour blend. Make sure to choose a high-quality blend designed for baking to get the best results.
- Dairy-Free Version: Substitute the butter with a dairy-free margarine or coconut oil. You could also use a vegan butter substitute, which can be found in most grocery stores. For the eggs, use a flax egg (1 tablespoon of ground flaxseed mixed with 2.5 tablespoons of water) as a substitute.
- Chocolate Chips: If you want to add a little extra indulgence, you can fold in about 1/2 cup of semi-sweet or white chocolate chips to the dough before chilling. This will add pockets of creamy goodness to your cookies.
- Natural Red Color: If you want to avoid artificial food coloring, you can use beet powder or another natural coloring alternative. Beet powder will give the cookies a subtle earthy flavor along with the red hue.
Step-by-Step Instructions
Making red velvet crinkle cookies is simple and fun, especially for beginner bakers. Follow the steps below to create a batch of these delicious cookies.
1. Preheat the Oven and Prepare Your Baking Sheets
Start by preheating your oven to 350°F (175°C). Line two baking sheets with parchment paper or silicone baking mats. This step ensures that the cookies won’t stick to the pans, and the parchment paper makes for easy cleanup.
2. Mix the Dry Ingredients
In a medium-sized bowl, whisk together the all-purpose flour, cocoa powder, baking powder, and salt. Whisking ensures the dry ingredients are evenly distributed and helps to prevent any lumps in the cocoa powder. Set this dry mixture aside while you work on the wet ingredients.
3. Cream the Butter and Sugar
In a large mixing bowl, cream together the softened butter and granulated sugar using an electric mixer on medium speed. Beat for about 2-3 minutes, until the mixture becomes light and fluffy. This process is key to creating the soft, chewy texture of the cookies. The air incorporated into the butter and sugar will give the cookies their lightness.
Once the butter and sugar are well combined, add in the eggs one at a time, beating well after each addition. This will help the eggs emulsify into the butter mixture and ensure that your dough comes together smoothly.
Stir in the vanilla extract and red food coloring. The red coloring will give the dough its beautiful red velvet hue, but be sure to mix it thoroughly so that the color is evenly distributed.
4. Combine Wet and Dry Ingredients
Gradually add the dry flour mixture to the wet ingredients in small batches. Use your mixer on low speed to avoid flour flying out of the bowl. Mix just until combined—do not overmix, as this can cause the cookies to become tough. At this stage, the dough will be soft and a little sticky, which is perfectly fine!
5. Chill the Dough
Cover the dough with plastic wrap or place it in an airtight container, and refrigerate it for at least 30 minutes. Chilling the dough is an important step because it helps the cookies maintain their shape while baking. It also makes the dough easier to handle and less sticky when forming cookie balls.
6. Shape the Cookies
Once the dough is chilled, it’s time to shape the cookies. Using a tablespoon or a cookie scoop, scoop out small portions of dough and roll them into 1-inch balls. The dough should be soft but firm enough to hold its shape. If the dough sticks to your hands, dust them lightly with flour or use parchment paper to handle the dough.
7. Coat the Dough in Powdered Sugar
Place the powdered sugar in a small bowl. Roll each dough ball in the powdered sugar until it is completely coated. This will create the crackled appearance as the cookies bake. Don’t skimp on the sugar coating—this is the key to achieving that perfect crinkle effect.
8. Bake the Cookies
Place the dough balls onto the prepared baking sheets, spacing them about 2 inches apart. The cookies will spread as they bake, so it’s important to leave room between each ball. Bake in the preheated oven for 10-12 minutes, or until the edges are set and the cookies have a beautiful cracked appearance. The centers should still be soft to the touch.
9. Cool and Enjoy
Allow the cookies to cool on the baking sheets for a few minutes before transferring them to a wire rack to cool completely. This prevents them from breaking apart while they’re still warm. Enjoy them as a sweet treat with a cup of coffee, milk, or hot cocoa!
Beginner Tips and Notes
Here are a few helpful tips for perfecting your red velvet crinkle cookies:
- Accurate Measuring: Always measure your ingredients accurately. For flour, use the spoon-and-level method to avoid adding too much, which can make your cookies dense.
- Chill the Dough: Don’t skip the chilling step! Chilling helps the dough firm up and prevents the cookies from spreading too much in the oven.
- Proper Baking Time: Be careful not to overbake the cookies. They should be soft in the center when you remove them from the oven. They will continue to cook slightly as they cool.
- Make Even Dough Balls: Use a cookie scoop to ensure all the cookies are the same size, which helps them bake evenly.
- Rolling in Powdered Sugar: Don’t be shy when rolling your dough balls in powdered sugar. A generous coating creates the signature crinkle effect.
Serving Suggestions
While red velvet crinkle cookies are delicious on their own, you can elevate them with a few creative serving suggestions:
- Serve with Ice Cream: Make ice cream sandwiches with your favorite flavor of ice cream, such as vanilla, chocolate, or cream cheese.
- Pair with Hot Drinks: These cookies pair wonderfully with a hot cup of coffee, cocoa, or a glass of milk. The sweetness of the cookies contrasts nicely with the bitterness of coffee or the creaminess of milk.
- Top with Frosting: For an extra indulgent treat, top each cookie with a dollop of cream cheese frosting or whipped cream.
Storage and Freezing Tips
- Room Temperature: Store the cookies in an airtight container at room temperature for up to 5 days.
- Freezing the Dough: If you want to prepare the dough ahead of time, you can freeze the dough balls. Place the dough balls on a baking sheet and freeze until solid, then transfer them to a freezer-safe bag or container. When ready to bake, roll in powdered sugar and bake as directed.
- Freezing Baked Cookies: You can also freeze baked cookies. Allow them to cool completely, then store them in an airtight container or freezer-safe bag. They’ll stay fresh for up to 3 months.
Conclusion
Red velvet crinkle cookies are a fun, festive, and delicious treat that will impress anyone who tries them. Whether you’re baking for a special occasion or just for the joy of it, these cookies offer a perfect combination of rich cocoa flavor, a slight tang, and an irresistibly chewy texture. With a simple, beginner-friendly recipe and easy-to-follow steps, you’ll be able to create these beautiful cookies in no time.
The next time you’re in the mood for a treat that’s both simple and sophisticated, these red velvet crinkle cookies will certainly do the trick. They are a guaranteed crowd-pleaser and a great way to add a touch of color and joy to any occasion. Happy baking!