If you’re a Disney fan, then you know that The Princess and the Frog isn’t just a beloved movie; it’s an inspiration for some truly mouthwatering food! One of the most iconic dishes from the movie is Tiana’s beignets—delightful, golden, pillowy pockets of dough, fried to perfection and dusted with powdered sugar. Imagine yourself in the heart of New Orleans, where the warm, sugary aroma of fresh beignets fills the air. Now, what if I told you that you could recreate this magic in your own kitchen? The best part? It’s simple enough for beginners! Tiana’s Beignets are a perfect choice for novice cooks because they require minimal ingredients, yet the result is nothing short of spectacular. They’re light, fluffy, and just the right amount of sweet—making them ideal for breakfast, brunch, or as a treat during your next Disney movie marathon. Whether you’re trying your hand at frying for the first time or simply looking to impress friends and family, this recipe is sure to become a new favorite.

Tiana’s Magical Beignets: A Disney-Inspired Recipe for Fluffy Fried Delights
Inspired by The Princess and the Frog, Tiana’s beignets bring a touch of Disney magic to your kitchen. This easy recipe is perfect for beginners, requiring just a few ingredients to create light, fluffy beignets dusted with powdered sugar. Whether you’re enjoying them alone or sharing with loved ones, these beignets will add sweetness to any occasion. Let’s get started!
- Total Time: 2 hours 40 minutes (including proofing time),
- Yield: 35 beignets
Ingredients
- 1 cup warm milk (about 110°F or 43°C)
- 1/2 cup granulated sugar, divided
- 2 1/2 teaspoons dry active yeast
- 1 large egg, at room temperature
- 4 tablespoons unsalted butter, melted
- 1 teaspoon pure vanilla extract
- 1/4 teaspoon salt
- 2 3/4 cups all-purpose flour (you may need up to 3 cups, depending on dough consistency)
- Vegetable or peanut oil, for frying
- Powdered sugar, for dusting
Instructions
Step 1: Activate the Yeast
In a large bowl or the bowl of a stand mixer, combine the warm milk, 2 tablespoons of the sugar, and the dry active yeast. Stir everything together until the yeast is dissolved. Let the mixture sit for about 5 minutes, or until it becomes foamy. This step is crucial as it shows that the yeast is working. If the mixture doesn’t foam, your yeast might be expired, and you should try again with fresh yeast.
Step 2: Add the Wet Ingredients
Once the yeast is activated and bubbly, stir in the remaining sugar, egg, melted butter, vanilla extract, and salt. Mix everything until well combined. The egg helps the dough rise and gives the beignets their rich texture, while the vanilla adds a lovely hint of flavor.
Step 3: Add the Flour
Gradually stir in the flour using a dough hook on your stand mixer, or a spoon if you’re mixing by hand. Keep adding flour until the dough pulls away from the sides of the bowl. If you’re using a stand mixer, knead the dough on a medium-low speed for 3-4 minutes. If you’re working by hand, transfer the dough to a clean surface and knead it gently for the same amount of time. The dough should be smooth and elastic, though still slightly sticky. Don’t be tempted to add too much flour, as doing so will make the beignets dense and heavy.
Step 4: Let the Dough Rise
Cover the bowl with plastic wrap and let the dough rise for at least 2 hours, or until it doubles in size. If you’re short on time, you can speed this up by placing the bowl in a warm area, like near an oven that’s preheating. Alternatively, for a slower rise and more flavor, you can refrigerate the dough overnight. Either way, patience is key!
Step 5: Roll Out the Dough
Once the dough has risen, gently punch it down to release any air bubbles. Lightly flour a countertop or cutting board, then turn the dough out onto the surface. Use a rolling pin to roll it out to about 1/2-inch thickness. If the dough sticks to the pin, add a little more flour. Then, use a pizza cutter or sharp knife to cut the dough into 1-2 inch squares.
Step 6: Fry the Beignets
Heat about 2 inches of oil in a deep frying pan or Dutch oven over medium heat until it reaches 350°F (175°C). Use a cooking thermometer to make sure the oil is at the right temperature. If the oil is too cold, the beignets will absorb too much oil and be greasy. If it’s too hot, they’ll brown too quickly on the outside without cooking through. Fry the beignets in batches, dropping 4-5 squares into the oil at a time. Cook them for about 2-2 ½ minutes, flipping halfway through, until they’re golden brown and puffed up. Use a slotted spoon to remove the beignets and let them drain on a paper towel-lined plate.
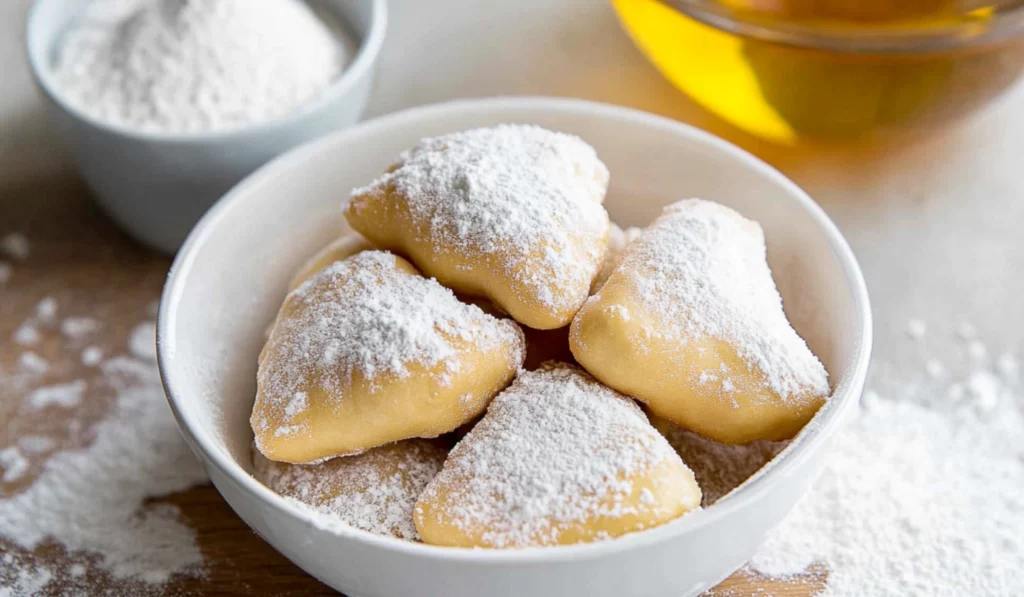
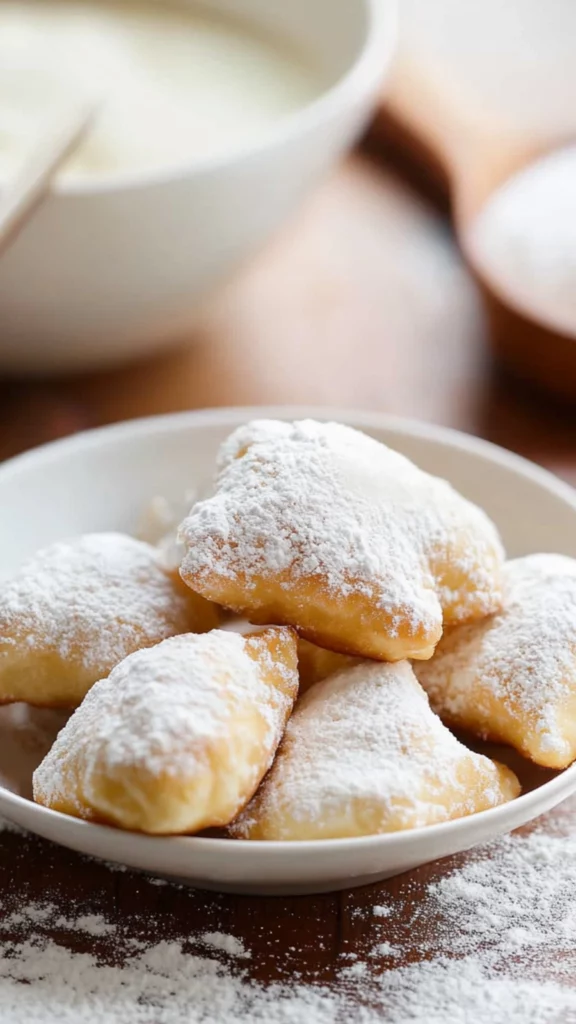
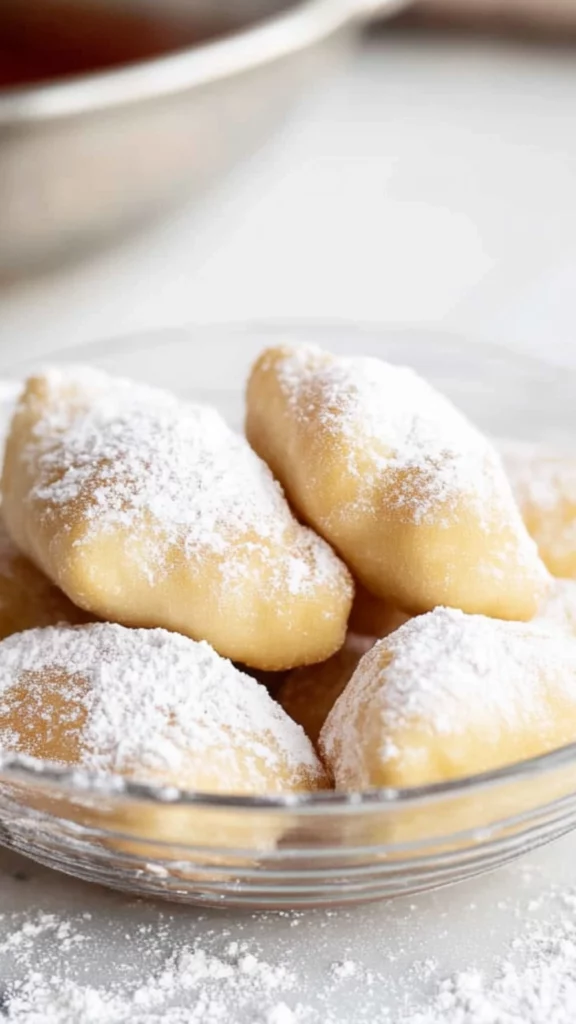
Step 7: Dust with Powdered Sugar
Let the beignets cool for about 5 minutes before generously dusting them with powdered sugar. The sugar will create a beautiful snowy coating on the fluffy pastries. Serve immediately and enjoy the magic of Tiana’s beignets in your very own kitchen!
Notes
- Kneading Tips: If you find that the dough is too sticky to knead by hand, don’t be afraid to add just a little more flour. However, as mentioned, don’t go overboard, or you risk ending up with dense, gummy beignets.
- Frying Temperature: To check if your oil is at the right temperature, you can drop a small piece of dough into the oil. If it immediately starts bubbling and rises to the surface, the oil is ready.
- Dough Proofing: If you don’t have 2 hours to wait for the dough to rise, you can place the dough in a warm oven (turned off, but with the light on) for a quicker rise.
- Prep Time: 20 minutes
- Cook Time: 20 minutes
- Category: Dessert
- Method: Frying
- Cuisine: American, French-inspired
- Diet: Vegetarian
Why This Recipe is Perfect for Beginners
If you’ve never made dough before, this recipe is a wonderful introduction. The dough for these beignets is relatively easy to handle, and the steps are simple and straightforward. You don’t need any fancy equipment; a stand mixer is optional, and you can easily use a bowl and spoon. The recipe also offers an opportunity to practice key cooking skills, such as kneading dough and frying at the right temperature. And even though there’s a bit of waiting for the dough to rise, the steps themselves are fast and manageable. But the best part? These beignets are incredibly forgiving. As long as you avoid over-flouring the dough, you’re good to go! The light, fluffy texture is all about the proper frying temperature, which we’ll discuss in detail so you can avoid any mishaps. Plus, they’re made with basic ingredients like milk, sugar, butter, and flour, making it easier than ever to dive in! While this recipe may seem like something from a professional kitchen, it’s actually very beginner-friendly. By breaking the process down step by step, anyone can achieve delicious beignets. And, of course, the end result is truly worth the effort—crispy on the outside, soft and airy on the inside, and dusted with a generous amount of powdered sugar. There’s no need to be intimidated by the frying process; with a little practice, you’ll be frying up perfect beignets every time!
Ingredients and Preparation
Here’s everything you’ll need to bring these beignets to life. This recipe makes about 35 beignets, so be prepared to share (or indulge in a few extra)!
Ingredients:
- 1 cup warm milk (about 110°F or 43°C)
- 1/2 cup granulated sugar, divided
- 2 1/2 teaspoons dry active yeast
- 1 large egg, at room temperature
- 4 tablespoons unsalted butter, melted
- 1 teaspoon pure vanilla extract
- 1/4 teaspoon salt
- 2 3/4 cups all-purpose flour (you may need up to 3 cups, depending on dough consistency)
- Vegetable or peanut oil, for frying
- Powdered sugar, for dusting
Ingredient Substitutes:
- Milk: You can use any type of milk, including dairy-free options like almond or oat milk, if you prefer.
- Yeast: If you don’t have dry active yeast, you can substitute it with instant yeast, though the rise time may vary slightly.
- Butter: If you’re looking for a dairy-free version, feel free to swap the butter with a plant-based option, such as coconut oil or vegan butter.
- Flour: While all-purpose flour works best, you could try using a gluten-free flour blend if you need a gluten-free version of these beignets. Just make sure to check that the blend is designed for baking.
Preparation:
The preparation for these beignets is easy and accessible for any cook. The dough takes only a few steps, with the primary time commitment being the rise time. You’ll need to make sure your ingredients are at room temperature for the best results, especially the egg and the butter. A quick tip here is to leave them out about 30 minutes before you start baking, so they’re at the perfect temperature to blend into the dough. Also, be mindful of the temperature of the milk when you activate the yeast. It needs to be warm but not too hot, as heat above 120°F can kill the yeast, preventing the dough from rising. Aim for a temperature of around 110°F (43°C), which is the perfect temperature to activate the yeast without causing it harm.
Step-by-Step Instructions
Now that we’ve got all the ingredients ready, let’s dive into the process of making these sweet, fluffy beignets. Follow these simple steps, and you’ll have a delicious batch of beignets in no time!
Step 1: Activate the Yeast
In a large bowl or the bowl of a stand mixer, combine the warm milk, 2 tablespoons of the sugar, and the dry active yeast. Stir everything together until the yeast is dissolved. Let the mixture sit for about 5 minutes, or until it becomes foamy. This step is crucial as it shows that the yeast is working. If the mixture doesn’t foam, your yeast might be expired, and you should try again with fresh yeast.
Step 2: Add the Wet Ingredients
Once the yeast is activated and bubbly, stir in the remaining sugar, egg, melted butter, vanilla extract, and salt. Mix everything until well combined. The egg helps the dough rise and gives the beignets their rich texture, while the vanilla adds a lovely hint of flavor.
Step 3: Add the Flour
Gradually stir in the flour using a dough hook on your stand mixer, or a spoon if you’re mixing by hand. Keep adding flour until the dough pulls away from the sides of the bowl. If you’re using a stand mixer, knead the dough on a medium-low speed for 3-4 minutes. If you’re working by hand, transfer the dough to a clean surface and knead it gently for the same amount of time. The dough should be smooth and elastic, though still slightly sticky. Don’t be tempted to add too much flour, as doing so will make the beignets dense and heavy.
Step 4: Let the Dough Rise
Cover the bowl with plastic wrap and let the dough rise for at least 2 hours, or until it doubles in size. If you’re short on time, you can speed this up by placing the bowl in a warm area, like near an oven that’s preheating. Alternatively, for a slower rise and more flavor, you can refrigerate the dough overnight. Either way, patience is key!
Step 5: Roll Out the Dough
Once the dough has risen, gently punch it down to release any air bubbles. Lightly flour a countertop or cutting board, then turn the dough out onto the surface. Use a rolling pin to roll it out to about 1/2-inch thickness. If the dough sticks to the pin, add a little more flour. Then, use a pizza cutter or sharp knife to cut the dough into 1-2 inch squares.
Step 6: Fry the Beignets
Heat about 2 inches of oil in a deep frying pan or Dutch oven over medium heat until it reaches 350°F (175°C). Use a cooking thermometer to make sure the oil is at the right temperature. If the oil is too cold, the beignets will absorb too much oil and be greasy. If it’s too hot, they’ll brown too quickly on the outside without cooking through. Fry the beignets in batches, dropping 4-5 squares into the oil at a time. Cook them for about 2-2 ½ minutes, flipping halfway through, until they’re golden brown and puffed up. Use a slotted spoon to remove the beignets and let them drain on a paper towel-lined plate.
Step 7: Dust with Powdered Sugar
Let the beignets cool for about 5 minutes before generously dusting them with powdered sugar. The sugar will create a beautiful snowy coating on the fluffy pastries. Serve immediately and enjoy the magic of Tiana’s beignets in your very own kitchen!
Beginner Tips and Notes
- Kneading Tips: If you find that the dough is too sticky to knead by hand, don’t be afraid to add just a little more flour. However, as mentioned, don’t go overboard, or you risk ending up with dense, gummy beignets.
- Frying Temperature: To check if your oil is at the right temperature, you can drop a small piece of dough into the oil. If it immediately starts bubbling and rises to the surface, the oil is ready.
- Dough Proofing: If you don’t have 2 hours to wait for the dough to rise, you can place the dough in a warm oven (turned off, but with the light on) for a quicker rise.
Troubleshooting Common Mistakes
- Beignets not puffing up: This could be because the oil wasn’t hot enough. Make sure the oil reaches 350°F before frying. If the oil is too cold, the dough will sink and absorb too much oil, resulting in greasy beignets that won’t puff up.
- Over-flouring the dough: If you add too much flour to the dough, you may end up with beignets that are tough and dense. Be patient, and use flour sparingly to avoid this.
- Dough not rising: If your dough doesn’t rise after 2 hours, it could be due to old yeast or too cold of an environment. Ensure that the room temperature is warm enough, or let the dough rise in a slightly heated oven.
Serving Suggestions
These beignets are best enjoyed warm and fresh, just as they are. However, if you want to get creative, here are a few ideas to elevate your beignet experience:
- Dipping Sauces: Pair your beignets with a rich chocolate ganache or a vanilla cream dip for a little extra indulgence.
- Beverages: Serve these beignets alongside a hot cup of coffee or a rich café au lait to channel the vibe of New Orleans’ iconic cafés.
- Fruit and Cream: Top your beignets with a few fresh berries and a dollop of whipped cream for a light and refreshing twist.
Storing Leftovers
If you happen to have any leftover beignets (which is unlikely!), you can store them in an airtight container for up to 2 days. To reheat, simply place them in a warm oven for a few minutes to get that crispy exterior back. Avoid microwaving, as this can make them soggy.
Final Thoughts
Tiana’s beignets are the perfect treat for beginners and seasoned bakers alike. With their simple ingredients, straightforward steps, and the thrill of frying, this recipe will quickly become a favorite in your kitchen. Don’t be afraid to give it a try—whether you’re making them for yourself or sharing them with friends and family, these beignets are sure to bring joy and magic to any occasion. Share your experiences with us in the comments below, and let us know how your batch turned out!
Enjoy this delicious recipe, and happy cooking!