
If you’ve ever found yourself daydreaming about the deliciously sweet and spicy flavor of Biscoff cookies, then these Biscoff Dessert Cups are going to be your new favorite treat! I was introduced to Biscoff cookies a few years ago at a friend’s dinner party, where she served them alongside coffee. The unique caramelized flavor and satisfying crunch were unlike anything I had tasted before. Ever since that night, I’ve been obsessed with all things Biscoff, and these Biscoff Dessert Cups are the ultimate way to enjoy the flavors of these cookies in a fun, easy-to-make treat.


Biscoff Dessert Cups: A Sweet Treat for Cookie Butter Lovers
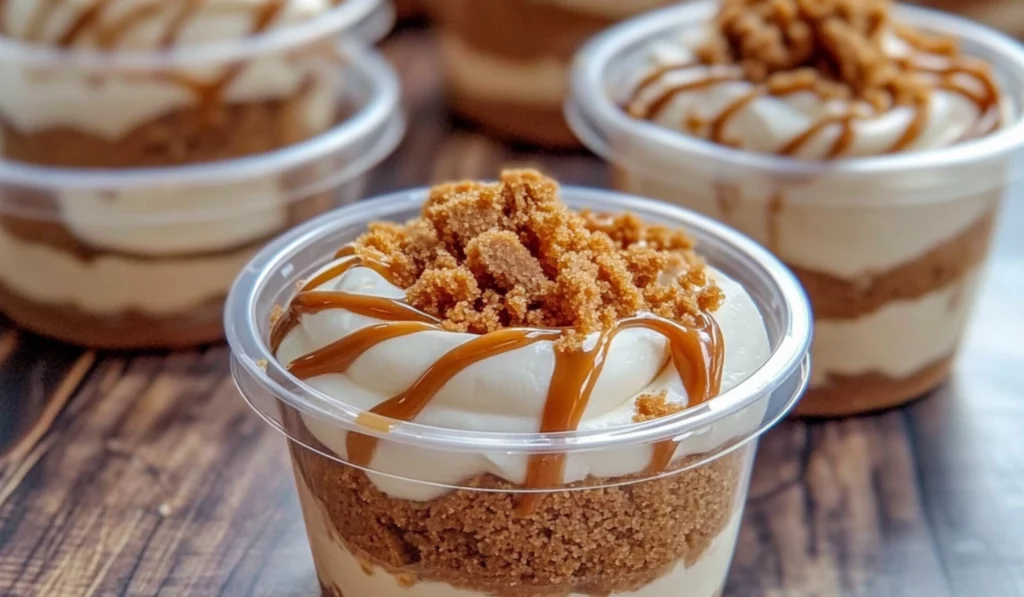
If you’re a fan of Biscoff cookies, these Biscoff Dessert Cups are about to become your new favorite treat! With a buttery cookie crust, creamy cookie butter cheesecake filling, and a drizzle of more Biscoff spread, this no-bake dessert is easy to make and packs all the flavor you love. Perfect for beginners, these individual cups are great for any occasion—whether you’re hosting or simply craving a sweet snack. Let’s get started!
- Total Time: 55 minutes
- Yield: 28 2-ounce cups 1x
Ingredients
Biscoff Cookie Crust:
- 2 cups Biscoff cookie crumbs (about 20 cookies)
- ¼ cup unsalted butter, melted
Cookie Butter Filling:
- 8 ounces cream cheese, room temperature
- ¾ cup granulated sugar
- 1 teaspoon vanilla extract
- ¾ cup Biscoff spread (cookie butter)
- 1 ½ cups heavy cream (chilled)
Toppings:
- 2 tablespoons Biscoff spread (cookie butter), melted slightly
- ¼ cup Biscoff cookie crumbs (for garnish)
Instructions
1. Prepare the Biscoff Cookie Crust:
Start by preparing the cookie crust. In a small bowl, combine the Biscoff cookie crumbs with the melted butter. Stir everything together until the mixture becomes moist and crumbly, and the crumbs hold together when pressed. If it feels too dry, simply add a bit more melted butter until the texture is just right.
2. Portion the Crust into Cups:
Now, you’ll portion the crumb mixture into 28 2-ounce plastic cups. To do this, you can use a small cookie scoop or a spoon. It’s best to press the crust firmly into each cup to create a solid base. Use the bottom of one of the cups to press down the crumbs to make sure they’re packed tightly. This will give you a sturdy crust that holds up when you add the creamy filling.
3. Prepare the Cookie Butter Filling:
Next, you’ll create the cheesecake filling. In a large mixing bowl, combine the cream cheese, granulated sugar, and vanilla extract. Use an electric hand mixer to beat everything together until it’s smooth and free of lumps. Add the Biscoff spread and continue mixing until fully combined. The filling should be velvety and thick, with a lovely caramel color from the Biscoff spread.
4. Whip the Heavy Cream:
Once the cream cheese mixture is smooth, it’s time to whip the heavy cream. Make sure the cream is chilled before whipping—it’ll whip up better. Use the electric mixer on medium-high speed to whip the cream until soft peaks form. You don’t want to over-whip it into stiff peaks, as this will make the filling too firm. Soft peaks will create a light, airy texture.
5. Fill the Cups:
Now, fill a piping bag with the cookie butter mixture. If you don’t have a piping bag, you can also use a plastic sandwich bag with the tip cut off. Pipe the filling into the cups until they’re about ¾ full. If you prefer, you can use a spoon to fill the cups, but piping will give a neater, more professional finish. Smooth out the tops for an even look.
6. Add the Topping:
In a microwave-safe bowl, melt the remaining Biscoff spread for about 10-15 seconds, just enough to make it pourable. Drizzle the melted Biscoff spread over the tops of the filled cups using a piping bag or a squeeze bottle. Be generous with the drizzle—it adds both flavor and a glossy finish. Then, sprinkle the tops of the cups with the remaining Biscoff cookie crumbs for a bit of crunch and extra flavor.
7. Chill the Dessert Cups:
After all the cups are filled and topped, place the lids on them and refrigerate for at least 2 to 3 hours, or overnight for the best results. The chilling process allows the flavors to meld together, and it helps the cheesecake filling firm up. If you’re in a rush, you can enjoy them after a few hours, but the texture and flavor will be best after longer chilling.
Notes
- Room Temperature Cream Cheese: Make sure your cream cheese is softened to room temperature before mixing it. Cold cream cheese can result in a lumpy filling, so give it 30 minutes out of the fridge before using it.
- Proper Whipping: When whipping the heavy cream, be sure not to over-whip it. If you whip it too long, it can turn into butter! Keep an eye on it and stop when soft peaks form.
- Crust Consistency: The crust should hold together well but not be too wet. If it’s too dry, add a little more melted butter; if it’s too wet, add a few more cookie crumbs until it reaches the right texture.
- Piping Tips: When piping the filling into the cups, it’s helpful to have the piping bag in a tall glass while you fill it. This keeps the bag open and prevents any spills.
- Prep Time: 45 minutes
- Cook Time: 10 minutes
- Category: Dessert
- Method: Mixing, Chilling, No-Bake
- Cuisine: American
- Diet: Vegetarian
These no-bake dessert cups feature a buttery Biscoff cookie crust, a creamy, dreamy cookie butter cheesecake filling, and a decadent drizzle of more Biscoff spread on top, making them irresistible to anyone with a sweet tooth. Whether you’re a seasoned baker or a beginner just starting out in the kitchen, this recipe is perfect for anyone looking for a simple yet impressive dessert.
Why This Recipe Is Perfect for Beginners
When I first started baking, I often gravitated toward no-bake desserts because they didn’t require any complicated techniques or time in the oven. These Biscoff Dessert Cups are no exception—they are easy to put together and require minimal equipment. No need to worry about complex mixing or timing your oven just right. The hardest part of the recipe is waiting for them to chill!
This dessert also offers some flexibility for substitutions, which is great for beginners who may not have all the exact ingredients on hand. It’s a great introduction to no-bake cheesecakes, and since the cups are individually portioned, they’re perfect for parties, gatherings, or meal prep. Most importantly, these Biscoff dessert cups are so delicious that no one will ever guess how simple they were to make!
Ingredients and Preparation
Here’s everything you’ll need to make your Biscoff Dessert Cups. Don’t worry, nothing on this list is complicated, and everything can be found at most grocery stores. If you’re missing one ingredient, there are easy substitutions available, which we’ll talk about in a moment.
Biscoff Cookie Crust:
- 2 cups Biscoff cookie crumbs (about 20 cookies)
- ¼ cup unsalted butter, melted
Cookie Butter Filling:
- 8 ounces cream cheese, room temperature
- ¾ cup granulated sugar
- 1 teaspoon vanilla extract
- ¾ cup Biscoff spread (cookie butter)
- 1 ½ cups heavy cream (chilled)
Toppings:
- 2 tablespoons Biscoff spread (cookie butter), melted slightly
- ¼ cup Biscoff cookie crumbs (for garnish)
Alternative Ingredient Suggestions:
- For the Crust: If you’re not a fan of Biscoff cookies, you can easily substitute with other cookies like graham crackers or even chocolate wafer cookies. You could also make the crust using gluten-free cookies if you need to make this recipe gluten-free.
- For the Filling: If you can’t find Biscoff spread (cookie butter), you could use Nutella or any other flavored spread that you like. However, the flavor profile of Biscoff is quite unique, so I recommend using cookie butter if possible to stay true to the recipe.
- For the Toppings: If you want to skip the melted Biscoff spread for a lighter option, you can drizzle with caramel or chocolate sauce for an extra twist. You can also add a sprinkle of chopped nuts, such as pecans or almonds, for added texture and flavor.
Step-by-Step Instructions
Making Biscoff Dessert Cups is a simple process, but breaking it down into easy-to-follow steps will ensure your dessert turns out perfectly. Here’s how you’ll make them:
1. Prepare the Biscoff Cookie Crust:
Start by preparing the cookie crust. In a small bowl, combine the Biscoff cookie crumbs with the melted butter. Stir everything together until the mixture becomes moist and crumbly, and the crumbs hold together when pressed. If it feels too dry, simply add a bit more melted butter until the texture is just right.
2. Portion the Crust into Cups:
Now, you’ll portion the crumb mixture into 28 2-ounce plastic cups. To do this, you can use a small cookie scoop or a spoon. It’s best to press the crust firmly into each cup to create a solid base. Use the bottom of one of the cups to press down the crumbs to make sure they’re packed tightly. This will give you a sturdy crust that holds up when you add the creamy filling.
3. Prepare the Cookie Butter Filling:
Next, you’ll create the cheesecake filling. In a large mixing bowl, combine the cream cheese, granulated sugar, and vanilla extract. Use an electric hand mixer to beat everything together until it’s smooth and free of lumps. Add the Biscoff spread and continue mixing until fully combined. The filling should be velvety and thick, with a lovely caramel color from the Biscoff spread.
4. Whip the Heavy Cream:
Once the cream cheese mixture is smooth, it’s time to whip the heavy cream. Make sure the cream is chilled before whipping—it’ll whip up better. Use the electric mixer on medium-high speed to whip the cream until soft peaks form. You don’t want to over-whip it into stiff peaks, as this will make the filling too firm. Soft peaks will create a light, airy texture.
5. Fill the Cups:
Now, fill a piping bag with the cookie butter mixture. If you don’t have a piping bag, you can also use a plastic sandwich bag with the tip cut off. Pipe the filling into the cups until they’re about ¾ full. If you prefer, you can use a spoon to fill the cups, but piping will give a neater, more professional finish. Smooth out the tops for an even look.
6. Add the Topping:
In a microwave-safe bowl, melt the remaining Biscoff spread for about 10-15 seconds, just enough to make it pourable. Drizzle the melted Biscoff spread over the tops of the filled cups using a piping bag or a squeeze bottle. Be generous with the drizzle—it adds both flavor and a glossy finish. Then, sprinkle the tops of the cups with the remaining Biscoff cookie crumbs for a bit of crunch and extra flavor.
7. Chill the Dessert Cups:
After all the cups are filled and topped, place the lids on them and refrigerate for at least 2 to 3 hours, or overnight for the best results. The chilling process allows the flavors to meld together, and it helps the cheesecake filling firm up. If you’re in a rush, you can enjoy them after a few hours, but the texture and flavor will be best after longer chilling.
Beginner Tips and Notes
Making these Biscoff Dessert Cups is easy, but there are a few tips that can help you perfect them:
- Room Temperature Cream Cheese: Make sure your cream cheese is softened to room temperature before mixing it. Cold cream cheese can result in a lumpy filling, so give it 30 minutes out of the fridge before using it.
- Proper Whipping: When whipping the heavy cream, be sure not to over-whip it. If you whip it too long, it can turn into butter! Keep an eye on it and stop when soft peaks form.
- Crust Consistency: The crust should hold together well but not be too wet. If it’s too dry, add a little more melted butter; if it’s too wet, add a few more cookie crumbs until it reaches the right texture.
- Piping Tips: When piping the filling into the cups, it’s helpful to have the piping bag in a tall glass while you fill it. This keeps the bag open and prevents any spills.
Serving Suggestions
These Biscoff Dessert Cups are sweet enough to be enjoyed on their own, but here are a few ideas for pairing them with other treats or beverages:
- For a Coffee Pairing: Biscoff cookies pair wonderfully with coffee, so serving these cups with a hot cup of coffee or espresso is a great idea. The warm drink will balance out the sweetness of the dessert.
- For a Dessert Spread: If you’re hosting a party or gathering, these Biscoff Dessert Cups would be the perfect addition to a dessert buffet. Pair them with other no-bake desserts like mini cheesecakes, mousse cups, or fruit tarts to create a variety of treats.
- For a Lighter Option: If you want to balance the richness of the dessert, serve them with fresh fruit such as berries or citrus slices. The tanginess of the fruit will cut through the sweetness of the Biscoff spread and provide a refreshing contrast.
Storage Tips for Leftovers
If you’re lucky enough to have any leftovers (although I doubt it!), these Biscoff Dessert Cups store well in the refrigerator. Simply cover them with their lids and keep them chilled for up to 2 to 3 days. The flavors continue to develop and meld as they sit, so they’ll taste just as good the next day, if not better!

Conclusion
Biscoff Dessert Cups are an indulgent, easy-to-make treat that’s perfect for any occasion. Whether you’re making them for a special event or just treating yourself, these cups are a guaranteed hit. With their creamy filling, crunchy Biscoff cookie crust, and drizzle of cookie butter on top, these dessert cups are a flavor-packed delight. So, gather your ingredients, follow the simple steps, and enjoy the sweet, spiced goodness of Biscoff in every bite!
We’d love to hear about how your Biscoff Dessert Cups turn out! Are you a cookie butter fan, or are you trying it for the first time? Don’t forget to share your thoughts and experiences in the comments below. If you have any tips of your own or if you experimented with different toppings or fillings, let us know! This community of dessert lovers is all about sharing ideas and inspiration.


