

Dessert is always a crowd-pleaser, and when it comes to a quick and delicious treat, the Cherry Delight recipe is hard to beat. With three simple layers—crunchy, creamy, and fruity—it brings together the best flavors in a straightforward, no-bake dessert that’s perfect for both beginners and seasoned home cooks. Whether you’re preparing for a family gathering, a holiday meal, or just a sweet craving, this dessert is a reliable choice that never fails to impress.

Cherry Delight Recipe: A Sweet and Easy Dessert for All Occasions
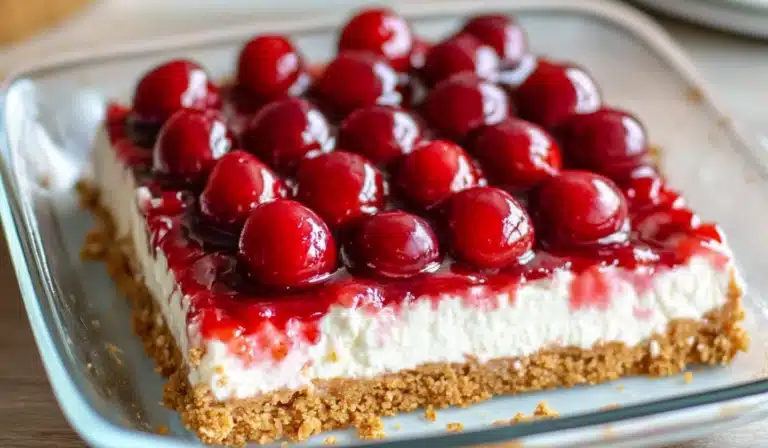
Got a craving for something sweet and easy? This Cherry Delight recipe is the answer! With three simple layers—graham cracker crust, creamy cheesecake filling, and a cherry topping—this dessert comes together in no time. Perfect for beginners, it’s a delicious, no-bake treat that’s sure to impress at any gathering. Let’s dive into this easy and irresistible dessert!
- Total Time: 4 hours 27 minutes (including refrigeration)
- Yield: 12 slices 1x
Ingredients
For the Crust:
- 2 1/2 cups graham cracker crumbs – The base of your dessert, bringing in that comforting, lightly sweet crunch.
- 1/4 cup granulated sugar – Adds sweetness to the graham cracker crust.
- 3/4 cup butter, melted – Holds the crust together and gives it a buttery richness.
For the Cheesecake Layer:
- 2 (8-ounce) blocks of cream cheese, softened – The creamy foundation of your dessert, providing richness and a tangy flavor.
- 1/4 cup sour cream – Adds tang and smoothness to the cheesecake mixture.
- 1 (8-ounce) tub Cool Whip, thawed overnight in the fridge – This gives the cheesecake layer a light and airy texture.
- 1 cup confectioner’s sugar – Sweetens the cheesecake layer and balances the tangy flavors.
- 2 teaspoons vanilla extract – Enhances the sweetness and depth of the cheesecake flavor.
For the Topping:
- 1 (21-ounce) can cherry pie filling – The crowning jewel of this dessert! This layer adds that tart-sweet pop of flavor and a vibrant, colorful topping.
Instructions
Step 1: Preparing the Crust
-
- Preheat your oven to 350°F (177ºC). While the oven heats up, spray a 9×13-inch baking dish with nonstick cooking spray and set it aside. This will prevent the crust from sticking and make cleanup a breeze.
-
- In a large mixing bowl, combine graham cracker crumbs (2 1/2 cups), melted butter (3/4 cup), and granulated sugar (1/4 cup). Stir well until everything is evenly mixed.
-
- Press the mixture into the bottom of your prepared baking dish. Make sure to press it down firmly, as this will create the base for your dessert.
-
- Bake the crust in the preheated oven for 12-14 minutes until the edges are golden and slightly crispy. Remove it from the oven and let it cool completely on a wire rack. This step is important to ensure that the crust holds its shape when you add the creamy layers.
Step 2: Making the Cheesecake Layer
-
- In a large bowl, beat together the cream cheese (2 blocks) and sour cream (1/4 cup) with an electric mixer until smooth and creamy. Make sure both ingredients are well incorporated to avoid any lumps.
-
- Add the confectioner’s sugar (1 cup) and vanilla extract (2 teaspoons). Beat the mixture for another 2 minutes until it becomes light and fluffy.
-
- Next, gently fold in the Cool Whip (1 tub) until well combined. Be careful not to overmix, as the Cool Whip gives this layer its airy texture, and overmixing can deflate it.
Step 3: Assembling the Layers
-
- Once the crust has cooled completely, spread the cream cheese mixture evenly over the crust. Use a spatula to smooth it out so that it covers the entire surface.
-
- Place the baking dish in the refrigerator and allow it to chill for a minimum of 4 hours, but if possible, let it set overnight for the best results. The cooling time helps the layers firm up, making it easier to cut into squares when serving.
Step 4: Adding the Topping
-
- Just before serving, spread the cherry pie filling (1 can) over the top of the cheesecake layer. You can spread it evenly, or for a more decorative look, leave it slightly uneven for a rustic touch.
-
- Once topped with cherries, cut into squares and serve. These individual servings are perfect for parties or family gatherings, making them a great choice for any occasion.
Notes
- What if the cheesecake layer seems too soft after chilling? If your cheesecake layer feels too soft or runny, it may need more time to chill. Let it sit in the refrigerator for an additional couple of hours to allow the filling to firm up. You can also place the dessert in the freezer for a short time (about 30 minutes) if you need to speed up the setting process.
- How do I avoid a soggy crust? Make sure the crust has cooled completely before adding the cheesecake layer. This will help maintain its firmness and prevent the crust from getting soggy. Additionally, if you want to ensure extra crispness, you can bake the crust a bit longer until it’s golden brown.
- What if I don’t have Cool Whip? If you don’t have Cool Whip or prefer a healthier option, you can substitute it with homemade whipped cream. Simply whip 1 cup of heavy cream with 2 tablespoons of powdered sugar until stiff peaks form. You can also use Greek yogurt for a tangier flavor and thicker consistency.
- Can I use a different fruit topping? While cherry pie filling is traditional, feel free to experiment with other fruit toppings. Blueberries, raspberries, or even a combination of fruits can add a fresh twist to this dessert. If you want to make your own fruit compote, you can simmer fresh fruit with sugar until it thickens and spoon it over the cheesecake layer for a more personalized topping.
- Prep Time: 15 minutes
- Cook Time: 12 minutes
- Category: Dessert
- Method: : No-bake, Refrigerated
- Cuisine: American
- Diet: Vegetarian
Why This Recipe Is Perfect for Beginners
The Cherry Delight recipe is the ultimate beginner-friendly dessert, combining ease of preparation with minimal cooking time. Thanks to store-bought ingredients like graham crackers, Cool Whip, and cherry pie filling, the recipe saves both time and effort, making it an ideal option for those new to baking or anyone looking to whip up something quick. With only a few simple steps, you’ll be able to create a stunning dessert that’s sure to impress your guests. Plus, the balance of tangy cream cheese and sweet cherries offers a refreshing treat that everyone can enjoy. Best of all, it requires no fancy baking techniques, so there’s no need to worry about perfecting complex skills.
The great thing about Cherry Delight is that it’s a treat you can customize. The graham cracker crust is firm and buttery, providing a satisfying crunch that pairs beautifully with the smooth, fluffy cheesecake filling and the sweet cherry topping. It’s a dessert that combines textures and flavors in a way that’s truly irresistible. This simple, layered dessert is ideal for beginners and an excellent way to introduce yourself to making delicious treats without a lot of fuss.
Ingredients and Preparation
Let’s dive into the ingredients for the Cherry Delight recipe. The best part? You likely have most of these items in your pantry already! Here’s what you’ll need:
For the Crust:
- 2 1/2 cups graham cracker crumbs – The base of your dessert, bringing in that comforting, lightly sweet crunch.
- 1/4 cup granulated sugar – Adds sweetness to the graham cracker crust.
- 3/4 cup butter, melted – Holds the crust together and gives it a buttery richness.
For the Cheesecake Layer:
- 2 (8-ounce) blocks of cream cheese, softened – The creamy foundation of your dessert, providing richness and a tangy flavor.
- 1/4 cup sour cream – Adds tang and smoothness to the cheesecake mixture.
- 1 (8-ounce) tub Cool Whip, thawed overnight in the fridge – This gives the cheesecake layer a light and airy texture.
- 1 cup confectioner’s sugar – Sweetens the cheesecake layer and balances the tangy flavors.
- 2 teaspoons vanilla extract – Enhances the sweetness and depth of the cheesecake flavor.
For the Topping:
- 1 (21-ounce) can cherry pie filling – The crowning jewel of this dessert! This layer adds that tart-sweet pop of flavor and a vibrant, colorful topping.
Step-by-Step Instructions
Now that we’ve got all the ingredients ready, let’s break down the steps to create this mouthwatering dessert. Don’t worry, this recipe is super simple and forgiving, making it ideal for beginner cooks.
Step 1: Preparing the Crust
- Preheat your oven to 350°F (177ºC). While the oven heats up, spray a 9×13-inch baking dish with nonstick cooking spray and set it aside. This will prevent the crust from sticking and make cleanup a breeze.
- In a large mixing bowl, combine graham cracker crumbs (2 1/2 cups), melted butter (3/4 cup), and granulated sugar (1/4 cup). Stir well until everything is evenly mixed.
- Press the mixture into the bottom of your prepared baking dish. Make sure to press it down firmly, as this will create the base for your dessert.
- Bake the crust in the preheated oven for 12-14 minutes until the edges are golden and slightly crispy. Remove it from the oven and let it cool completely on a wire rack. This step is important to ensure that the crust holds its shape when you add the creamy layers.
Step 2: Making the Cheesecake Layer
- In a large bowl, beat together the cream cheese (2 blocks) and sour cream (1/4 cup) with an electric mixer until smooth and creamy. Make sure both ingredients are well incorporated to avoid any lumps.
- Add the confectioner’s sugar (1 cup) and vanilla extract (2 teaspoons). Beat the mixture for another 2 minutes until it becomes light and fluffy.
- Next, gently fold in the Cool Whip (1 tub) until well combined. Be careful not to overmix, as the Cool Whip gives this layer its airy texture, and overmixing can deflate it.
Step 3: Assembling the Layers
- Once the crust has cooled completely, spread the cream cheese mixture evenly over the crust. Use a spatula to smooth it out so that it covers the entire surface.
- Place the baking dish in the refrigerator and allow it to chill for a minimum of 4 hours, but if possible, let it set overnight for the best results. The cooling time helps the layers firm up, making it easier to cut into squares when serving.
Step 4: Adding the Topping
- Just before serving, spread the cherry pie filling (1 can) over the top of the cheesecake layer. You can spread it evenly, or for a more decorative look, leave it slightly uneven for a rustic touch.
- Once topped with cherries, cut into squares and serve. These individual servings are perfect for parties or family gatherings, making them a great choice for any occasion.
Beginner Tips and Notes
- What if the cheesecake layer seems too soft after chilling? If your cheesecake layer feels too soft or runny, it may need more time to chill. Let it sit in the refrigerator for an additional couple of hours to allow the filling to firm up. You can also place the dessert in the freezer for a short time (about 30 minutes) if you need to speed up the setting process.
- How do I avoid a soggy crust? Make sure the crust has cooled completely before adding the cheesecake layer. This will help maintain its firmness and prevent the crust from getting soggy. Additionally, if you want to ensure extra crispness, you can bake the crust a bit longer until it’s golden brown.
- What if I don’t have Cool Whip? If you don’t have Cool Whip or prefer a healthier option, you can substitute it with homemade whipped cream. Simply whip 1 cup of heavy cream with 2 tablespoons of powdered sugar until stiff peaks form. You can also use Greek yogurt for a tangier flavor and thicker consistency.
- Can I use a different fruit topping? While cherry pie filling is traditional, feel free to experiment with other fruit toppings. Blueberries, raspberries, or even a combination of fruits can add a fresh twist to this dessert. If you want to make your own fruit compote, you can simmer fresh fruit with sugar until it thickens and spoon it over the cheesecake layer for a more personalized topping.
Serving Suggestions
This Cherry Delight recipe is an indulgent treat that pairs beautifully with a variety of sides. If you’re serving it for a special occasion, here are a few serving suggestions to make the meal even more memorable:
- Whipped Cream: Add a dollop of freshly whipped cream on top for an extra creamy touch. You can even sprinkle some crushed graham crackers on top of the whipped cream for added texture.
- Vanilla Ice Cream: Serve this dessert alongside a scoop of vanilla ice cream for an indulgent dessert duo. The cool creaminess of the ice cream complements the richness of the cheesecake layer and the tartness of the cherries.
- Coffee or Iced Tea: Pair this treat with a warm cup of coffee or a refreshing iced tea for a delightful dessert experience. The sweetness of the Cherry Delight balances nicely with a cup of coffee, making it the perfect end to a meal.
Storage Tips
- Leftovers: Store any leftover Cherry Delight in an airtight container in the refrigerator. It should stay fresh for up to 3-4 days. If you plan to store leftovers, it’s best to wait to add the cherry pie filling until just before serving, as it can make the crust soggy if left on for too long.
- Freezing: If you want to make this dessert ahead of time, you can freeze it. Simply cover it tightly with plastic wrap and aluminum foil and freeze for up to 1 month. When ready to serve, let it thaw in the refrigerator overnight before topping with the cherry pie filling. This dessert freezes well, so you can prepare it in advance for a future event.
Variations on the Classic Cherry Delight
The beauty of this Cherry Delight recipe lies in its simplicity and versatility. While the traditional version with graham cracker crust, cream cheese filling, and cherry topping is a classic, there are plenty of variations you can try to make this dessert your own.
- Different Fruit Toppings: Swap out the cherry pie filling for another fruit topping. Blueberry, strawberry, or raspberry pie filling all work beautifully in this recipe. You could also use fresh fruit, but keep in mind that the fresh fruit may release some moisture and affect the texture of the dessert.
- Nut Crust: Instead of using graham cracker crumbs for the crust, you can try using crushed nuts such as pecans, walnuts, or almonds for a more decadent twist. This adds a rich, nutty flavor to the dessert and creates a delicious contrast with the creamy cheesecake layer.
- Chocolate Cherry Delight: For a chocolate twist, sprinkle mini chocolate chips or melted chocolate over the cheesecake layer before refrigerating it. The rich chocolate flavor complements the cherries perfectly.
- Mini Cherry Delights: Instead of making a large batch in a 9×13-inch baking dish, you can create individual servings in small cups or jars. This is perfect for parties, as everyone gets their own portion. Simply layer the graham cracker crumbs, cheesecake filling, and cherry topping into small cups and refrigerate as usual.

Conclusion
This Cherry Delight recipe is a simple yet irresistible dessert that combines the best of both worlds—creamy cheesecake, a buttery graham cracker crust, and sweet, tart cherries. Its easy preparation and make-ahead nature make it an ideal option for beginner cooks or anyone looking for a fuss-free yet impressive treat. Whether you’re serving it at a family gathering or just craving something sweet, this dessert is sure to become a favorite. The layers of flavor and texture create a delightful experience that will have your guests coming back for more. Give this recipe a try and let us know how it turns out in the comments below. Enjoy every bite!


