
When it comes to impressing your friends or family with a show-stopping dessert, few recipes deliver as much impact as vanilla panna cotta. It’s creamy, smooth, and elegant—and you’d be surprised at how easy it is to make. This classic Italian dessert is perfect for beginners because it requires minimal effort, yet the results are undeniably impressive. As a kid, I remember the first time I tasted panna cotta at a quaint Italian restaurant. The velvety texture and delicate vanilla flavor left me craving more, and since then, it’s become my go-to dessert for special occasions and dinner parties. What’s even better is that panna cotta is a fantastic make-ahead dessert, which means you can prepare it the day before and have it ready to serve whenever you need it. This recipe is straightforward and foolproof, making it ideal for beginner cooks who want to create a beautiful, delicious dessert without feeling overwhelmed. Whether you’re hosting a dinner party or just want to treat yourself, this vanilla panna cotta is sure to impress. The best part? With just a few simple ingredients and only 10 minutes of active prep time, you’ll have a stunning dessert that will leave everyone asking for the recipe.


How to Make Vanilla Panna Cotta: A Beginner’s Guide to This Elegant Italian Dessert
Vanilla panna cotta is a simple yet elegant dessert that’s perfect for beginners. With just a few ingredients and minimal effort, you can create a smooth, creamy treat that looks impressive and tastes amazing. I first made panna cotta for a family gathering and was amazed by how quickly it came together—and how everyone loved it. This easy-to-follow recipe will have you making a restaurant-worthy dessert in no time, and it’s sure to become a favorite in your kitchen!
- Total Time: 4 hours 10 minutes (includes chilling time)
- Yield: 6 servings 1x
Ingredients
- 1 ½ cups plus 1 tablespoon heavy cream (375ml)
- 1 cup plus 1 tablespoon whole milk (250ml)
- ½ cup caster sugar (95g) (or granulated sugar as an alternative)
- 4 teaspoons gelatin powder (12g sachet)
- 3 teaspoons vanilla paste or 1 vanilla bean (for that authentic vanilla flavor)
Instructions
- Heat the Dairy Mixture: In a medium saucepan, combine the heavy cream, whole milk, and vanilla. Place the pan over medium heat and bring the mixture to a boil. Keep a close eye on it because dairy can quickly boil over. Once it begins to bubble around the edges, turn off the heat immediately. This is the moment when you want to add the sugar, so be prepared. If the milk boils over, it can cause the panna cotta mixture to separate, so it’s essential to stay vigilant during this step.
- Add the Sugar: Stir in the caster sugar and continue stirring until it has completely dissolved into the milk and cream mixture. This will create a smooth, sweet base for your panna cotta. The sugar should dissolve quickly, so make sure to stir for a couple of minutes to avoid any gritty texture. At this stage, you can taste the mixture and adjust the sweetness, adding a bit more sugar if you prefer a sweeter panna cotta.
- Add the Gelatin: Sprinkle the gelatin powder into the warm mixture while whisking constantly. It’s important to add the gelatin slowly and whisk quickly to prevent any lumps from forming. The gelatin should dissolve completely into the hot liquid, so make sure to stir for a minute or so to ensure there are no undissolved bits. If you’re using gelatin sheets instead of powder, bloom them in a bit of cold water for a few minutes before adding them to the warm milk mixture. Gelatin helps the panna cotta set and gives it that silky, delicate texture that is so iconic.
- Cool the Mixture: After the gelatin has fully dissolved, pour the panna cotta mixture into individual ramekins or moulds. These can be anything from small ceramic cups to silicone moulds—just make sure they are suitable for chilling. Allow the panna cotta to cool at room temperature for about 30 minutes before transferring them to the refrigerator. Cooling the mixture for a bit helps prevent condensation from forming on the surface, ensuring a smoother finish once set.
- Refrigerate: Allow the panna cotta to set in the fridge for at least 4–6 hours, or overnight if you have the time. The longer you leave them to chill, the firmer the texture will be, which is ideal for unmoulding later. You’ll notice that the panna cotta becomes beautifully thick and creamy as it sets in the fridge. If you’re in a rush and need to serve it sooner, 4 hours will usually suffice, but for the best results, I recommend leaving them overnight. The slow chilling process allows the gelatin to work its magic, and the panna cotta will have the perfect texture when you serve it.
Notes
- Preventing Lumps in the Gelatin: One of the most common mistakes beginners make is adding gelatin to hot liquid too quickly. Always sprinkle the gelatin powder slowly and whisk vigorously to prevent clumps. It’s also important to make sure the gelatin fully dissolves in the warm liquid, as undissolved gelatin will lead to a lumpy texture.
- What to Do If the Milk Forms a Skin: Sometimes, the milk can form a skin on top of the panna cotta mixture before you refrigerate it. If this happens, simply use a spoon to skim it off before chilling. This is optional, as the skin doesn’t affect the final texture, but it can be a little unsightly. If you don’t mind the skin, you can leave it and simply stir it into the mixture before pouring it into the ramekins.
- How to Tell if Panna Cotta Has Set Properly: After the panna cotta has chilled for a few hours, check its consistency by gently nudging the side of one of the ramekins. The panna cotta should jiggle like a soft custard but remain firm enough to hold its shape. If it seems too runny, let it chill a little longer. If it sets too firm, you can easily fix that by warming the mixture gently and adding a little more milk or cream to loosen it.
- Gelatin Troubleshooting: If your panna cotta doesn’t set after chilling, it may be that the gelatin wasn’t properly dissolved. In this case, simply return the mixture to the stove (on low heat) and stir until the gelatin dissolves completely, then pour it into the ramekins again to chill. If the gelatin is still giving you trouble, it could be that the temperature of the milk mixture wasn’t hot enough when you added the gelatin, so be sure the mixture is steaming hot, but not boiling, when you incorporate the gelatin.
- Prep Time: 10 minutes
- Cook Time: 5 minutes
- Category: Dessert
- Method: Stove Top, Chilling
- Cuisine: Italian
- Diet: Vegetarian
Ingredients and Preparation
To make this creamy vanilla panna cotta, you’ll need a few key ingredients. Don’t worry about tracking down anything exotic—most of these items are pantry staples that you can find at your local grocery store. Here’s what you’ll need:
- 1 ½ cups plus 1 tablespoon heavy cream (375ml)
- 1 cup plus 1 tablespoon whole milk (250ml)
- ½ cup caster sugar (95g) (or granulated sugar as an alternative)
- 4 teaspoons gelatin powder (12g sachet)
- 3 teaspoons vanilla paste or 1 vanilla bean (for that authentic vanilla flavor)
If you can’t find vanilla paste, using vanilla extract is perfectly fine, though the paste tends to give a richer, more concentrated flavor and the beautiful specks of vanilla seeds that make the dessert visually striking. Gelatin is the essential ingredient that helps the panna cotta set, but don’t worry—using gelatin powder is easy and reliable. If you have trouble finding it, you can substitute gelatin sheets, though you’ll need to adjust the quantity according to the package instructions. The sugar helps to sweeten the panna cotta, and while caster sugar works best for its fine texture, you can use granulated sugar in a pinch. If you’re trying to reduce your sugar intake, feel free to substitute with a natural sweetener like honey or maple syrup, but keep in mind that this might slightly alter the texture of your panna cotta. As for the cream and milk, using full-fat versions is key to achieving that luxurious, rich consistency that panna cotta is known for. However, if you’re looking for a lighter version, you can try swapping the cream for half-and-half or a lower-fat option, though it may affect the creamy texture slightly.
Step-by-Step Instructions
Making panna cotta is easier than it sounds, and with these step-by-step instructions, you’ll be able to create a smooth and creamy dessert every time. Let’s dive into the process:
- Heat the Dairy Mixture: In a medium saucepan, combine the heavy cream, whole milk, and vanilla. Place the pan over medium heat and bring the mixture to a boil. Keep a close eye on it because dairy can quickly boil over. Once it begins to bubble around the edges, turn off the heat immediately. This is the moment when you want to add the sugar, so be prepared. If the milk boils over, it can cause the panna cotta mixture to separate, so it’s essential to stay vigilant during this step.
- Add the Sugar: Stir in the caster sugar and continue stirring until it has completely dissolved into the milk and cream mixture. This will create a smooth, sweet base for your panna cotta. The sugar should dissolve quickly, so make sure to stir for a couple of minutes to avoid any gritty texture. At this stage, you can taste the mixture and adjust the sweetness, adding a bit more sugar if you prefer a sweeter panna cotta.
- Add the Gelatin: Sprinkle the gelatin powder into the warm mixture while whisking constantly. It’s important to add the gelatin slowly and whisk quickly to prevent any lumps from forming. The gelatin should dissolve completely into the hot liquid, so make sure to stir for a minute or so to ensure there are no undissolved bits. If you’re using gelatin sheets instead of powder, bloom them in a bit of cold water for a few minutes before adding them to the warm milk mixture. Gelatin helps the panna cotta set and gives it that silky, delicate texture that is so iconic.
- Cool the Mixture: After the gelatin has fully dissolved, pour the panna cotta mixture into individual ramekins or moulds. These can be anything from small ceramic cups to silicone moulds—just make sure they are suitable for chilling. Allow the panna cotta to cool at room temperature for about 30 minutes before transferring them to the refrigerator. Cooling the mixture for a bit helps prevent condensation from forming on the surface, ensuring a smoother finish once set.
- Refrigerate: Allow the panna cotta to set in the fridge for at least 4–6 hours, or overnight if you have the time. The longer you leave them to chill, the firmer the texture will be, which is ideal for unmoulding later. You’ll notice that the panna cotta becomes beautifully thick and creamy as it sets in the fridge. If you’re in a rush and need to serve it sooner, 4 hours will usually suffice, but for the best results, I recommend leaving them overnight. The slow chilling process allows the gelatin to work its magic, and the panna cotta will have the perfect texture when you serve it.
Beginner Tips and Notes
Making panna cotta is a simple process, but there are a few tips and troubleshooting tricks that can help ensure your dessert turns out perfectly every time:
- Preventing Lumps in the Gelatin: One of the most common mistakes beginners make is adding gelatin to hot liquid too quickly. Always sprinkle the gelatin powder slowly and whisk vigorously to prevent clumps. It’s also important to make sure the gelatin fully dissolves in the warm liquid, as undissolved gelatin will lead to a lumpy texture.
- What to Do If the Milk Forms a Skin: Sometimes, the milk can form a skin on top of the panna cotta mixture before you refrigerate it. If this happens, simply use a spoon to skim it off before chilling. This is optional, as the skin doesn’t affect the final texture, but it can be a little unsightly. If you don’t mind the skin, you can leave it and simply stir it into the mixture before pouring it into the ramekins.
- How to Tell if Panna Cotta Has Set Properly: After the panna cotta has chilled for a few hours, check its consistency by gently nudging the side of one of the ramekins. The panna cotta should jiggle like a soft custard but remain firm enough to hold its shape. If it seems too runny, let it chill a little longer. If it sets too firm, you can easily fix that by warming the mixture gently and adding a little more milk or cream to loosen it.
- Gelatin Troubleshooting: If your panna cotta doesn’t set after chilling, it may be that the gelatin wasn’t properly dissolved. In this case, simply return the mixture to the stove (on low heat) and stir until the gelatin dissolves completely, then pour it into the ramekins again to chill. If the gelatin is still giving you trouble, it could be that the temperature of the milk mixture wasn’t hot enough when you added the gelatin, so be sure the mixture is steaming hot, but not boiling, when you incorporate the gelatin.
How to Remove Panna Cotta from Moulds
One of the most impressive aspects of panna cotta is its ability to be unmoulded and served as a beautiful, wobbly dessert. If you’re wondering how to get your panna cotta out of its moulds without making a mess, follow these steps:
- Warm Water: Fill a bowl with hot (but not boiling) water. This helps to loosen the panna cotta from the sides of the ramekin or mould, making it easier to release.
- Dip the Moulds: Take each panna cotta and dip the bottom of the ramekin or mould into the hot water for about 10–15 seconds. The heat will loosen the panna cotta from the sides of the mould, making it easier to flip out.
- Invert the Moulds: Place a serving plate over the top of the mould, then carefully flip it over. Gently lift the mould off, and your panna cotta should slide right out. If it sticks, gently tap the sides of the mould to help release it. If you’re having trouble, dipping the mould in hot water for a few extra seconds can help, but be cautious not to submerge it for too long. You don’t want to melt the panna cotta!
Serving Suggestions
Vanilla panna cotta is incredibly versatile, and there are plenty of ways to serve it to elevate the flavor and presentation:
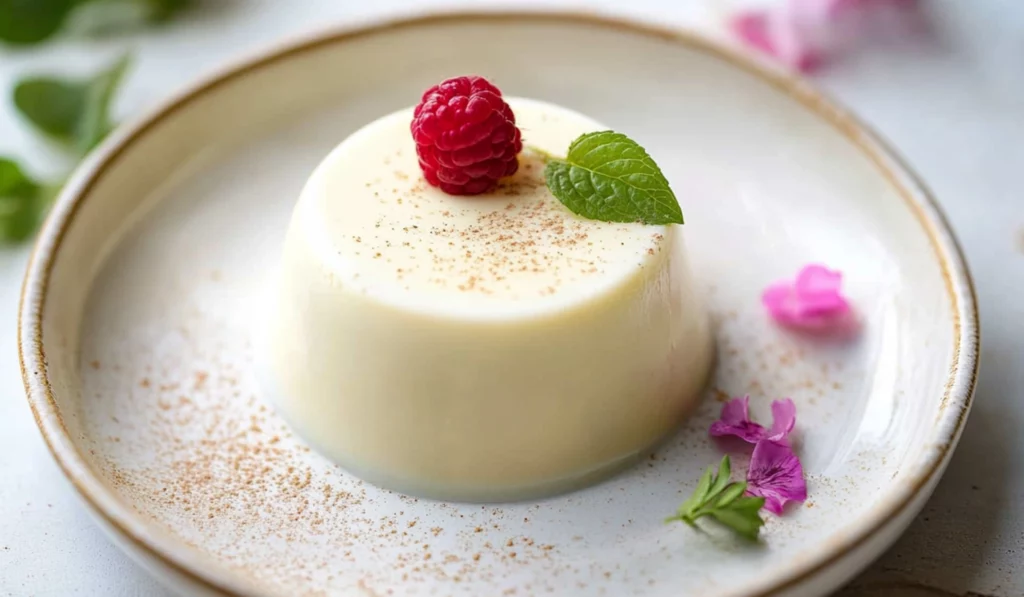
- Fresh Berries: A handful of fresh raspberries, blueberries, or strawberries is the perfect complement to the creamy panna cotta. The tartness of the berries balances the sweetness of the dessert. You can also toss the berries with a little sugar to create a simple fruit compote, which will add extra flavor to the dish.
- Fruit Coulis: A drizzle of berry or citrus coulis (pureed fruit) can add an extra layer of flavor and make the dish even more visually appealing. You can easily make a berry coulis by blending fresh or frozen berries with a bit of sugar and lemon juice, then straining the mixture to remove the seeds.
- Caramel Sauce: For a richer dessert, drizzle warm caramel sauce over the panna cotta before serving. The deep, buttery flavor of caramel pairs beautifully with the vanilla, and the slight bitterness balances the sweetness of the panna cotta.
- Chopped Nuts: For a bit of crunch, try topping your panna cotta with crushed pistachios or almonds. Their slightly salty taste pairs beautifully with the creamy sweetness of the panna cotta.
- Chocolate Shavings: If you’re a chocolate lover, shave some dark chocolate over the top of your panna cotta for a decadent finish. Dark chocolate complements the richness of the panna cotta without overpowering the delicate flavor.
Storage Tips
Panna cotta can be made up to two days ahead of time. Simply cover the ramekins with plastic wrap and store them in the fridge. If you have leftovers, keep them chilled and enjoy them within 3–4 days. The panna cotta can also be stored in the fridge for up to a week, but it’s best when consumed within a few days to ensure the best texture and flavor.

Conclusion: A Simple, Elegant Dessert for All
Vanilla panna cotta is the perfect beginner-friendly dessert that combines simplicity with elegance. It’s a versatile treat that’s as easy to make as it is impressive to serve. Whether you’re hosting a dinner party or enjoying a quiet evening at home, this creamy dessert is sure to be a crowd-pleaser. And the best part? It’s make-ahead, so you can focus on enjoying the moment instead of spending your time in the kitchen. I hope you feel inspired to give this recipe a try! If you do, I’d love to hear about your experience. Did you try any fun variations or top it with a unique garnish? Share your thoughts and photos in the comments below, and let’s keep the conversation going! Happy cooking!


