I remember the first time I made banana pudding. It was for a summer barbecue, and I wanted to bring something classic and comforting. I stumbled upon the Magnolia Bakery recipe, and I was immediately drawn to its simplicity. The result was a creamy, dreamy dessert that was a hit with everyone. This Magnolia Bakery Banana Pudding recipe is perfect for beginner cooks. It requires no baking, minimal preparation, and uses readily available ingredients. It’s a guaranteed crowd-pleaser and a delightful treat for any occasion. If you’re looking for an easy, indulgent, and classic dessert, this banana pudding is your perfect solution. It offers a delightful balance of creamy, sweet, and crunchy textures, making it a perfect treat for any gathering. It’s a fantastic addition to your repertoire of quick and healthy meals, especially when you’re looking for a sweet treat that’s easy to prepare.


Magnolia Bakery Banana Pudding: A No-Bake Delight for All
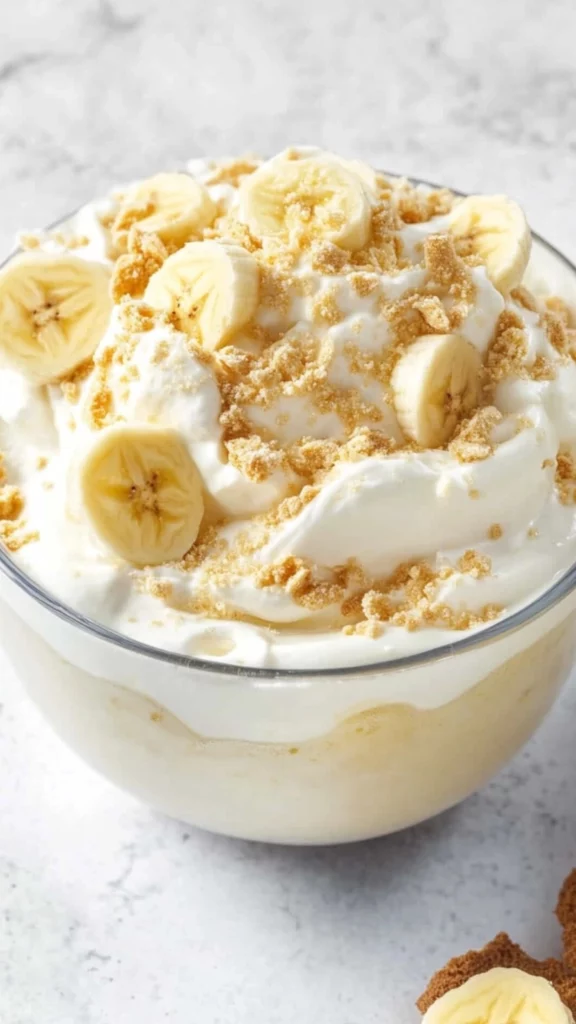
Magnolia Bakery Banana Pudding is a classic no-bake dessert with creamy vanilla pudding, Nilla Wafers, and fresh bananas. It’s a simple and delicious treat perfect for beginner cooks.
- Total Time: 4 hours 20 minutes (including chilling)
- Yield: 12 servings 1x
Ingredients
- 1 14-ounce can sweetened condensed milk
- 1 ¼ cups ice-cold water
- 1 3.4-ounce box instant vanilla pudding mix
- 3 cups heavy whipping cream
- 1 12-ounce box Nilla Wafers
- 4 cups sliced bananas
Instructions
-
Prepare the Pudding Base: Add sweetened condensed milk, ice-cold water, and instant vanilla pudding mix to a medium-sized bowl. Whisk or mix with a hand mixer until combined, about 2 minutes. Mixing ensures a smooth and lump-free pudding base.
-
Chill the Pudding: Cover the bowl and chill for 3-4 hours or overnight. You want the pudding to set properly. Chilling allows the pudding to thicken and set, creating the right consistency.
-
Whip the Cream: In a large bowl, beat heavy whipping cream until stiff peaks form. You can use a hand or a stand mixer. Whipping until stiff peaks creates a light and airy cream that will fold easily into the pudding.
-
Fold in the Cream: Gently fold the whipped cream into the chilled pudding mixture. Folding gently prevents deflating the cream, ensuring a light and fluffy pudding.
-
Assemble the Pudding: In a large, wide-bottomed bowl, place 1/3 of the Nilla Wafers on the bottom. Layer 1/3 of the sliced bananas over the wafers. Top with 1/3 of the pudding mixture. Layering creates the classic banana pudding texture and ensures even distribution of ingredients.
-
Repeat Layers: Repeat the layers twice more, using the remaining wafers, bananas, and pudding. Repeating layers ensures even distribution of ingredients and a consistent texture throughout the pudding.
-
Garnish: Garnish the top with wafer crumbs for a decorative touch. Garnish adds visual appeal and a final touch of crunch.
-
Chill: Wrap the bowl tightly with plastic wrap and chill for at least 4 hours before serving. You can chill up to 8 hours, but it’s not recommended to chill it longer than that. Chilling allows the flavors to meld and the pudding to set completely.
-
Serve and Enjoy: Serve the chilled banana pudding and enjoy the creamy, sweet, and crunchy treat.
Notes
- Chill pudding thoroughly for best consistency.
- Fold whipped cream gently to maintain lightness.
- Assemble shortly before serving to prevent soggy wafers.
- Use ripe but firm bananas for optimal texture.
- Prep Time: 20 minutes
- Cook Time: 0 minutes
- Category: Dessert
- Method: Mixing, Assembling, Chilling
- Cuisine: American
Ingredients and Preparation: Your Banana Pudding Blueprint – The Essentials
This Magnolia Bakery Banana Pudding is wonderfully simple, but the quality of the ingredients matters. Remember, the key to stress-free dessert making is having all your ingredients and tools ready before you start assembling. This mise en place approach makes the process smooth and enjoyable. It also prevents you from forgetting a crucial ingredient mid-assembly.
The Creamy Base: The Heart of the Pudding – The Foundation of Flavor:
- 1 14-ounce can sweetened condensed milk – Provides sweetness and creaminess. Alternatives: You can use a low-sugar condensed milk for a slightly less sweet version. Sweetened condensed milk gives the pudding its signature richness.
- 1 ¼ cups ice-cold water (297ml) – Dilutes the condensed milk and creates the pudding base. Alternatives: You can use milk for a richer flavor, but water keeps it light and airy. Ice cold water helps the pudding set quickly.
- 1 3.4-ounce box instant vanilla pudding mix – Provides the vanilla flavor and thickening agent. Alternatives: You can use banana cream pudding mix for an extra banana boost. Instant pudding mix simplifies the process.
The Airy Layer: The Light and Fluffy Cream – The Cloud-Like Texture:
- 3 cups heavy whipping cream (704ml) – Adds richness and volume. Alternatives: You can use a non-dairy whipped topping for a lighter option. Heavy whipping cream gives the pudding a light and airy texture.
The Textural Elements: The Crunchy and Fruity Additions – The Perfect Contrast:
- 1 12-ounce box Nilla Wafers – Provides a crunchy texture. Alternatives: You can use other vanilla cookies, shortbread, or even graham crackers. Nilla Wafers are the classic choice for this recipe.
- 4 cups sliced bananas (about 5-6 bananas) – Adds sweetness and fruitiness. Alternatives: You can use other fruits like strawberries or blueberries, but bananas are traditional. Ripe bananas add a natural sweetness.
Step-by-Step Instructions: Your Guide to Banana Pudding Perfection – Easy and Clear
- Prepare the Pudding Base: Add sweetened condensed milk, ice-cold water, and instant vanilla pudding mix to a medium-sized bowl. Whisk or mix with a hand mixer until combined, about 2 minutes. Mixing ensures a smooth and lump-free pudding base.
- Chill the Pudding: Cover the bowl and chill for 3-4 hours or overnight. You want the pudding to set properly. Chilling allows the pudding to thicken and set, creating the right consistency.
- Whip the Cream: In a large bowl, beat heavy whipping cream until stiff peaks form. You can use a hand or a stand mixer. Whipping until stiff peaks creates a light and airy cream that will fold easily into the pudding.
- Fold in the Cream: Gently fold the whipped cream into the chilled pudding mixture. Folding gently prevents deflating the cream, ensuring a light and fluffy pudding.
- Assemble the Pudding: In a large, wide-bottomed bowl, place 1/3 of the Nilla Wafers on the bottom. Layer 1/3 of the sliced bananas over the wafers. Top with 1/3 of the pudding mixture. Layering creates the classic banana pudding texture and ensures even distribution of ingredients.
- Repeat Layers: Repeat the layers twice more, using the remaining wafers, bananas, and pudding. Repeating layers ensures even distribution of ingredients and a consistent texture throughout the pudding.
- Garnish: Garnish the top with wafer crumbs for a decorative touch. Garnish adds visual appeal and a final touch of crunch.
- Chill: Wrap the bowl tightly with plastic wrap and chill for at least 4 hours before serving. You can chill up to 8 hours, but it’s not recommended to chill it longer than that. Chilling allows the flavors to meld and the pudding to set completely.
- Serve and Enjoy: Serve the chilled banana pudding and enjoy the creamy, sweet, and crunchy treat.
Beginner Tips and Notes: Your Kitchen Companion – Helpful Advice and Hacks
- Troubleshooting: Pudding Problems Solved:
- Lumpy Pudding: Whisk or mix thoroughly to ensure all ingredients are combined. Mixing well prevents lumps.
- Runny Pudding: Ensure the pudding chills for the recommended time to set properly. Proper chilling is essential for the right consistency.
- Deflated Cream: Fold the whipped cream gently into the pudding mixture to prevent deflating. Gentle folding keeps the cream light.
- Soggy Wafers: Assemble the pudding shortly before serving to prevent the wafers from becoming too soggy. Timing is key for crispy wafers.
- Prep Efficiency: Time-Saving Strategies:
- Chill Pudding Overnight: Prepare the pudding base the night before to save time. Overnight chilling allows the pudding to set completely.
- Use Instant Pudding Mix: Instant pudding mix simplifies the process and saves time. Instant pudding is a convenient option.
- Slice Bananas Just Before Assembling: Bananas brown quickly, so slice them just before assembling the pudding. Freshly sliced bananas maintain their appearance.
- Use a Hand Mixer: A hand mixer makes whipping cream and mixing the pudding base quick and easy. A hand mixer is a versatile tool.
- Tool Substitutions: Making Do with What You Have:
- No Hand Mixer: Use a whisk and some elbow grease to whip the cream. A whisk works well for manual whipping.
- No Large Bowl: Use a large pot or several smaller bowls for assembling the pudding. Alternative containers can be used.
- No Plastic Wrap: Use a lid or aluminum foil to cover the bowl. Covering the bowl prevents drying.
- No Wide-Bottomed Bowl: Use a deep dish or a trifle bowl. Alternative serving dishes can be used.
- Flavor Boosters: Adding Your Personal Touch:
- Add Vanilla Extract: A teaspoon of vanilla extract to the pudding base enhances the flavor. Vanilla extract adds depth of flavor.
- Use Banana Extract: Add a few drops of banana extract to the pudding base for an extra banana boost. Banana extract intensifies the banana flavor.
- Layer with Caramel Sauce: Drizzle caramel sauce between the layers for added sweetness. Caramel sauce adds a rich sweetness.
- Add a Sprinkle of Cinnamon: Sprinkle cinnamon on top for a warm and spicy note. Cinnamon adds a warm spice.
Serving Suggestions: Elevating Your Banana Pudding Experience
This Magnolia Bakery Banana Pudding is a delightful treat on its own, but you can enhance the experience with complementary sides and toppings.
- Sides: A Perfect Pairing:
- Vanilla Ice Cream: Serve alongside a scoop of vanilla ice cream for an extra creamy treat. Ice cream enhances the creaminess.
- Whipped Cream: Top with a dollop of fresh whipped cream for added lightness. Extra whipped cream adds a light topping.
- Caramel Sauce: Drizzle caramel sauce over the top for added sweetness. Caramel sauce adds a rich topping.
- Fresh Berries: Serve with fresh berries like strawberries or blueberries for a fruity contrast. Berries add a refreshing contrast.
- Toppings: A Flavor Boost:
- Chocolate Shavings: Sprinkle chocolate shavings on top for a decadent touch. Chocolate shavings add a rich topping.
- Crushed Nuts: Add crushed nuts like pecans or walnuts for added texture. Nuts add a crunchy topping.
- Cookie Crumbs: Sprinkle cookie crumbs on top for added crunch. Cookie crumbs add a crunchy texture.
- Meringue: Top with a layer of meringue for a light and airy topping. Meringue adds a light and airy topping.
- Storage: Keeping Leftovers Fresh:
- Refrigerate: Store leftover pudding in an airtight container in the refrigerator for up to 3 days. Proper storage maintains freshness.
- Do Not Freeze: Do not freeze banana pudding, as the texture will change. Freezing alters the texture.
- Assemble Shortly Before Serving: Assemble the pudding shortly before serving to prevent the wafers from becoming too soggy. Timing prevents soggy wafers.
A Culinary Adventure: From Simple Dessert to Sweet Sensation
This Magnolia Bakery Banana Pudding is a testament to how easy and delicious a homemade dessert can be. It’s perfect for potlucks, picnics, or any time you want a sweet treat. So, gather your ingredients, follow the instructions, and get ready to enjoy a creamy, dreamy dessert! Don’t be afraid to experiment with different variations and add your personal touch. And most importantly, have fun! We’d love to see your Magnolia Bakery Banana Pudding creations! Share your photos and any variations you try in the comments below. Happy pudding making!
What other quick, easy, and flavorful desserts would you like to see us explore? Are you interested in learning more about different dessert techniques or perhaps mastering other culinary skills? Let us know in the comments! We’re here to support you on your culinary journey, one delicious bite at a time. We can’t wait to hear about your culinary triumphs! Share your photos and tag us in your creations – we’re excited to see what you make! We’re confident that this recipe will become a regular part of your dessert repertoire. It’s a guaranteed way to bring some sweet, creamy, and crunchy goodness to your table. Enjoy!