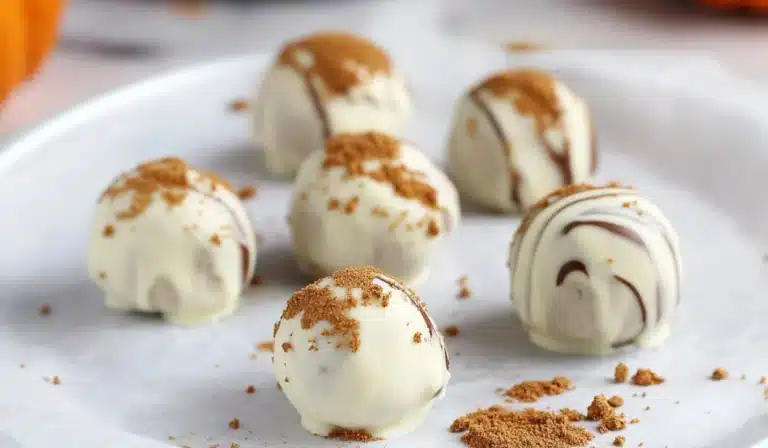
When the crisp air of autumn settles in, and the leaves turn shades of orange and gold, there’s no denying the comforting allure of pumpkin-flavored treats. Whether it’s in the form of pies, lattes, muffins, or cakes, the rich and warm flavor of pumpkin reigns supreme during the fall season. However, if you’re looking for a treat that’s quick, easy, and absolutely delicious, then look no further than these No-Bake Pumpkin Balls. These delightful little bites combine the flavors of pumpkin pie, the creaminess of cheesecake, and the sweetness of white chocolate into an irresistible no-bake dessert.

No-Bake Pumpkin Balls: A Delicious Bite of Fall Without the Fuss
When the crisp air of autumn settles in, and the leaves turn shades of orange and gold, there’s no denying the comforting allure of pumpkin-flavored treats. Whether it’s in the form of pies, lattes, muffins, or cakes, the rich and warm flavor of pumpkin reigns supreme during the fall season. However, if you’re looking for a treat that’s quick, easy, and absolutely delicious, then look no further than these No-Bake Pumpkin Balls. These delightful little bites combine the flavors of pumpkin pie, the creaminess of cheesecake, and the sweetness of white chocolate into an irresistible no-bake dessert.
- Total Time: 1 hour 5 minutes
- Yield: 24 truffles 1x
Ingredients
For the Filling
- 4 ounces (113 g) cream cheese, softened: Cream cheese serves as the base for the filling, lending a smooth, tangy flavor that pairs beautifully with the pumpkin and spices.
- 2 tablespoons powdered sugar: The powdered sugar adds the right amount of sweetness to balance the tanginess of the cream cheese and pumpkin puree.
- ⅓ cup (80 g) pumpkin puree: This is the star ingredient, infusing the pumpkin balls with its signature rich, earthy flavor.
- 2 cups (240 g) graham cracker crumbs, divided: The graham cracker crumbs help form the dough while adding a nutty flavor and slight crunch to each bite.
- ½ teaspoon pumpkin pie spice: Pumpkin pie spice combines cinnamon, nutmeg, and cloves to evoke that classic fall flavor.
- ½ teaspoon cinnamon: A pinch of cinnamon enhances the flavor of the pumpkin and adds warmth to the overall taste.
For the Coating
- 2 cups (340 g) white chocolate chips: The white chocolate provides a rich, creamy finish to each pumpkin ball.
- 1–2 teaspoons coconut oil (optional): A small amount of coconut oil helps to achieve a smooth, glossy coating for the chocolate.
Optional Garnishes
- Crushed graham crackers
- Festive sprinkles (think Halloween or Thanksgiving colors)
- Chopped nuts, such as pecans or walnuts
Instructions
Step 1: Prepare the Filling
To start, take the softened cream cheese and powdered sugar and place them into a large mixing bowl. Using a stand mixer or hand mixer, beat the ingredients on medium speed until the mixture becomes smooth and creamy. This process should take about 2–3 minutes. The goal is to make the cream cheese mixture light and airy, which will help the pumpkin balls maintain a smooth texture. Be careful not to overmix, as this could cause the mixture to become too runny.
Step 2: Incorporate Pumpkin and Spices
Next, add the pumpkin puree, 1 cup of graham cracker crumbs, pumpkin pie spice, and cinnamon into the cream cheese mixture. Use a spatula or spoon to mix the ingredients until they are fully incorporated. This will create a flavorful and aromatic dough-like mixture. The pumpkin puree will provide a deep orange color and an unmistakable autumn scent that will make your kitchen smell like fall.
Step 3: Adjust the Texture
After mixing the initial ingredients, add the remaining cup of graham cracker crumbs to the mixture. This will help firm up the dough and give it a more manageable texture, making it easier to roll into balls. Continue mixing until everything is well combined. At this point, you should have a thick, cohesive dough that’s easy to shape into individual pumpkin balls.
Step 4: Chill the Dough
Cover the bowl with plastic wrap and refrigerate the dough for at least 30 minutes. Chilling the dough is a crucial step, as it allows the mixture to firm up, making it easier to roll the balls without them falling apart. If you have more time, you can chill the dough for up to an hour for the best results.
Step 5: Roll Into Balls
Once the dough has chilled, line a baking sheet with parchment paper to prevent the pumpkin balls from sticking. Using a tablespoon or small cookie scoop, portion out the dough into roughly 1-inch balls. Roll them gently between your palms to ensure they are uniform in size. Place each ball onto the parchment paper, making sure to leave enough space between them so they don’t touch while they chill.
Step 6: Chill Again
Place the baking sheet with the rolled pumpkin balls back into the refrigerator for another 30 minutes. This second chilling step is necessary to firm up the balls before coating them in melted chocolate.
Step 7: Melt the Chocolate
While the pumpkin balls are chilling, it’s time to melt the white chocolate. Place the white chocolate chips into a microwave-safe bowl. If you’re using coconut oil, add 1–2 teaspoons to the bowl to help smooth the chocolate. Microwave the chocolate on high in 30-second intervals, stirring well after each interval, until the chocolate is completely melted and smooth.
Step 8: Coat the Pumpkin Balls
Once the white chocolate is melted and smooth, it’s time to coat the pumpkin balls. Using a fork or candy dipper, dip each pumpkin ball into the melted chocolate, ensuring that it’s fully coated. Tap the fork gently on the side of the bowl to remove any excess chocolate, then place the coated ball back onto the parchment-lined baking sheet. Repeat the process until all the pumpkin balls are coated in chocolate.
Step 9: Decorate and Chill
If you have extra melted chocolate, you can drizzle it over the top of the coated balls for an extra decorative touch. Alternatively, you can sprinkle crushed graham crackers, festive sprinkles, or chopped nuts over the chocolate coating to add texture and visual appeal. Place the baking sheet with the decorated pumpkin balls back into the refrigerator for about 20–30 minutes, or until the chocolate coating has fully set.
Step 10: Serve and Enjoy
Once the chocolate has hardened, your No-Bake Pumpkin Balls are ready to be enjoyed. Transfer them to a serving platter and serve them immediately, or store them in an airtight container in the refrigerator for up to 5 days. These pumpkin balls make the perfect fall treat for any occasion—whether it’s a casual snack or a festive dessert to share with friends and family.
Notes
- Be sure to use softened cream cheese to avoid lumps in your filling.
- If you prefer a darker chocolate coating, feel free to use milk or dark chocolate chips instead of white chocolate.
- Refrigerating the dough is essential for easy rolling, so don’t skip this step!
- If the white chocolate is difficult to work with, adding coconut oil will help smooth it out and give the coating a nice sheen.
- For a little crunch, you can add chopped nuts such as pecans, walnuts, or almonds to the dough itself.
- Sprinkles or crushed graham crackers make great garnish options to add a pop of color and texture.
- Prep Time: 5 minutes
- Cook Time: 1 hour (for chilling time)
- Category: Dessert, Fall Treats, No-Bake
- Method: No-bake
- Cuisine: American
- Diet: Vegetarian
Unlike many traditional pumpkin recipes that require lengthy cooking times and numerous steps, No-Bake Pumpkin Balls are incredibly easy to prepare and require only a few simple ingredients. Best of all, they don’t require any baking—making them an ideal option when you want to avoid heating up the oven or spend hours in the kitchen. Whether you’re making them for a fall get-together, a cozy dessert, or a holiday treat, these No-Bake Pumpkin Balls are sure to become a favorite in your seasonal recipe collection. With their comforting taste, smooth texture, and satisfying crunch, these bite-sized delights offer the perfect balance of flavor and convenience.
Why Choose No-Bake Pumpkin Balls?
There’s something undeniably convenient and fun about no-bake desserts. For one, they take significantly less time to prepare than baked goods, making them perfect for those busy moments when you want a sweet treat without all the fuss. Plus, because no baking is involved, you can skip the long wait times associated with preheating the oven and cooking the batter. Instead, these No-Bake Pumpkin Balls come together in just a few simple steps, and the refrigerator does most of the work for you.
Not only are they quick and easy, but the taste and texture of these pumpkin balls are simply irresistible. The cream cheese base creates a velvety smooth filling, while the graham cracker crumbs lend a crunchy texture that mimics the crust of a pumpkin pie. The addition of pumpkin puree infuses each bite with the warm, cozy flavor of fall spices, and the final touch of white chocolate adds a rich sweetness that perfectly complements the pumpkin flavor. These bite-sized treats are truly the best of both worlds: indulgent yet easy to make, satisfying yet light enough to enjoy as a snack or dessert.
What’s more, you can easily customize the recipe to suit your personal preferences. From experimenting with different coatings, such as dark chocolate or milk chocolate, to adding extra flavorings like nutmeg or ginger, the possibilities are endless. You can also swap out the white chocolate for a dairy-free option to make these treats more inclusive. However you choose to make them, these No-Bake Pumpkin Balls are guaranteed to be a hit with anyone who loves the comforting flavors of fall.
Ingredients for No-Bake Pumpkin Balls
For the Filling
- 4 ounces (113 g) cream cheese, softened: Cream cheese serves as the base for the filling, lending a smooth, tangy flavor that pairs beautifully with the pumpkin and spices.
- 2 tablespoons powdered sugar: The powdered sugar adds the right amount of sweetness to balance the tanginess of the cream cheese and pumpkin puree.
- ⅓ cup (80 g) pumpkin puree: This is the star ingredient, infusing the pumpkin balls with its signature rich, earthy flavor.
- 2 cups (240 g) graham cracker crumbs, divided: The graham cracker crumbs help form the dough while adding a nutty flavor and slight crunch to each bite.
- ½ teaspoon pumpkin pie spice: Pumpkin pie spice combines cinnamon, nutmeg, and cloves to evoke that classic fall flavor.
- ½ teaspoon cinnamon: A pinch of cinnamon enhances the flavor of the pumpkin and adds warmth to the overall taste.
For the Coating
- 2 cups (340 g) white chocolate chips: The white chocolate provides a rich, creamy finish to each pumpkin ball.
- 1–2 teaspoons coconut oil (optional): A small amount of coconut oil helps to achieve a smooth, glossy coating for the chocolate.
Optional Garnishes
- Crushed graham crackers
- Festive sprinkles (think Halloween or Thanksgiving colors)
- Chopped nuts, such as pecans or walnuts
Step-by-Step Instructions
Step 1: Prepare the Filling
To start, take the softened cream cheese and powdered sugar and place them into a large mixing bowl. Using a stand mixer or hand mixer, beat the ingredients on medium speed until the mixture becomes smooth and creamy. This process should take about 2–3 minutes. The goal is to make the cream cheese mixture light and airy, which will help the pumpkin balls maintain a smooth texture. Be careful not to overmix, as this could cause the mixture to become too runny.
Step 2: Incorporate Pumpkin and Spices
Next, add the pumpkin puree, 1 cup of graham cracker crumbs, pumpkin pie spice, and cinnamon into the cream cheese mixture. Use a spatula or spoon to mix the ingredients until they are fully incorporated. This will create a flavorful and aromatic dough-like mixture. The pumpkin puree will provide a deep orange color and an unmistakable autumn scent that will make your kitchen smell like fall.
Step 3: Adjust the Texture
After mixing the initial ingredients, add the remaining cup of graham cracker crumbs to the mixture. This will help firm up the dough and give it a more manageable texture, making it easier to roll into balls. Continue mixing until everything is well combined. At this point, you should have a thick, cohesive dough that’s easy to shape into individual pumpkin balls.
Step 4: Chill the Dough
Cover the bowl with plastic wrap and refrigerate the dough for at least 30 minutes. Chilling the dough is a crucial step, as it allows the mixture to firm up, making it easier to roll the balls without them falling apart. If you have more time, you can chill the dough for up to an hour for the best results.
Step 5: Roll Into Balls
Once the dough has chilled, line a baking sheet with parchment paper to prevent the pumpkin balls from sticking. Using a tablespoon or small cookie scoop, portion out the dough into roughly 1-inch balls. Roll them gently between your palms to ensure they are uniform in size. Place each ball onto the parchment paper, making sure to leave enough space between them so they don’t touch while they chill.
Step 6: Chill Again
Place the baking sheet with the rolled pumpkin balls back into the refrigerator for another 30 minutes. This second chilling step is necessary to firm up the balls before coating them in melted chocolate.
Step 7: Melt the Chocolate
While the pumpkin balls are chilling, it’s time to melt the white chocolate. Place the white chocolate chips into a microwave-safe bowl. If you’re using coconut oil, add 1–2 teaspoons to the bowl to help smooth the chocolate. Microwave the chocolate on high in 30-second intervals, stirring well after each interval, until the chocolate is completely melted and smooth.
Step 8: Coat the Pumpkin Balls
Once the white chocolate is melted and smooth, it’s time to coat the pumpkin balls. Using a fork or candy dipper, dip each pumpkin ball into the melted chocolate, ensuring that it’s fully coated. Tap the fork gently on the side of the bowl to remove any excess chocolate, then place the coated ball back onto the parchment-lined baking sheet. Repeat the process until all the pumpkin balls are coated in chocolate.
Step 9: Decorate and Chill
If you have extra melted chocolate, you can drizzle it over the top of the coated balls for an extra decorative touch. Alternatively, you can sprinkle crushed graham crackers, festive sprinkles, or chopped nuts over the chocolate coating to add texture and visual appeal. Place the baking sheet with the decorated pumpkin balls back into the refrigerator for about 20–30 minutes, or until the chocolate coating has fully set.
Step 10: Serve and Enjoy
Once the chocolate has hardened, your No-Bake Pumpkin Balls are ready to be enjoyed. Transfer them to a serving platter and serve them immediately, or store them in an airtight container in the refrigerator for up to 5 days. These pumpkin balls make the perfect fall treat for any occasion—whether it’s a casual snack or a festive dessert to share with friends and family.
Tips for Perfect Pumpkin Balls
- Be sure to use softened cream cheese to avoid lumps in your filling.
- If you prefer a darker chocolate coating, feel free to use milk or dark chocolate chips instead of white chocolate.
- Refrigerating the dough is essential for easy rolling, so don’t skip this step!
- If the white chocolate is difficult to work with, adding coconut oil will help smooth it out and give the coating a nice sheen.
- For a little crunch, you can add chopped nuts such as pecans, walnuts, or almonds to the dough itself.
- Sprinkles or crushed graham crackers make great garnish options to add a pop of color and texture.
Creative Variations
- Use dairy-free chocolate if you want to make this recipe suitable for those who are lactose intolerant or vegan.
- For a more spicy flavor, add a pinch of nutmeg or cloves to the mixture along with the cinnamon and pumpkin pie spice.
- Add a swirl of caramel sauce to the chocolate for a decadent twist.
- If you’re craving a little extra crunch, roll the pumpkin balls in chopped nuts, toasted coconut, or crushed pretzels.
Serving Suggestions
These No-Bake Pumpkin Balls are perfect for any fall occasion. Serve them as an after-dinner treat at Thanksgiving, bring them to a Halloween party, or enjoy them as an everyday snack with a warm cup of coffee or tea. They also make an excellent gift idea—just package them in a cute tin or box for a homemade gift that’s sure to impress.
You can also serve these pumpkin balls on a dessert platter alongside other fall-themed treats such as pumpkin pie, cinnamon rolls, or apple crisps. The rich flavors and smooth texture of the pumpkin balls pair beautifully with a variety of other autumn desserts, making them a versatile addition to any dessert spread.

Why You’ll Love These No-Bake Pumpkin Balls
These No-Bake Pumpkin Balls truly embody the essence of fall. They offer the perfect balance of creamy, spiced, and sweet flavors, all wrapped up in a bite-sized, easy-to-make treat. Not only are they a delightful way to celebrate the season, but their minimal prep time and effortless presentation make them a convenient and crowd-pleasing option. Whether you’re preparing them for a special occasion, a casual gathering, or simply to enjoy with your family, these pumpkin balls are a guaranteed hit.
Give this recipe a try and discover just how easy and delicious no-bake desserts can be. With their combination of creamy filling, crunchy texture, and rich chocolate coating, these No-Bake Pumpkin Balls are sure to be a new favorite in your fall dessert rotation.