
There are few things more universally loved than the combination of chocolate and peanut butter, and when you pair it with rich, fudgy brownies and creamy pudding, you’re in for a treat that will leave everyone asking for seconds. That’s exactly what happened the first time I made this Peanut Butter Cup Brownie Trifle. It was a family gathering, and I wanted something that would impress without taking hours of preparation. After just one bite, this dessert was a hit, and people kept coming back for more. The best part? It’s so easy to make, even for beginner cooks, and it’s one of those desserts that seems far more complicated than it actually is. The layers of decadent flavors come together to form a dessert that looks impressive but only takes about an hour to prepare. The combination of fudgy brownies, peanut butter pudding, Cool Whip, and Reese’s cups creates a dessert that’s perfectly balanced in flavor, texture, and sweetness.

Peanut Butter Cup Brownie Trifle: A Decadent, Crowd-Pleasing Dessert
If you love the classic combo of chocolate and peanut butter, this Peanut Butter Cup Brownie Trifle is about to become your new favorite dessert. With layers of fudgy brownies, creamy peanut butter pudding, and crunchy Reese’s cups, it’s a decadent treat that’s easy to make and perfect for beginner cooks. Whether you’re hosting a party or just craving something sweet, this trifle is sure to impress with minimal effort and maximum flavor!
- Total Time: 1 hour
- Yield: 12 servings 1x
Ingredients
- 1 package fudge brownie mix (plus the ingredients called for on the box, usually water, eggs, and oil)
- 2 packages miniature Reese’s cups (roughly chopped)
- 4 cups cold milk (preferably 2%)
- 2 packages instant vanilla pudding
- 1 cup creamy peanut butter
- 4 teaspoons vanilla extract
- 2 cans Cool Whip (8 oz each, thawed)
Instructions
1. Prepare the Brownies:
Preheat your oven to 350°F (175°C). Butter a 12×9-inch baking pan or grease it with nonstick cooking spray. This ensures that the brownies come out easily once they’ve cooled. Prepare the fudge brownie mix according to the instructions on the box. Typically, you’ll need to add a few ingredients like water, eggs, and oil, but make sure to follow the directions on the back of the package to get the best results. Once the brownie batter is mixed, pour it into the prepared baking pan. Spread it out evenly so it bakes into a nice, flat layer. Bake the brownies in the preheated oven for 20-25 minutes, or until a toothpick inserted into the center comes out with moist crumbs. You don’t want it to come out completely clean, as this would mean the brownies are overbaked and too dry. Let the brownies cool completely in the pan before cutting them into ¾-inch slices. Cooling them properly will ensure they don’t crumble when you layer them in the trifle.
2. Prepare the Peanut Butter Pudding Mixture:
In a large bowl, whisk together the instant vanilla pudding mix and 4 cups of cold milk. Beat the mixture for about 2 minutes or until it thickens to a pudding-like consistency. You’ll know it’s ready when it no longer moves when you tilt the bowl. At this point, add the creamy peanut butter and vanilla extract. Stir the mixture until smooth, ensuring the peanut butter is fully incorporated and there are no lumps. Next, fold in 1 ½ cups of Cool Whip. This adds a light, airy texture to the pudding, making it more spreadable and giving it a creamy consistency that contrasts beautifully with the denser layers of brownies and Reese’s cups.
3. Assemble the Trifle:
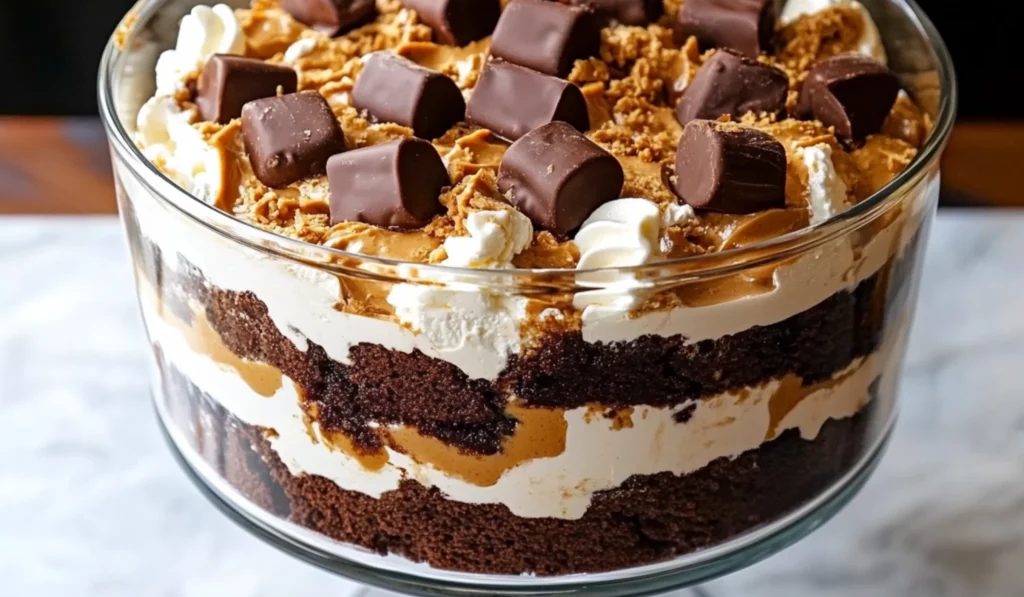
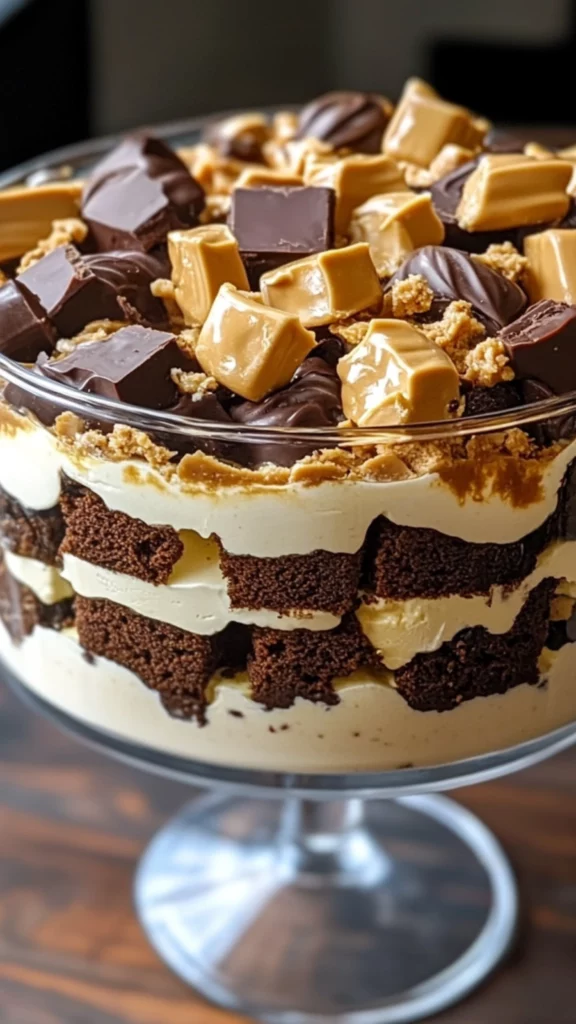
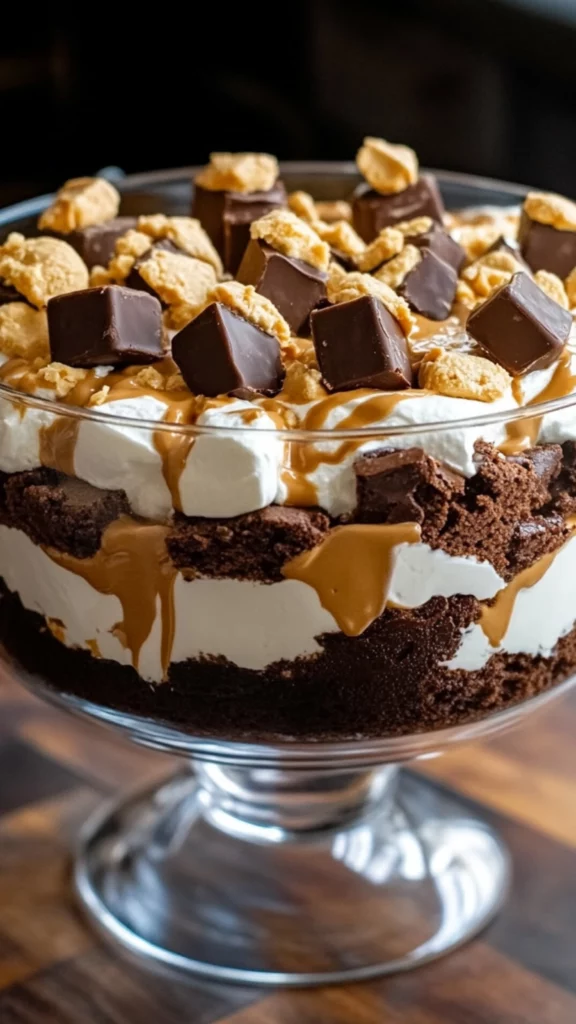
Now comes the fun part: layering everything together to create your beautiful trifle! You’ll need a 5-quart trifle dish or any clear glass bowl that can hold all the layers. The key to a great trifle is getting even layers, so take your time as you build this dessert. Start with a layer of one-third of the brownie slices at the bottom of your trifle dish. The brownies will provide a dense, chocolatey base that sets the tone for the rest of the dessert. Next, add one-third of the peanut butter pudding mixture over the brownies, smoothing it out with a spatula. Then, sprinkle half of the halved Reese’s cups on top of the pudding. These will add a delightful crunch and peanut butter flavor to each bite. Repeat the layers twice: one more layer of brownies, followed by the pudding, and then the remaining Reese’s cups. Finish with a final layer of the peanut butter pudding mixture, smoothing it out to create a nice, even top. This is where the beauty of the trifle really shows through—the layers of brownie, pudding, and candy are all visible through the glass, creating a stunning dessert.
4. Add the Final Touches:
Spread the remaining Cool Whip on top of the final layer of pudding. This gives the trifle a light, fluffy topping that balances out the richness of the brownies and peanut butter. Once the Cool Whip is spread evenly, garnish the top with the remaining halved Reese’s cups for a finishing touch. This not only adds extra flavor but also makes the dessert look extra fancy.
5. Chill Before Serving:
Refrigerate your trifle for at least 30 minutes before serving. This allows the flavors to meld together and helps the layers set so they stay in place when you serve it. The chill time is important, so don’t skip it! The trifle will keep in the fridge for up to 3 days, making it a great dessert to make ahead of time.
Notes
- If your brownies come out too dry, you may have overbaked them. Check them early to avoid overbaking, and remember that they should have moist crumbs when you check with a toothpick.
- If your pudding mixture doesn’t thicken properly, it’s usually a sign that you didn’t beat it long enough. Make sure to beat the pudding for at least 2 minutes to get it to the right consistency.
- If your Cool Whip doesn’t spread easily, it may not be thawed enough. Make sure it’s completely thawed before you start assembling your trifle.
- Prep Time: 30 minutes
- Cook Time: 30 minutes
- Category: Dessert
- Method: Baking, Layering
- Cuisine: American
- Diet: Vegetarian
This Peanut Butter Cup Brownie Trifle is the ultimate no-bake dessert that’s perfect for any occasion. Whether you’re hosting a dinner party, attending a potluck, or just looking for a delicious treat to enjoy on a weekend afternoon, this dessert will quickly become a go-to. The recipe is simple yet indulgent, and it’s a great way for beginner cooks to practice assembling layers and making a dessert that looks just as good as it tastes. It’s also perfect for anyone who loves peanut butter and chocolate, as the combination is always a crowd favorite. If you’re a beginner cook, don’t let the idea of making a trifle intimidate you. With just a few basic ingredients and minimal cooking skills, you can create a dessert that will have everyone asking for your secret.
Ingredients and Preparation
Before diving into the steps, let’s take a closer look at the ingredients you’ll need for this rich and decadent dessert. The beauty of this recipe lies in its simplicity. The ingredients are easy to find, and most of them come from the baking aisle or the refrigerated section of your local grocery store. Here’s everything you’ll need:
Ingredients:
- 1 package fudge brownie mix (plus the ingredients called for on the box, usually water, eggs, and oil)
- 2 packages miniature Reese’s cups (roughly chopped)
- 4 cups cold milk (preferably 2%)
- 2 packages instant vanilla pudding
- 1 cup creamy peanut butter
- 4 teaspoons vanilla extract
- 2 cans Cool Whip (8 oz each, thawed)
Alternative Ingredients:
While this recipe uses classic ingredients, there are plenty of substitutions you can make if you want to try something different or accommodate dietary preferences.
- Brownie Mix: While the recipe calls for a store-bought brownie mix, you can easily make your own brownies from scratch. If you’re pressed for time, though, a pre-made mix is a great shortcut. Alternatively, you can use a gluten-free brownie mix if you’re catering to dietary restrictions.
- Miniature Reese’s Cups: If you prefer, you can substitute the Reese’s cups with another type of candy, such as Snickers, Milky Way, or even chopped Kit-Kats. This gives you a chance to get creative with the flavors and textures of your trifle.
- Peanut Butter: While creamy peanut butter is the go-to here, you can opt for chunky peanut butter if you like a little extra texture. If you have peanut allergies to consider, feel free to swap in almond butter or sunflower seed butter for a nut-free version.
- Cool Whip: If you’re looking to avoid Cool Whip, you can use freshly whipped cream instead. Just make sure to whip it to soft peaks before using, but keep in mind that fresh whipped cream may not hold up quite as well as Cool Whip, especially in a dessert like this that requires refrigeration.
The key to making this dessert successfully is having everything prepped and ready before you start layering. Once you have all your ingredients on hand, the steps are straightforward, and the result will be a beautifully layered dessert that will wow your guests and have them asking for the recipe.
Step-by-Step Instructions
This recipe comes together in just a few simple steps. Even if you’re new to baking or assembling desserts, these directions are easy to follow. You don’t need any special tools or equipment—just a few basic kitchen staples, and you’ll be well on your way to making this Peanut Butter Cup Brownie Trifle.
1. Prepare the Brownies:
Preheat your oven to 350°F (175°C). Butter a 12×9-inch baking pan or grease it with nonstick cooking spray. This ensures that the brownies come out easily once they’ve cooled. Prepare the fudge brownie mix according to the instructions on the box. Typically, you’ll need to add a few ingredients like water, eggs, and oil, but make sure to follow the directions on the back of the package to get the best results. Once the brownie batter is mixed, pour it into the prepared baking pan. Spread it out evenly so it bakes into a nice, flat layer. Bake the brownies in the preheated oven for 20-25 minutes, or until a toothpick inserted into the center comes out with moist crumbs. You don’t want it to come out completely clean, as this would mean the brownies are overbaked and too dry. Let the brownies cool completely in the pan before cutting them into ¾-inch slices. Cooling them properly will ensure they don’t crumble when you layer them in the trifle.
2. Prepare the Peanut Butter Pudding Mixture:
In a large bowl, whisk together the instant vanilla pudding mix and 4 cups of cold milk. Beat the mixture for about 2 minutes or until it thickens to a pudding-like consistency. You’ll know it’s ready when it no longer moves when you tilt the bowl. At this point, add the creamy peanut butter and vanilla extract. Stir the mixture until smooth, ensuring the peanut butter is fully incorporated and there are no lumps. Next, fold in 1 ½ cups of Cool Whip. This adds a light, airy texture to the pudding, making it more spreadable and giving it a creamy consistency that contrasts beautifully with the denser layers of brownies and Reese’s cups.
3. Assemble the Trifle:
Now comes the fun part: layering everything together to create your beautiful trifle! You’ll need a 5-quart trifle dish or any clear glass bowl that can hold all the layers. The key to a great trifle is getting even layers, so take your time as you build this dessert. Start with a layer of one-third of the brownie slices at the bottom of your trifle dish. The brownies will provide a dense, chocolatey base that sets the tone for the rest of the dessert. Next, add one-third of the peanut butter pudding mixture over the brownies, smoothing it out with a spatula. Then, sprinkle half of the halved Reese’s cups on top of the pudding. These will add a delightful crunch and peanut butter flavor to each bite. Repeat the layers twice: one more layer of brownies, followed by the pudding, and then the remaining Reese’s cups. Finish with a final layer of the peanut butter pudding mixture, smoothing it out to create a nice, even top. This is where the beauty of the trifle really shows through—the layers of brownie, pudding, and candy are all visible through the glass, creating a stunning dessert.
4. Add the Final Touches:
Spread the remaining Cool Whip on top of the final layer of pudding. This gives the trifle a light, fluffy topping that balances out the richness of the brownies and peanut butter. Once the Cool Whip is spread evenly, garnish the top with the remaining halved Reese’s cups for a finishing touch. This not only adds extra flavor but also makes the dessert look extra fancy.
5. Chill Before Serving:
Refrigerate your trifle for at least 30 minutes before serving. This allows the flavors to meld together and helps the layers set so they stay in place when you serve it. The chill time is important, so don’t skip it! The trifle will keep in the fridge for up to 3 days, making it a great dessert to make ahead of time.
Beginner Tips and Notes
While this dessert is straightforward, there are a few things to keep in mind to make sure everything goes smoothly.
Troubleshooting Tips:
- If your brownies come out too dry, you may have overbaked them. Check them early to avoid overbaking, and remember that they should have moist crumbs when you check with a toothpick.
- If your pudding mixture doesn’t thicken properly, it’s usually a sign that you didn’t beat it long enough. Make sure to beat the pudding for at least 2 minutes to get it to the right consistency.
- If your Cool Whip doesn’t spread easily, it may not be thawed enough. Make sure it’s completely thawed before you start assembling your trifle.
Kitchen Efficiency Tips:
- Make the brownies ahead of time: You can bake the brownies the day before you plan to assemble the trifle. This will save you time on the day you serve the dessert, and the brownies will have plenty of time to cool.
- Prep the pudding and Cool Whip: While the brownies are cooling, you can prepare the pudding mixture and fold in the Cool Whip. This way, everything is ready when it’s time to assemble.
- Use a serrated knife to cut the brownies: If you’re having trouble cutting the brownies into even slices, use a serrated knife. This will prevent the brownies from crumbling and will give you clean slices to layer.
Serving Suggestions
This trifle is indulgent on its own, but if you’re looking to take it to the next level, here are a few ideas for serving and pairing:
- Serve the trifle alongside a cold glass of milk or a rich cup of coffee to balance the sweetness.
- Add a scoop of vanilla ice cream on the side for an extra indulgent dessert experience.
- Garnish the trifle with a sprinkle of sea salt for a sophisticated contrast to the sweetness, or drizzle with chocolate sauce for added richness.
If you have leftovers (which is rare!), you can store the trifle in the refrigerator for up to 3 days. Make sure to cover it tightly with plastic wrap or store it in an airtight container to preserve its freshness.
Conclusion: Try It Today!
This Peanut Butter Cup Brownie Trifle is everything you could want in a dessert: easy to make, stunning to look at, and packed with flavor. It’s perfect for beginner cooks, and its simple steps ensure that anyone can make a beautiful, decadent dessert. Whether you’re celebrating a special occasion or just indulging in a treat, this trifle is sure to impress. Try it out today, and share your creations in the comments below. We’d love to hear how it turned out and any variations you made. Happy baking and even happier eating! By following these simple instructions and tips, you’ll create a dessert that’s not only delicious but also beautiful. This easy sheet pan dinner-style dessert comes together effortlessly and will quickly become your go-to recipe for any occasion.


