There’s something undeniably comforting about rich, creamy desserts during the fall, especially when they feature the warm flavors of pumpkin and spice. One of my favorite desserts to make during the cooler months is pumpkin creme brulee. This twist on the classic French dessert combines smooth pumpkin custard with a crispy, caramelized sugar top, offering the perfect balance of textures and flavors. The subtle sweetness of the pumpkin, combined with the rich creaminess and the delicate crunch from the brulee topping, makes this dessert not only a crowd-pleaser but also a fantastic treat for the holiday season. It’s also a perfect recipe for beginner cooks because it’s relatively easy to prepare and doesn’t require any complex techniques. With a few simple steps, you’ll have a dessert that looks elegant, tastes incredible, and will impress anyone who tries it.


Pumpkin Creme Brulee: A Cozy Fall Dessert Perfect for Beginners
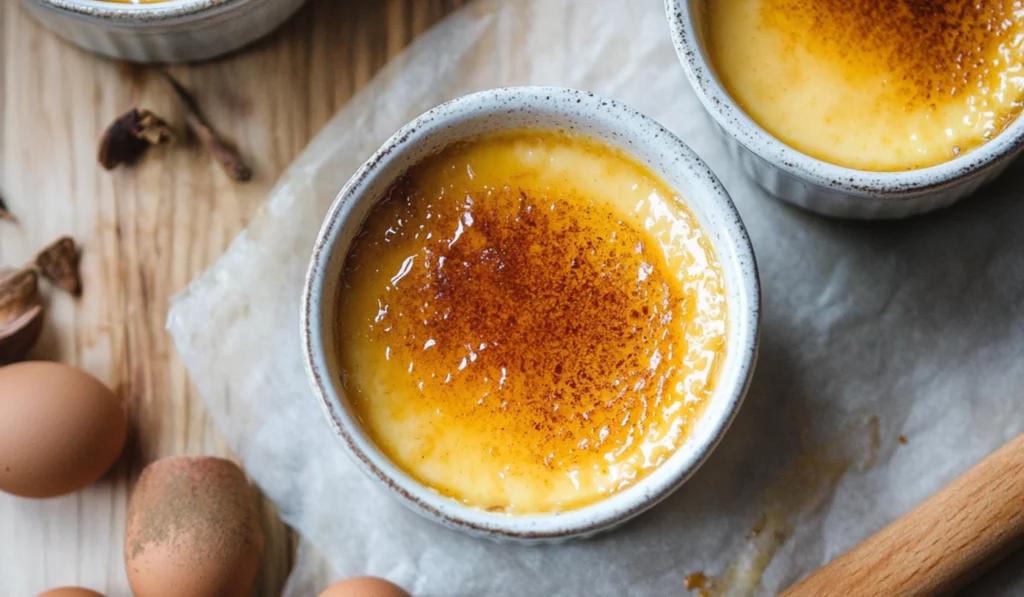
Pumpkin Creme Brulee is the ultimate fall dessert, blending the warmth of pumpkin spice with creamy custard and a perfectly caramelized sugar topping. It may sound fancy, but it’s surprisingly easy for beginners to make. Perfect for holiday gatherings or cozy nights in, this dessert is sure to impress with its rich flavors and elegant presentation.
- Total Time: 50 minutes
- Yield: 6 servings
Ingredients
For the Custard:
- 2 cups (480 ml) heavy whipping cream: This forms the base of the creamy custard.
- 1 ½ teaspoons pure vanilla extract: For a subtle vanilla flavor that complements the pumpkin.
- 4 large egg yolks: The egg yolks are what give the custard its richness and silky texture.
- ¼ cup (50g) light brown sugar: Brown sugar adds a hint of molasses flavor that pairs beautifully with pumpkin.
- ¼ cup (60g) pumpkin puree: Make sure you use pure pumpkin puree, not pumpkin pie filling, for the best flavor.
- ¼ teaspoon pumpkin spice mix: A perfect blend of cinnamon, nutmeg, and cloves—classic fall flavors.
- ⅛ teaspoon salt: A small amount of salt helps balance the sweetness of the custard.
For the Topping:
- 6 teaspoons granulated sugar: The sugar is sprinkled on top of the custard just before caramelizing to create that perfect crunchy brulee topping.
Instructions
Step 1: Preheat the Oven and Prepare the Ramekins
Start by preheating your oven to 300°F (150°C). Place six 4-ounce ramekins in a large roasting pan or baking dish. These ramekins will hold the custard as it bakes in the water bath. Set the roasting pan aside for now—we’ll come back to it later.
Step 2: Prepare the Custard Base
In a medium saucepan, combine the heavy whipping cream, vanilla extract, half the brown sugar, pumpkin puree, pumpkin spice mix, and salt. Heat this mixture over medium heat until it starts to simmer gently. You don’t need to bring it to a boil, just warm it up until it begins to bubble at the edges. While this is heating, prepare the egg yolks.
Step 3: Whisk the Egg Yolks and Remaining Sugar
In a separate heatproof bowl, whisk together the egg yolks and the remaining brown sugar. Whisk until the mixture is well-blended. It’s important not to incorporate air into the mixture, so avoid over-whisking—it should just be smooth and uniform.
Step 4: Temper the Eggs
Now comes the crucial step of adding the hot cream mixture to the egg yolks. The key here is tempering the eggs, which ensures that they don’t cook too quickly and curdle. Slowly pour half of the hot cream mixture into the egg yolks, whisking constantly to prevent the eggs from scrambling. After that, slowly pour the egg mixture back into the saucepan with the rest of the cream mixture, whisking all the while. Keep whisking gently and cook on low heat until the mixture begins to thicken slightly. You’ll know it’s ready when the sugar has dissolved and the custard coats the back of a spoon. Do not let it boil—this could cause the eggs to curdle.
Step 5: Strain the Mixture
To ensure a smooth custard, it’s a good idea to strain the mixture through a fine mesh sieve. This removes any cooked bits of egg and creates a velvety smooth texture. Pour the custard evenly into the prepared ramekins.
Step 6: Set Up the Water Bath
Now, carefully place the roasting pan with the ramekins into the preheated oven. Pour hot water into the pan, filling it halfway up the sides of the ramekins. This water bath helps the custard bake gently and evenly, preventing it from curdling. Bake for 25-30 minutes, or until the custard has set but is still slightly wobbly in the center when you gently shake the ramekins. You don’t want the custard to be too firm—just a little jiggle is perfect. Once done, remove the ramekins from the water bath and let them cool on a wire rack at room temperature.
Step 7: Chill the Custards
After they’ve cooled, cover each ramekin with plastic wrap and place them in the fridge to chill for at least 4 hours, preferably overnight. This allows the flavors to meld and the custard to set to the perfect creamy consistency.
Step 8: Brulee the Custard
Now, the fun part—caramelizing the sugar! Just before serving, sprinkle about ½ to 1 teaspoon of granulated sugar over the surface of each custard. Hold the ramekin by the edges and gently shake it from side to side until the sugar is evenly distributed. Then, using a kitchen torch, caramelize the sugar by moving the flame in small circles over the surface of the custard. Start from the edges and work your way towards the center. You’ll know it’s done when the sugar is golden brown and bubbly. If you don’t have a kitchen torch, you can also place the ramekins under the broiler for a minute or two, but keep a close eye on them so they don’t burn.
Step 9: Serve and Enjoy
Once the sugar is caramelized, serve the pumpkin creme brulee immediately. You can garnish with a few extra spices, like a light sprinkle of pumpkin spice, or even top with a few roasted pumpkin seeds for some added crunch
Notes
- Tempering the eggs is a crucial step to ensure the custard is smooth and not scrambled. Make sure you pour the hot cream mixture into the eggs slowly and whisk constantly.
- Water bath tip: When pouring water into the roasting pan, be careful not to splash any water into the ramekins. This could water down your custard and affect the texture.
- Torching the sugar: If you don’t have a torch, you can use the broiler, but keep the ramekins about 6 inches away from the heat source. Watch them closely to avoid burning.
- Storage: Store any leftover creme brulee in the refrigerator for up to 3 days. However, it’s best to caramelize the sugar just before serving to maintain that crispy texture.
- Prep Time: 15 minutes
- Cook Time: 35 minutes
- Category: Dessert
- Method: Baking, Broiling
- Cuisine: American
- Diet: Vegetarian
Why This Recipe is Perfect for Beginners
If you’re new to cooking, especially desserts, making pumpkin creme brulee might seem intimidating at first. But fear not! This recipe is beginner-friendly, and the steps are straightforward. You don’t need to be a professional pastry chef to pull off this decadent treat. The main challenge is just the patience to wait for the custard to set and chill. The water bath method ensures a silky smooth texture, while the torch caramelizing the sugar on top adds that signature brulee finish without any tricky techniques. This makes pumpkin creme brulee the ideal recipe for those who are starting their baking journey, as it provides an opportunity to master a couple of key skills—making custard, baking in a water bath, and using a torch—without feeling overwhelmed.
This dessert also works wonderfully as a showstopper at holiday gatherings, whether it’s Thanksgiving, Christmas, or any special occasion where you want something extra impressive but easy to prepare. You can make it ahead of time, letting the custard set and chill in the fridge until you’re ready to serve. A few minutes under the torch to create that iconic crispy sugar crust, and you’re all set to delight your guests with this sweet, velvety treat.
Ingredients and Preparation
Before we dive into the step-by-step instructions, let’s go over the ingredients you’ll need. Don’t worry about any complicated items or techniques—everything here is accessible and easy to find. Here’s what you’ll need:
For the Custard:
- 2 cups (480 ml) heavy whipping cream: This forms the base of the creamy custard.
- 1 ½ teaspoons pure vanilla extract: For a subtle vanilla flavor that complements the pumpkin.
- 4 large egg yolks: The egg yolks are what give the custard its richness and silky texture.
- ¼ cup (50g) light brown sugar: Brown sugar adds a hint of molasses flavor that pairs beautifully with pumpkin.
- ¼ cup (60g) pumpkin puree: Make sure you use pure pumpkin puree, not pumpkin pie filling, for the best flavor.
- ¼ teaspoon pumpkin spice mix: A perfect blend of cinnamon, nutmeg, and cloves—classic fall flavors.
- ⅛ teaspoon salt: A small amount of salt helps balance the sweetness of the custard.
For the Topping:
- 6 teaspoons granulated sugar: The sugar is sprinkled on top of the custard just before caramelizing to create that perfect crunchy brulee topping.
Step-by-Step Instructions
Now that you have everything ready, let’s walk through the process of making pumpkin creme brulee. This dessert involves a few key techniques, but don’t let that scare you—each step is simple and manageable, and I’ll guide you through it.
Step 1: Preheat the Oven and Prepare the Ramekins
Start by preheating your oven to 300°F (150°C). Place six 4-ounce ramekins in a large roasting pan or baking dish. These ramekins will hold the custard as it bakes in the water bath. Set the roasting pan aside for now—we’ll come back to it later.
Step 2: Prepare the Custard Base
In a medium saucepan, combine the heavy whipping cream, vanilla extract, half the brown sugar, pumpkin puree, pumpkin spice mix, and salt. Heat this mixture over medium heat until it starts to simmer gently. You don’t need to bring it to a boil, just warm it up until it begins to bubble at the edges. While this is heating, prepare the egg yolks.
Step 3: Whisk the Egg Yolks and Remaining Sugar
In a separate heatproof bowl, whisk together the egg yolks and the remaining brown sugar. Whisk until the mixture is well-blended. It’s important not to incorporate air into the mixture, so avoid over-whisking—it should just be smooth and uniform.
Step 4: Temper the Eggs
Now comes the crucial step of adding the hot cream mixture to the egg yolks. The key here is tempering the eggs, which ensures that they don’t cook too quickly and curdle. Slowly pour half of the hot cream mixture into the egg yolks, whisking constantly to prevent the eggs from scrambling. After that, slowly pour the egg mixture back into the saucepan with the rest of the cream mixture, whisking all the while. Keep whisking gently and cook on low heat until the mixture begins to thicken slightly. You’ll know it’s ready when the sugar has dissolved and the custard coats the back of a spoon. Do not let it boil—this could cause the eggs to curdle.
Step 5: Strain the Mixture
To ensure a smooth custard, it’s a good idea to strain the mixture through a fine mesh sieve. This removes any cooked bits of egg and creates a velvety smooth texture. Pour the custard evenly into the prepared ramekins.
Step 6: Set Up the Water Bath
Now, carefully place the roasting pan with the ramekins into the preheated oven. Pour hot water into the pan, filling it halfway up the sides of the ramekins. This water bath helps the custard bake gently and evenly, preventing it from curdling. Bake for 25-30 minutes, or until the custard has set but is still slightly wobbly in the center when you gently shake the ramekins. You don’t want the custard to be too firm—just a little jiggle is perfect. Once done, remove the ramekins from the water bath and let them cool on a wire rack at room temperature.
Step 7: Chill the Custards
After they’ve cooled, cover each ramekin with plastic wrap and place them in the fridge to chill for at least 4 hours, preferably overnight. This allows the flavors to meld and the custard to set to the perfect creamy consistency.
Step 8: Brulee the Custard
Now, the fun part—caramelizing the sugar! Just before serving, sprinkle about ½ to 1 teaspoon of granulated sugar over the surface of each custard. Hold the ramekin by the edges and gently shake it from side to side until the sugar is evenly distributed. Then, using a kitchen torch, caramelize the sugar by moving the flame in small circles over the surface of the custard. Start from the edges and work your way towards the center. You’ll know it’s done when the sugar is golden brown and bubbly. If you don’t have a kitchen torch, you can also place the ramekins under the broiler for a minute or two, but keep a close eye on them so they don’t burn.
Step 9: Serve and Enjoy
Once the sugar is caramelized, serve the pumpkin creme brulee immediately. You can garnish with a few extra spices, like a light sprinkle of pumpkin spice, or even top with a few roasted pumpkin seeds for some added crunch.
Beginner Tips and Notes
- Tempering the eggs is a crucial step to ensure the custard is smooth and not scrambled. Make sure you pour the hot cream mixture into the eggs slowly and whisk constantly.
- Water bath tip: When pouring water into the roasting pan, be careful not to splash any water into the ramekins. This could water down your custard and affect the texture.
- Torching the sugar: If you don’t have a torch, you can use the broiler, but keep the ramekins about 6 inches away from the heat source. Watch them closely to avoid burning.
- Storage: Store any leftover creme brulee in the refrigerator for up to 3 days. However, it’s best to caramelize the sugar just before serving to maintain that crispy texture.
Serving Suggestions
Pumpkin creme brulee is a dessert that speaks for itself, but it pairs beautifully with a variety of complementary sides. For a more indulgent dessert experience, serve with a small dollop of whipped cream, or perhaps a scoop of cinnamon ice cream for an extra treat. If you want to keep things lighter, fresh berries, like raspberries or blackberries, provide a nice tart contrast to the rich sweetness of the custard.
If you want to make a full meal out of it, serve your pumpkin creme brulee as the grand finale after a delicious homemade pumpkin soup or a savory roasted chicken dinner. The smooth, creamy custard provides a lovely contrast to the savory dishes, making it a perfect end to a fall-inspired meal.

Conclusion
Whether you’re a beginner baker or a seasoned pro, pumpkin creme brulee is a dessert that’s sure to impress. With a little practice, you’ll be able to master the techniques and create a delicious, creamy dessert that’s perfect for the fall season. Don’t be intimidated by the steps—take your time, enjoy the process, and most importantly, enjoy the final result. Let me know how it turns out, and feel free to share your thoughts or any adjustments you made in the comments. Happy baking!