

Dessert lovers, rejoice! If you’ve ever wanted to create something that looks and tastes like it came from a bakery but doesn’t require a lot of effort, then these Strawberry Cheesecake Bars are the answer. Picture this: a buttery graham cracker crust, smooth and creamy cheesecake filling, topped with fresh, juicy strawberries, and finished off with a perfectly golden, crumbly topping. Sounds irresistible, right? That’s exactly what you’ll get with this easy, beginner-friendly recipe. What’s even better is that it requires only a few simple ingredients, which means no complicated steps and no stress. If you’re new to baking or simply want to make something that’s impressive yet easy, these bars are for you.

Strawberry Cheesecake Bars: The Perfect Dessert for Beginners
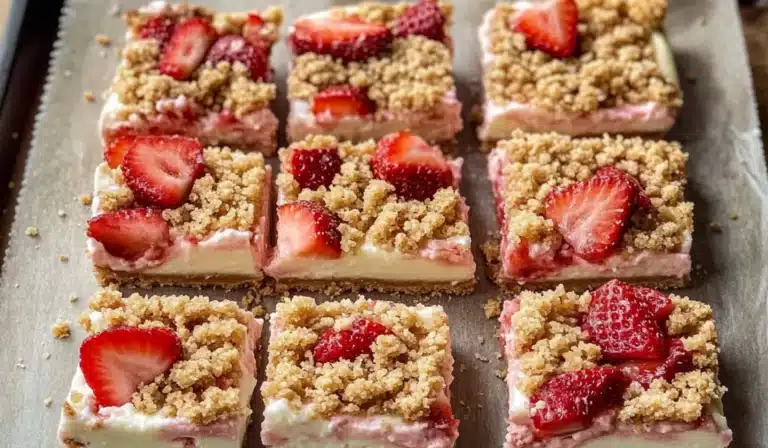
These Strawberry Cheesecake Bars are the perfect dessert—easy to make and packed with flavor. With a buttery graham cracker crust, creamy cheesecake filling, fresh strawberries, and a crumbly topping, they’re sure to become a favorite for any occasion!
- Total Time: 2 hours 50 minutes (includes chilling time)
- Yield: 9 servings 1x
Ingredients
Crust Ingredients:
- 1 ½ cups (126 g) graham cracker crumbs (about 10–12 crushed graham cracker sheets)
- 6 tablespoons unsalted butter, melted
- ¼ cup (50 g) granulated sugar
Filling Ingredients:
- 2 packages (8 ounces each) cream cheese, room temperature
- 2 large eggs, room temperature
- ⅓ cup (67 g) granulated sugar
- 1 teaspoon vanilla extract
- ¼ teaspoon kosher salt
- 2 cups (332 g) freshly diced strawberries
Crumble Topping Ingredients:
- ¾ cup (94 g) all-purpose flour
- ¼ cup (50 g) light brown sugar, packed
- ¼ teaspoon kosher salt
- 5 tablespoons unsalted butter, melted
Instructions
Step 1: Prepare the Crust
Start by preheating your oven to 350°F (175°C). Line a 9×9-inch baking dish with parchment paper. Make sure the paper goes up the sides to help with easy removal later.
Next, in a medium-sized bowl, combine the graham cracker crumbs, melted butter, and granulated sugar. Mix everything together until it resembles wet sand. If the mixture feels too dry or crumbly, add a little extra melted butter, one tablespoon at a time, until the crumbs stick together.
Once you’ve got your crust mixture, press it firmly into the bottom of your prepared baking dish. Use a spoon or the bottom of a glass to pack it down evenly and make sure it forms a solid base. The crust is the foundation of these cheesecake bars, so make sure it’s pressed firmly enough that it won’t crumble easily after baking. Now, set the baking dish aside while you work on the cheesecake filling.
Step 2: Make the Cheesecake Filling
In a large bowl, take the room-temperature cream cheese and beat it with a hand mixer or stand mixer until it’s smooth and free of lumps. The key to a smooth cheesecake filling is ensuring the cream cheese is soft, so make sure it’s been left at room temperature for at least 30 minutes before you begin mixing.
Once the cream cheese is smooth, add the eggs, granulated sugar, vanilla extract, and kosher salt. Beat everything together on medium speed until you have a creamy and uniform mixture. You want the filling to be thick and silky, with no lumps remaining. Be sure to scrape the sides of the bowl occasionally to ensure everything gets evenly incorporated.
Once the cheesecake filling is ready, spread it evenly over the graham cracker crust, smoothing the top with a spatula. You want the filling layer to be thick, so don’t worry if it doesn’t cover the edges completely. This layer will bake into a creamy, luscious filling that’s just the right texture.
Step 3: Add the Strawberries
The next step is where the flavor really starts to shine. Dice your fresh strawberries into small pieces and scatter them evenly over the cheesecake filling. The strawberries add a burst of freshness and a tangy sweetness that balances the richness of the cheesecake. If you want to get creative, you can try adding other berries or fruit combinations—blueberries, raspberries, or even sliced peaches work wonderfully in this recipe.
Step 4: Prepare the Crumble Topping
In a medium bowl, combine the all-purpose flour, light brown sugar, and kosher salt. Whisk these dry ingredients together until well combined. Then, add in the melted butter and stir until the mixture forms a crumbly dough. The crumble topping should be thick and clumpy, but not too sticky. You want the topping to bake into golden, crisp crumbs that will add a satisfying crunch to each bite.
Once your crumble topping is ready, sprinkle it evenly over the strawberries, making sure the entire surface is covered. The topping will form a lovely golden crust as it bakes, adding texture and flavor to the bars.
Step 5: Bake and Cool
Now that your bars are assembled, place the baking dish in the preheated oven. Bake for 35-40 minutes, or until the topping is golden brown and the cheesecake filling is set. It’s important not to overbake, as this can cause the filling to dry out. The edges should be firm, and the center should still have a slight jiggle when gently shaken.
Once the bars are done baking, remove them from the oven and let them cool on a wire rack for about an hour. After that, transfer the dish to the refrigerator and chill for at least 1 more hour to allow the flavors to meld and the filling to firm up completely.
Step 6: Serve and Enjoy
Once your Strawberry Cheesecake Bars have chilled, they’re ready to be served! Use the parchment paper to lift the bars out of the baking dish and cut them into squares. Each piece will have a perfect balance of crust, creamy cheesecake filling, and juicy strawberries topped with a crumbly, buttery topping.
Notes
- Room Temperature Ingredients: As mentioned earlier, using room-temperature cream cheese and eggs is crucial for achieving a smooth filling. If you forget to take them out ahead of time, you can microwave the cream cheese for 10-15 seconds to soften it.
- Don’t Overmix the Filling: When mixing the cheesecake filling, be careful not to overbeat it, as this can introduce air bubbles into the batter and affect the texture.
- Preventing Soggy Bars: If your strawberries release too much moisture during baking, you can help prevent a soggy crust by lightly patting them dry with paper towels before adding them to the filling.
- Prep Time: 15 minutes
- Cook Time: 35 minutes
- Category: Dessert
- Method: Baking
- Cuisine: American
- Diet: Vegetarian
I still remember the first time I made these Strawberry Cheesecake Bars. It was a weekend afternoon, and I was looking for a simple yet show-stopping dessert to bring to a family dinner. With only a handful of ingredients and a little bit of time, I managed to bake a dessert that everyone raved about. The combination of textures—crunchy, creamy, and soft—was absolutely perfect, and I knew I had a keeper. Over the years, I’ve perfected the recipe, and I’ve seen countless beginners enjoy making it. It’s an easy recipe to follow, and the best part? It’s a guaranteed crowd-pleaser!
These Strawberry Cheesecake Bars aren’t just delicious—they also offer the perfect balance of simplicity and elegance. The three layers of goodness come together effortlessly, and you don’t need any advanced baking skills to pull it off. Whether you’re hosting a casual family dinner, preparing a treat for a gathering, or just indulging your sweet tooth, this dessert will satisfy all your cravings and impress everyone who tries it. And trust me, once you make these, they’ll become your go-to for any occasion.
Ingredients and Preparation
Crust Ingredients:
- 1 ½ cups (126 g) graham cracker crumbs (about 10-12 crushed graham cracker sheets)
- 6 tablespoons unsalted butter, melted
- ¼ cup (50 g) granulated sugar
Filling Ingredients:
- 2 packages (8 ounces each) cream cheese, room temperature
- 2 large eggs, room temperature
- ⅓ cup (67 g) granulated sugar
- 1 teaspoon vanilla extract
- ¼ teaspoon kosher salt
- 2 cups (332 g) freshly diced strawberries
Crumble Topping Ingredients:
- ¾ cup (94 g) all-purpose flour
- ¼ cup (50 g) light brown sugar, packed
- ¼ teaspoon kosher salt
- 5 tablespoons unsalted butter, melted
Ingredient Substitutions and Tips
Before we get into the step-by-step instructions, let’s talk about ingredient substitutions and adjustments you can make based on what you have available.
- Graham Cracker Crumbs: If you don’t have graham crackers, you can use other types of cookies like digestive biscuits, vanilla wafers, or even shortbread cookies for the crust. If you want to make it healthier, consider using whole wheat crackers for a nutty flavor and extra fiber.
- Butter: While the recipe calls for unsalted butter, salted butter can be used if that’s what you have on hand, but be cautious about adding additional salt to the crust or filling.
- Cream Cheese: If you’re looking for a lighter option, you can swap the cream cheese for low-fat cream cheese or even Greek yogurt for a tangier filling, though the texture might differ slightly.
- Fresh Strawberries: Fresh strawberries are best, but frozen strawberries can be used in a pinch. Just make sure to thaw them and drain off excess water to avoid a soggy filling.
Step-by-Step Instructions
Step 1: Prepare the Crust
Start by preheating your oven to 350°F (175°C). Line a 9×9-inch baking dish with parchment paper. Make sure the paper goes up the sides to help with easy removal later.
Next, in a medium-sized bowl, combine the graham cracker crumbs, melted butter, and granulated sugar. Mix everything together until it resembles wet sand. If the mixture feels too dry or crumbly, add a little extra melted butter, one tablespoon at a time, until the crumbs stick together.
Once you’ve got your crust mixture, press it firmly into the bottom of your prepared baking dish. Use a spoon or the bottom of a glass to pack it down evenly and make sure it forms a solid base. The crust is the foundation of these cheesecake bars, so make sure it’s pressed firmly enough that it won’t crumble easily after baking. Now, set the baking dish aside while you work on the cheesecake filling.
Step 2: Make the Cheesecake Filling
In a large bowl, take the room-temperature cream cheese and beat it with a hand mixer or stand mixer until it’s smooth and free of lumps. The key to a smooth cheesecake filling is ensuring the cream cheese is soft, so make sure it’s been left at room temperature for at least 30 minutes before you begin mixing.
Once the cream cheese is smooth, add the eggs, granulated sugar, vanilla extract, and kosher salt. Beat everything together on medium speed until you have a creamy and uniform mixture. You want the filling to be thick and silky, with no lumps remaining. Be sure to scrape the sides of the bowl occasionally to ensure everything gets evenly incorporated.
Once the cheesecake filling is ready, spread it evenly over the graham cracker crust, smoothing the top with a spatula. You want the filling layer to be thick, so don’t worry if it doesn’t cover the edges completely. This layer will bake into a creamy, luscious filling that’s just the right texture.
Step 3: Add the Strawberries
The next step is where the flavor really starts to shine. Dice your fresh strawberries into small pieces and scatter them evenly over the cheesecake filling. The strawberries add a burst of freshness and a tangy sweetness that balances the richness of the cheesecake. If you want to get creative, you can try adding other berries or fruit combinations—blueberries, raspberries, or even sliced peaches work wonderfully in this recipe.
Step 4: Prepare the Crumble Topping
In a medium bowl, combine the all-purpose flour, light brown sugar, and kosher salt. Whisk these dry ingredients together until well combined. Then, add in the melted butter and stir until the mixture forms a crumbly dough. The crumble topping should be thick and clumpy, but not too sticky. You want the topping to bake into golden, crisp crumbs that will add a satisfying crunch to each bite.
Once your crumble topping is ready, sprinkle it evenly over the strawberries, making sure the entire surface is covered. The topping will form a lovely golden crust as it bakes, adding texture and flavor to the bars.
Step 5: Bake and Cool
Now that your bars are assembled, place the baking dish in the preheated oven. Bake for 35-40 minutes, or until the topping is golden brown and the cheesecake filling is set. It’s important not to overbake, as this can cause the filling to dry out. The edges should be firm, and the center should still have a slight jiggle when gently shaken.
Once the bars are done baking, remove them from the oven and let them cool on a wire rack for about an hour. After that, transfer the dish to the refrigerator and chill for at least 1 more hour to allow the flavors to meld and the filling to firm up completely.
Step 6: Serve and Enjoy
Once your Strawberry Cheesecake Bars have chilled, they’re ready to be served! Use the parchment paper to lift the bars out of the baking dish and cut them into squares. Each piece will have a perfect balance of crust, creamy cheesecake filling, and juicy strawberries topped with a crumbly, buttery topping.
Beginner Tips and Notes
- Room Temperature Ingredients: As mentioned earlier, using room-temperature cream cheese and eggs is crucial for achieving a smooth filling. If you forget to take them out ahead of time, you can microwave the cream cheese for 10-15 seconds to soften it.
- Don’t Overmix the Filling: When mixing the cheesecake filling, be careful not to overbeat it, as this can introduce air bubbles into the batter and affect the texture.
- Preventing Soggy Bars: If your strawberries release too much moisture during baking, you can help prevent a soggy crust by lightly patting them dry with paper towels before adding them to the filling.
Serving Suggestions
These Strawberry Cheesecake Bars are delicious all on their own, but if you’re looking to add a little something extra, here are some serving ideas:
- Whipped Cream: Top the bars with a dollop of fresh whipped cream for extra creaminess.
- Ice Cream: Vanilla or strawberry ice cream pairs perfectly with the cheesecake’s tanginess.
- Chocolate Drizzle: A drizzle of melted chocolate or a dusting of cocoa powder can add an extra layer of flavor.
Storage Tips
If you have leftovers (which might be hard to believe after tasting these bars), they can be stored in an airtight container in the refrigerator for up to 3 days. For longer storage, you can freeze them. Wrap each bar individually in plastic wrap, then store them in a freezer-safe container. They’ll keep well for up to 2 months in the freezer. When ready to eat, just thaw the bars in the refrigerator overnight for the best texture.

Conclusion
These Strawberry Cheesecake Bars are not just a delicious dessert, they’re also a great recipe for beginners who want to try their hand at baking. With minimal ingredients, simple steps, and a guaranteed delicious result, this recipe is a winner for any occasion. Whether you’re new to baking or a seasoned pro, these bars will impress your friends and family alike. I hope you enjoy making and eating these as much as I do. Don’t forget to share your thoughts and any tweaks you make in the comments below—I love hearing how people make these recipes their own!


