Ingredients
For the Sugar Cookie Bars, you’ll need:
- 1/2 cup butter (softened)
- 3/4 cup sugar
- 1 whole egg
- 1 tsp. vanilla extract
- 1/2 tsp. almond extract
- 3 tbsp. cream cheese (softened)
- 1 tsp. baking powder
- 2 cups all-purpose flour
For the Sugar Cookie Frosting, you’ll need:
- 1/4 cup butter (softened)
- 2 cups powdered sugar
- 2 tbsp. milk
- 1/2 tsp. vanilla extract
- Pink food coloring gel (optional)
- Sprinkles (optional)
Instructions
Step 1: Prepare the Cookie Dough
To start, preheat your oven to 350°F (175°C) and line a 9 x 9-inch baking pan with parchment paper. This step is important to ensure your bars don’t stick to the pan and come out easily once baked.
Next, in a large bowl, use a hand mixer or stand mixer to beat together the softened butter and sugar until the mixture becomes light and fluffy. This will take about 2-3 minutes. Once fluffy, add in the egg, vanilla extract, almond extract, and softened cream cheese. Beat the mixture until everything is well incorporated.
Step 2: Add Dry Ingredients
Slowly add in the flour and baking powder. It’s important to do this gradually to avoid creating a mess and to ensure the dough comes together without being overmixed. You should have a thick cookie dough batter when the flour is fully incorporated. If your dough feels too thick to spread easily, feel free to add a tablespoon or two of milk to loosen it up slightly.
Step 3: Bake the Bars
Now, spread the cookie dough evenly into the prepared 9 x 9-inch baking pan. Use a spatula to smooth it out, making sure the dough is spread evenly across the pan.
Bake for 20-25 minutes or until the top is light golden brown and the center is set. Keep an eye on the bars as baking times may vary slightly depending on your oven. Let the cookie bars cool for a few minutes before frosting.
Step 4: Make the Frosting
While the cookie bars are cooling, make the frosting. In a medium bowl, beat together the softened butter, powdered sugar, milk, and vanilla extract until smooth and creamy. If you want to add some color, incorporate a few drops of pink food coloring gel to give your frosting a lovely pastel shade.
If the frosting feels too thick, add a little more milk, one teaspoon at a time, until you reach your desired consistency. If it’s too thin, add more powdered sugar. You want the frosting to be spreadable but not too runny.
Step 5: Frost and Garnish
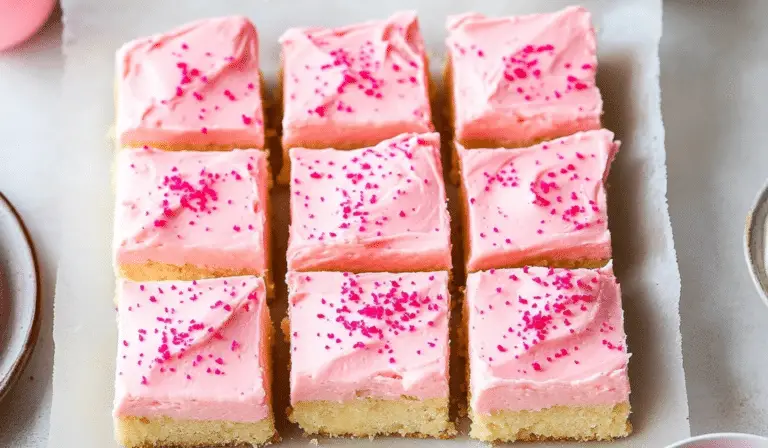
Once the bars have cooled, generously spread the frosting over the top of each one. If desired, top with sprinkles to add a fun, festive touch. You can use any type of sprinkles you prefer, whether that’s rainbow, holiday-themed, or simple sugar crystals.
Step 6: Slice and Serve
Once the frosting is applied, it’s time to slice the sugar cookie bars. For perfect slices, refrigerate the frosted bars for a few minutes to allow the frosting to set. This will help you cut neat, uniform squares. You can cut them into 16 smaller squares or 9 larger ones, depending on how big you want your servings to be. If you’re feeling creative, you can also cut them into rectangles or even triangles.
Notes
- Chill the dough: If you have the time, chilling the cookie dough for about 30 minutes before baking can help prevent the bars from spreading too much in the pan.
- Don’t overmix the dough: Overmixing the dough can result in dense and tough cookie bars. Mix the ingredients just until they’re incorporated to keep the texture soft and chewy.
- Customize the frosting: While the pink frosting is great for Valentine’s Day or spring celebrations, you can easily swap out the food coloring and sprinkles to suit the occasion. Red and green for Christmas, orange and black for Halloween, or even blue and yellow for a fun summer treat.
- Make it dairy-free: If you’re looking for a dairy-free version, you can use dairy-free butter and non-dairy milk (like almond or oat milk). The frosting can also be made with powdered sugar and dairy-free margarine instead of butter.
- Prep Time: 10 minutes
- Cook Time: 25 minutes
- Category: Dessert
- Method: Baking
- Cuisine: American
- Diet: Vegetarian