There’s a reason why chocolate chip cookies are a perennial favorite. They represent more than just a sweet treat; they’re a symbol of warmth, comfort, and the simple joys of homemade baking. I can still vividly recall my early attempts at baking these quintessential cookies, which resulted in a series of flat, uninspiring discs. It was a humbling experience, but it ignited a passion for understanding the nuances of cookie baking. This recipe for Thick and Chewy Chocolate Chip Cookies is designed to be your reliable guide, especially if you’re new to the world of baking.

The Timeless Appeal: Unlocking the Secrets to Thick and Chewy Chocolate Chip Cookies

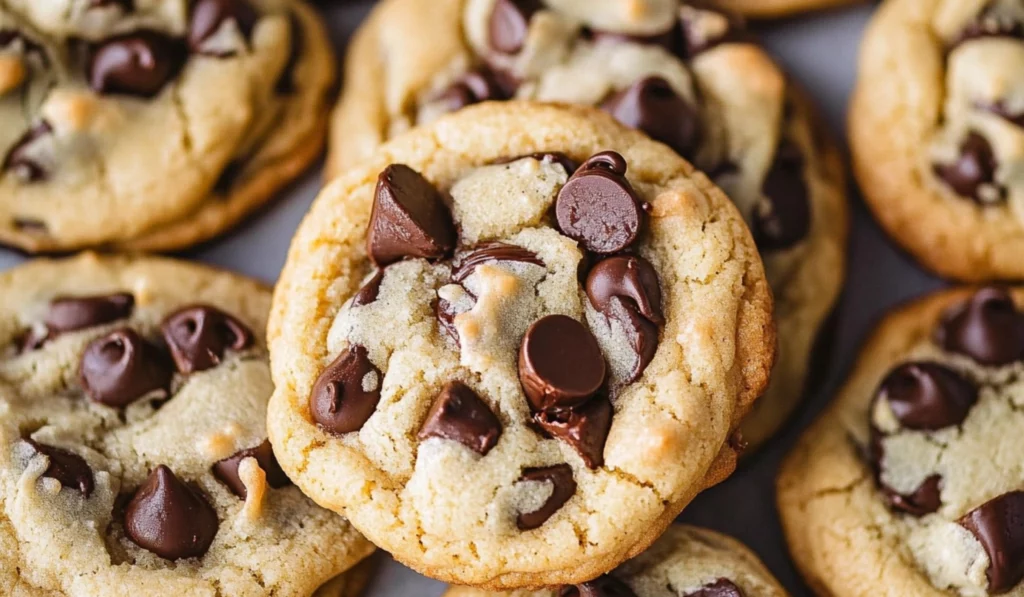
There’s nothing quite like the warm, comforting scent of homemade chocolate chip cookies. These Thick and Chewy Chocolate Chip Cookies are a classic for a reason: they’re irresistibly delicious, easy to make, and perfect for any occasion. Imagine biting into a soft, chewy cookie packed with melty chocolate chips and chunks. This recipe is ideal for beginner bakers, offering clear instructions and foolproof results. Whether you’re baking for a cozy night in or a special gathering, these cookies are sure to be a hit.
- Prep Time: 20 minutes
- Cook Time: 15 minutes
- Total Time: 35 minutes
- Yield: 16 cookies 1x
- Category: Dessert
- Method: Baking
- Cuisine: American
- Diet: Vegetarian
Ingredients
- 3 cups all-purpose flour
- 2 teaspoons cornstarch
- 1 teaspoon salt
- 1 teaspoon baking soda
- 1 cup unsalted butter, room temperature
- 1 cup brown sugar
- ½ cup granulated sugar
- 2 large eggs
- 1 tablespoon vanilla extract
- 8 ounces semi-sweet chocolate chips (plus extra for topping)
- 4 to 8 ounces chocolate chunks (plus extra for topping)
- Optional: Maldon sea salt flakes
Instructions
- Preheat the Oven: Preheat your oven to 350°F (175°C). This ensures even baking and consistent results.
- Prepare the Baking Sheet: Line a baking sheet with parchment paper or a silicone baking mat. This prevents sticking and makes cleanup a breeze.
- Combine Dry Ingredients: In a medium bowl, whisk together the flour, cornstarch, salt, and baking soda. Whisking helps to aerate the flour and ensure even distribution of the other dry ingredients. Set aside.
- Cream Butter and Sugars: In a large bowl, using an electric mixer, cream the softened butter with the brown sugar and granulated sugar until light and fluffy, about 2-3 minutes. This process incorporates air into the dough, resulting in a tender and chewy texture.
- Add Eggs and Vanilla: Add the eggs one at a time, mixing well after each addition. Stir in the vanilla extract.
- Incorporate Dry Ingredients: Gradually add the dry ingredients to the wet ingredients, mixing on low speed until just combined. Avoid overmixing, as this can lead to tough cookies.
- Add Chocolate: Stir in the chocolate chips and chocolate chunks until evenly distributed throughout the dough.
- Portion the Dough: Using a cookie scoop or a spoon, portion out ¼ to ½ cup of dough for each cookie. Place them about 3 inches apart on the prepared baking sheet. For thicker cookies, use the ½ cup measurement.
- Bake: Bake for 12-15 minutes for ¼ cup portions and 15-20 minutes for ½ cup portions. The edges should be golden brown, and the center should be slightly underbaked. The cookies will continue to cook as they cool.
- Cool: Allow the cookies to cool on the baking sheet for 15 minutes before transferring them to a wire rack to cool completely.
Notes
- Ensure butter is at room temperature for proper creaming.
- Avoid overmixing the dough for tender cookies.
- For thicker cookies use the ½ cup measurement.
- Press extra chocolate chips and chunks into the tops of the cookies before baking.
- Cool cookies on the baking sheet to allow them to set.
Why are these cookies an excellent starting point for beginners? First, they’re remarkably straightforward. The ingredient list is manageable, and the steps are clearly outlined, minimizing the potential for confusion. Second, the baking process is relatively quick, making it perfect for those spontaneous cravings or last-minute dessert needs. And let’s be honest, the end result—a warm, gooey chocolate chip cookie—is universally loved. It’s a classic for a reason, and you’ll be amazed at how easily you can achieve professional-level results.
Ingredients and Preparation: Building the Foundation of Flavor
The success of any recipe hinges on the quality and accuracy of its ingredients. Let’s delve into each component and explore potential variations for added flexibility.
- 3 cups all-purpose flour: This forms the structural backbone of our cookies. For a slightly different texture and flavor profile, consider substituting up to ½ cup with whole wheat pastry flour. This will introduce a subtle nuttiness and a bit more fiber. Experimenting with different flours can be a fun way to find your favorite cookie texture.
- 2 teaspoons cornstarch: This is the secret weapon for achieving that signature thick and chewy texture. Cornstarch acts as a thickening agent, preventing the cookies from spreading too thin. It’s a trick used by professional bakers to ensure a satisfying chew.
- 1 teaspoon salt: Salt plays a crucial role in balancing the sweetness and enhancing the overall flavor profile. Don’t skip it! It’s a flavor enhancer, not just a salty addition.
- 1 teaspoon baking soda: Baking soda is responsible for the cookies’ rise and spread. It reacts with the acids in the dough to create those characteristic air pockets. Understanding the science of baking soda is key to consistent results.
- 1 cup unsalted butter, room temperature: Using room temperature butter is essential for proper creaming. The butter should be soft but not melted. This ensures it incorporates evenly with the sugar, creating a light and airy texture. If the butter is too cold, it will be difficult to cream. If it is too warm, it wont hold the air properly.
- 1 cup brown sugar: Brown sugar adds moisture and a rich, caramel-like sweetness to the cookies. Light or dark brown sugar can be used, with dark brown sugar providing a more intense flavor. The molasses in brown sugar is what gives it that unique taste.
- ½ cup granulated sugar: Granulated sugar contributes to the cookies’ crisp edges and classic sweetness. It provides the necessary balance to the brown sugar.
- 2 large eggs: Eggs act as a binding agent, holding the ingredients together and adding richness. They also contribute to the cookies’ moisture content. Room temperature eggs also incorporate better.
- 1 tablespoon vanilla extract: Vanilla extract infuses the cookies with a warm, aromatic flavor. Use pure vanilla extract for the best results. Imitation vanilla extract will not provide the same depth of flavor.
- 8 ounces semi-sweet chocolate chips: The star of the show! Feel free to experiment with different types of chocolate chips, such as dark chocolate, milk chocolate, or even white chocolate. Reserve some extra chips to press into the tops of the cookies before baking for a visually appealing finish. High quality chocolate chips will also make a difference.
- 4 to 8 ounces chocolate chunks: Chocolate chunks add textural variety and a decadent touch. You can use pre-made chocolate chunks or chop up your favorite chocolate bars. Again, save some to place on top before baking.
- Optional: Maldon sea salt flakes: A sprinkle of sea salt flakes on top of the baked cookies adds a sophisticated touch and balances the sweetness. It’s a great finishing touch.
Preparation: Setting the Stage for Success
- Ensure all ingredients are measured accurately using measuring cups and spoons.
- Bring your butter and eggs to room temperature at least 30 minutes before baking.
- Line your baking sheets with parchment paper or silicone mats to prevent sticking and ensure easy cleanup.
Step-by-Step Instructions: Your Guide to Cookie Mastery
- Preheat the Oven: Preheat your oven to 350°F (175°C). This ensures even baking and consistent results.
- Prepare the Baking Sheet: Line a baking sheet with parchment paper or a silicone baking mat. This prevents sticking and makes cleanup a breeze.
- Combine Dry Ingredients: In a medium bowl, whisk together the flour, cornstarch, salt, and baking soda. Whisking helps to aerate the flour and ensure even distribution of the other dry ingredients. Set aside.
- Cream Butter and Sugars: In a large bowl, using an electric mixer, cream the softened butter with the brown sugar and granulated sugar until light and fluffy, about 2-3 minutes. This process incorporates air into the dough, resulting in a tender and chewy texture.
- Add Eggs and Vanilla: Add the eggs one at a time, mixing well after each addition. Stir in the vanilla extract.
- Incorporate Dry Ingredients: Gradually add the dry ingredients to the wet ingredients, mixing on low speed until just combined. Avoid overmixing, as this can lead to tough cookies.
- Add Chocolate: Stir in the chocolate chips and chocolate chunks until evenly distributed throughout the dough.
- Portion the Dough: Using a cookie scoop or a spoon, portion out ¼ to ½ cup of dough for each cookie. Place them about 3 inches apart on the prepared baking sheet. For thicker cookies, use the ½ cup measurement.
- Bake: Bake for 12-15 minutes for ¼ cup portions and 15-20 minutes for ½ cup portions. The edges should be golden brown, and the center should be slightly underbaked. The cookies will continue to cook as they cool.
- Cool: Allow the cookies to cool on the baking sheet for 15 minutes before transferring them to a wire rack to cool completely.
Beginner Tips and Notes: Troubleshooting and Efficiency
- Overmixing: Avoid overmixing the dough after adding the flour. Overmixing develops the gluten, resulting in tough cookies. Mix until just combined.
- Spreading: If your cookies spread too much, chill the dough for 30 minutes before baking.
- Undercooking: If the center of the cookie is still gooey or shiny, bake for an additional 1-2 minutes.
- Overbrowning: If the edges are browning too quickly, lower the oven temperature slightly.
- Efficient Prep: Measure out all your ingredients before you start baking. This will streamline the process.
- Tool Substitutes: If you don’t have a cookie scoop, use a tablespoon or ice cream scoop. If you don’t have an electric mixer, use a sturdy hand whisk, but be prepared for a bit of a workout!
Serving Suggestions: Enhancing Your Cookie Experience
- Pair with a cold glass of milk for a classic combination.
- Create ice cream sandwiches by sandwiching a scoop of your favorite ice cream between two cookies.
- Drizzle melted chocolate over the cooled cookies for an extra decadent treat.
- Storage: Store leftover cookies in an airtight container at room temperature for up to 5 days. For longer storage, freeze them in a single layer on a baking sheet, then transfer them to a freezer bag.

Conclusion: Your Culinary Journey and the Enduring Joy of Baking
Baking these thick and chewy chocolate chip cookies is far more than just following a set of instructions. It’s an invitation to embark on a personal culinary journey, a chance to connect with the timeless traditions of home baking, and an opportunity to create moments of pure joy. It’s about transforming simple, everyday ingredients into something truly extraordinary—a warm, comforting treat that brings smiles and creates lasting memories. As you navigate the steps of this recipe, remember that each batch of cookies is a unique expression of your creativity and passion. Don’t be afraid to experiment, to deviate from the recipe, and to infuse your own personal touch. Perhaps you’ll add a dash of cinnamon for a warm, spicy note, or incorporate a handful of toasted nuts for added crunch. Maybe you’ll discover a new favorite chocolate variety that elevates the cookies to a whole new level. The possibilities are endless, and the joy of discovery is an integral part of the baking experience.
Beyond the delicious end result, baking offers a multitude of benefits. It’s a therapeutic activity that allows you to slow down, focus on the present moment, and engage your senses. It’s a way to express your love and care for others, as you share the fruits of your labor with family and friends. And it’s a skill that you can continue to develop and refine over time, building confidence and fostering a sense of accomplishment. I wholeheartedly encourage you to embrace this baking adventure. Gather your ingredients, preheat your oven, and allow yourself to be immersed in the delightful process of creating these irresistible cookies. Share your experiences in the comments below. Did you encounter any challenges? Did you make any modifications? What was your favorite part of the baking process? Your stories will not only inspire other beginner bakers but also contribute to a vibrant community of shared culinary passion.
Remember that every baker, regardless of their skill level, began with a single recipe and a desire to create something delicious. With practice, patience, and a dash of enthusiasm, you’ll find yourself mastering the art of baking and creating treats that bring smiles to everyone around you. So, let the aroma of freshly baked cookies fill your kitchen, and may your culinary journey be filled with joy, discovery, and the sweet satisfaction of success. Happy baking!