
Some recipes become more than just a meal—they carry memories, celebrations, and moments of indulgence. One such recipe is the Boston Cream Pie Cheesecake, a show-stopping dessert that combines the rich, creamy texture of cheesecake with the iconic layers of a Boston cream pie. This dessert is perfect for those who can’t decide between cheesecake or cake—it’s both! Whether you’re preparing it for a special occasion, a family gathering, or simply treating yourself to something extraordinary, this dessert is a true crowd-pleaser.


Boston Cream Pie Cheesecake: A Sweet Fusion of Two Classic Desserts
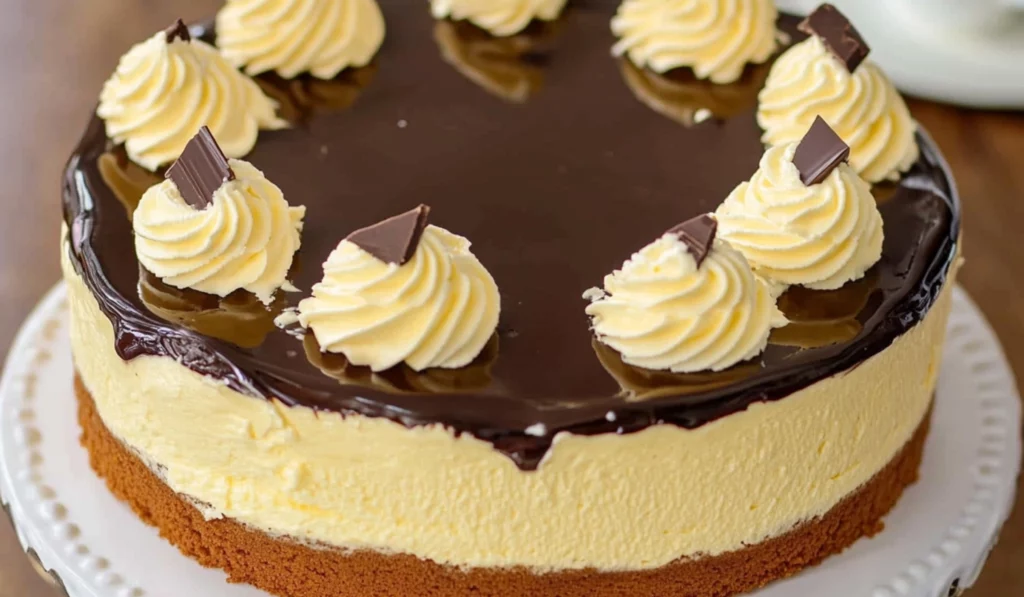
When cheesecake meets Boston cream pie, the result is pure dessert bliss. This Boston Cream Pie Cheesecake combines the creamy richness of cheesecake with the light, fluffy texture of a classic Boston cream pie, topped off with silky pastry cream and a glossy chocolate glaze. It’s a showstopper dessert that’s surprisingly simple to make, even for beginners. With clear steps and easy-to-find ingredients, you’ll be able to create this indulgent treat in no time. Ready to elevate your baking skills? Let’s get started!
- Total Time: 2 hours 25 minutes
- Yield: 16 servings 1x
Ingredients
Cake Layer:
- ½ cup sifted cake flour
- 1 teaspoon baking powder
- 1 pinch salt
- 3 large eggs, separated
- ⅓ cup sugar (for the egg yolks)
- 2 tablespoons sugar (for the egg whites)
- 1 teaspoon pure vanilla extract
- 3 tablespoons unsalted butter, melted
- ¼ teaspoon cream of tartar
Cheesecake Layer:
- 4 (8 ounce) packages cream cheese, softened
- 1⅔ cups sugar
- ¼ cup cornstarch
- 1 tablespoon pure vanilla extract
- 2 large eggs
- ¾ cup heavy whipping cream
Pastry Cream:
- 1 pint heavy cream
- 1 package instant vanilla pudding (3.4 ounces)
- ⅓ cup milk
Chocolate Glaze:
- 4 ounces semisweet chocolate, coarsely chopped
- 1 tablespoon light corn syrup
- 4 tablespoons butter
Instructions
Step 1: Make the Cake Layer
- Preheat your oven to 350°F (175°C). Butter a 9-inch springform pan generously, and wrap the outside of the pan with foil to prevent any leaks during baking. This is especially important since the cheesecake layer needs a water bath, and you don’t want any water seeping in.
- In a medium bowl, sift the cake flour, baking powder, and salt. Sifting helps to aerate the flour and removes any lumps. Set the dry ingredients aside.
- Using an electric mixer, beat the egg yolks and ⅓ cup sugar on high for about 3 minutes until the mixture becomes thick and forms light-yellow ribbons. This step is crucial as it helps to create a smooth, airy batter.
- Add the vanilla extract to the egg yolk mixture and beat it in well.
- Gradually sift the flour mixture over the egg yolk batter. Stir gently until the flour is fully incorporated, then add the melted butter and mix until smooth. It’s essential to combine the butter thoroughly to achieve the desired texture.
- In a separate, clean bowl, beat the egg whites with cream of tartar on high until frothy. Gradually add the remaining 2 tablespoons of sugar and continue beating until stiff peaks form. When the egg whites are ready, they should stand up in stiff peaks but not be dry.
- Gently fold ⅓ of the egg whites into the cake batter to lighten it. Then, carefully fold in the rest of the egg whites. Be as gentle as possible during this step to prevent deflating the air bubbles that make the cake layer fluffy.
- Pour the batter into the prepared pan and bake for 13-15 minutes or until just set. The cake should be golden on top, and it should spring back lightly when touched. Be sure not to overbake the cake, or it might become dry.
- Cool the cake on a wire rack while you prepare the cheesecake filling.
Step 2: Make the Cheesecake Layer
- Beat one package of softened cream cheese, ⅓ cup sugar, and cornstarch in a large bowl with an electric mixer on low for about 3 minutes, until smooth and creamy. Be sure to scrape down the sides of the bowl regularly to ensure everything is well incorporated.
- Add the remaining cream cheese and beat on high speed until well combined, about 2-3 minutes. The cheesecake batter should be smooth and creamy with no lumps.
- Gradually add the remaining sugar and vanilla extract, and beat until fully incorporated.
- Add the eggs, one at a time, beating well after each addition. It’s essential to add the eggs one at a time to prevent overmixing, which can cause the cheesecake to crack during baking.
- Add the heavy cream and mix it into the batter until smooth and creamy.
- Spoon the cheesecake filling over the cooled cake layer in the springform pan. Be careful not to disturb the cake layer as you spread the cheesecake filling.
- Wrap the pan in foil and place it in a large shallow pan. Add hot water around the pan to about 1 inch up the sides. This water bath method helps cook the cheesecake gently and prevents cracking.
- Bake for 75-85 minutes, or until the center barely jiggles when shaken. The cheesecake will continue to cook as it cools, so don’t worry if it seems a little soft when you take it out of the oven.
- Cool the cheesecake on a wire rack for 1 hour. Then, cover the pan with plastic wrap and refrigerate for at least 4 hours or overnight to allow it to set properly.
Step 3: Make the Pastry Cream
- In a large mixing bowl, combine the heavy cream, instant vanilla pudding mix, and milk. Use a whisk or an electric mixer to beat the mixture on high until it thickens into a custard-like consistency. It should hold its shape when you lift the whisk.
- Spread or pipe the pastry cream onto the chilled cheesecake layer. You can use a spatula to spread it evenly or pipe it with a piping bag for a more decorative look.
- Refrigerate the cheesecake again for at least 30 minutes to allow the pastry cream to set and firm up before adding the chocolate glaze.
Step 4: Make the Chocolate Glaze
- In a microwave-safe bowl, combine the semisweet chocolate, corn syrup, and butter. Microwave the mixture in 30-second intervals, stirring each time, until everything is melted and smooth. Be careful not to overheat the chocolate, as it can seize up.
- Let the glaze cool slightly before pouring it over the pastry cream layer. This prevents it from melting the cream underneath. Pour the glaze evenly over the top of the cake, making sure it covers the pastry cream.
- Allow the glaze to set before serving. You can speed up this process by chilling the cake in the refrigerator for about 30 minutes.
Notes
- How to Tell if the Cake is Done: The cake layer should be lightly golden on top and spring back when you touch it. Be careful not to overbake the cake, or it will become dry.
- Water Bath Tip: Ensure your springform pan is tightly sealed with foil to prevent any water from seeping into the cheesecake while baking. If you’re unsure, you can place the pan on a large sheet of heavy-duty foil and fold the edges over to ensure it’s tightly sealed.
- Avoiding Cracks: To prevent cracks in the cheesecake, make sure not to overmix the batter. Be gentle when folding in the egg whites and use a water bath to keep the cheesecake moist and even while baking. Also, allow the cheesecake to cool gradually rather than rapidly to avoid temperature shock.
- Cooling: Be patient when cooling the cheesecake. It needs time to set properly in the fridge, and rushing this step could result in a soggy or unset cheesecake.
- Prep Time: 45 minutes
- Cook Time: 1 hour 40 minutes
- Category: Dessert
- Method: Baking
- Cuisine: American
- Diet: Vegetarian
What makes the Boston Cream Pie Cheesecake so special is its intricate layers of light sponge cake, creamy cheesecake filling, silky pastry cream, and decadent chocolate glaze. The perfect balance of flavors and textures makes each bite a delightful experience. And despite its seemingly complicated nature, this recipe is beginner-friendly if you take it step by step. Let’s dive into the details of how to make this irresistible treat.
Why This Recipe is Perfect for Beginners
If you’ve never made a cheesecake before, this recipe might seem daunting at first glance. But with clear instructions and a few helpful tips, you’ll be able to tackle each layer one at a time and achieve a beautiful result. The Boston Cream Pie Cheesecake is a great choice for beginners because it’s mostly made up of basic ingredients you likely already have in your pantry and fridge. While the baking process involves multiple steps, the beauty of this recipe lies in its simplicity once you break it down. With each component of the cake—cake layer, cheesecake filling, pastry cream, and glaze—this recipe gives you plenty of opportunities to learn new baking techniques, all while resulting in a stunning dessert.
Additionally, this recipe is perfect for those who want to impress guests without spending hours in the kitchen. The combination of flavors is familiar enough to make it approachable but sophisticated enough to make any celebration feel extra special. Moreover, the ingredients are flexible and can be substituted based on what you have available, giving you freedom without compromising the flavor. So whether you’re making it for a birthday, a holiday, or just because, this Boston Cream Pie Cheesecake will become your go-to showstopper.
Ingredients and Preparation
Before we get started with the step-by-step instructions, let’s gather all the ingredients you’ll need for each layer of this incredible cheesecake.
Cake Layer:
- ½ cup sifted cake flour
- 1 teaspoon baking powder
- 1 pinch salt
- 3 large eggs, separated
- ⅓ cup sugar (for the egg yolks)
- 2 tablespoons sugar (for the egg whites)
- 1 teaspoon pure vanilla extract
- 3 tablespoons unsalted butter, melted
- ¼ teaspoon cream of tartar
Cheesecake Layer:
- 4 (8 ounce) packages cream cheese, softened
- 1⅔ cups sugar
- ¼ cup cornstarch
- 1 tablespoon pure vanilla extract
- 2 large eggs
- ¾ cup heavy whipping cream
Pastry Cream:
- 1 pint heavy cream
- 1 package instant vanilla pudding (3.4 ounces)
- ⅓ cup milk
Chocolate Glaze:
- 4 ounces semisweet chocolate, coarsely chopped
- 1 tablespoon light corn syrup
- 4 tablespoons butter
Alternative Ingredient Suggestions
This recipe is quite flexible, allowing you to make adjustments based on dietary preferences or what you have on hand.
- Cake Flour: If you don’t have cake flour, you can substitute it with a combination of all-purpose flour and cornstarch. For every 1 cup of cake flour, use 1 cup of all-purpose flour and remove 2 tablespoons of flour. Add 2 tablespoons of cornstarch to make up the difference. Alternatively, you can use all-purpose flour without the cornstarch, though it might result in a slightly denser cake layer.
- Cream Cheese: If you prefer a lower-fat option, you can use reduced-fat cream cheese. However, keep in mind that the texture may be slightly different, and the cheesecake might not be as rich.
- Heavy Cream: You can substitute heavy cream with half-and-half or milk if you’re looking for a lighter alternative. However, this might affect the richness of the cheesecake layer and pastry cream, so keep that in mind when making your choice.
- Instant Pudding: While the instant vanilla pudding works wonderfully here, you can opt for a homemade custard or even a different flavored pudding mix (like chocolate or butterscotch) for variation.
- Chocolate: Dark chocolate or milk chocolate can be used instead of semisweet chocolate, depending on your sweetness preference. Dark chocolate will give the glaze a more intense, slightly bitter flavor that balances the sweetness of the cake layers, while milk chocolate will create a sweeter glaze.
Step-by-Step Instructions
Now that you have your ingredients ready, let’s break down the steps to make this stunning Boston Cream Pie Cheesecake.
Step 1: Make the Cake Layer
- Preheat your oven to 350°F (175°C). Butter a 9-inch springform pan generously, and wrap the outside of the pan with foil to prevent any leaks during baking. This is especially important since the cheesecake layer needs a water bath, and you don’t want any water seeping in.
- In a medium bowl, sift the cake flour, baking powder, and salt. Sifting helps to aerate the flour and removes any lumps. Set the dry ingredients aside.
- Using an electric mixer, beat the egg yolks and ⅓ cup sugar on high for about 3 minutes until the mixture becomes thick and forms light-yellow ribbons. This step is crucial as it helps to create a smooth, airy batter.
- Add the vanilla extract to the egg yolk mixture and beat it in well.
- Gradually sift the flour mixture over the egg yolk batter. Stir gently until the flour is fully incorporated, then add the melted butter and mix until smooth. It’s essential to combine the butter thoroughly to achieve the desired texture.
- In a separate, clean bowl, beat the egg whites with cream of tartar on high until frothy. Gradually add the remaining 2 tablespoons of sugar and continue beating until stiff peaks form. When the egg whites are ready, they should stand up in stiff peaks but not be dry.
- Gently fold ⅓ of the egg whites into the cake batter to lighten it. Then, carefully fold in the rest of the egg whites. Be as gentle as possible during this step to prevent deflating the air bubbles that make the cake layer fluffy.
- Pour the batter into the prepared pan and bake for 13-15 minutes or until just set. The cake should be golden on top, and it should spring back lightly when touched. Be sure not to overbake the cake, or it might become dry.
- Cool the cake on a wire rack while you prepare the cheesecake filling.
Step 2: Make the Cheesecake Layer
- Beat one package of softened cream cheese, ⅓ cup sugar, and cornstarch in a large bowl with an electric mixer on low for about 3 minutes, until smooth and creamy. Be sure to scrape down the sides of the bowl regularly to ensure everything is well incorporated.
- Add the remaining cream cheese and beat on high speed until well combined, about 2-3 minutes. The cheesecake batter should be smooth and creamy with no lumps.
- Gradually add the remaining sugar and vanilla extract, and beat until fully incorporated.
- Add the eggs, one at a time, beating well after each addition. It’s essential to add the eggs one at a time to prevent overmixing, which can cause the cheesecake to crack during baking.
- Add the heavy cream and mix it into the batter until smooth and creamy.
- Spoon the cheesecake filling over the cooled cake layer in the springform pan. Be careful not to disturb the cake layer as you spread the cheesecake filling.
- Wrap the pan in foil and place it in a large shallow pan. Add hot water around the pan to about 1 inch up the sides. This water bath method helps cook the cheesecake gently and prevents cracking.
- Bake for 75-85 minutes, or until the center barely jiggles when shaken. The cheesecake will continue to cook as it cools, so don’t worry if it seems a little soft when you take it out of the oven.
- Cool the cheesecake on a wire rack for 1 hour. Then, cover the pan with plastic wrap and refrigerate for at least 4 hours or overnight to allow it to set properly.
Step 3: Make the Pastry Cream
- In a large mixing bowl, combine the heavy cream, instant vanilla pudding mix, and milk. Use a whisk or an electric mixer to beat the mixture on high until it thickens into a custard-like consistency. It should hold its shape when you lift the whisk.
- Spread or pipe the pastry cream onto the chilled cheesecake layer. You can use a spatula to spread it evenly or pipe it with a piping bag for a more decorative look.
- Refrigerate the cheesecake again for at least 30 minutes to allow the pastry cream to set and firm up before adding the chocolate glaze.
Step 4: Make the Chocolate Glaze
- In a microwave-safe bowl, combine the semisweet chocolate, corn syrup, and butter. Microwave the mixture in 30-second intervals, stirring each time, until everything is melted and smooth. Be careful not to overheat the chocolate, as it can seize up.
- Let the glaze cool slightly before pouring it over the pastry cream layer. This prevents it from melting the cream underneath. Pour the glaze evenly over the top of the cake, making sure it covers the pastry cream.
- Allow the glaze to set before serving. You can speed up this process by chilling the cake in the refrigerator for about 30 minutes.
Beginner Tips and Notes
- How to Tell if the Cake is Done: The cake layer should be lightly golden on top and spring back when you touch it. Be careful not to overbake the cake, or it will become dry.
- Water Bath Tip: Ensure your springform pan is tightly sealed with foil to prevent any water from seeping into the cheesecake while baking. If you’re unsure, you can place the pan on a large sheet of heavy-duty foil and fold the edges over to ensure it’s tightly sealed.
- Avoiding Cracks: To prevent cracks in the cheesecake, make sure not to overmix the batter. Be gentle when folding in the egg whites and use a water bath to keep the cheesecake moist and even while baking. Also, allow the cheesecake to cool gradually rather than rapidly to avoid temperature shock.
- Cooling: Be patient when cooling the cheesecake. It needs time to set properly in the fridge, and rushing this step could result in a soggy or unset cheesecake.
Serving Suggestions
Once your Boston Cream Pie Cheesecake is ready, it’s time to serve this decadent dessert. Here are some ideas to elevate the experience:
- Complementary Sides: Pair this cheesecake with a light, fresh fruit salad to balance the richness. Berries like raspberries or strawberries complement the chocolate and vanilla flavors beautifully. A scoop of vanilla ice cream also makes for a perfect accompaniment to this creamy dessert.
- Storage: This cheesecake can be stored in the refrigerator for up to 3-4 days. Keep it tightly wrapped in plastic wrap to prevent it from absorbing any unwanted odors from the fridge. If you have leftovers, you can freeze slices individually for later enjoyment.

Conclusion: Your Next Baking Challenge
There’s something truly magical about the Boston Cream Pie Cheesecake—the rich layers of cheesecake and cake come together to create a dessert that’s as stunning as it is delicious. Whether you’re a beginner or a seasoned baker, this recipe will give you the chance to experiment with different techniques while creating a treat that’s sure to impress. Don’t be afraid to get creative with the presentation, add a twist, or even try variations of the flavors.
Once you’ve made this delicious dessert, I’d love to hear about your experience. Let me know how it turned out in the comments below! Don’t forget to share any creative ideas or tips you came up with while making your own Boston Cream Pie Cheesecake.
Happy baking, and enjoy every bite!


