
This High Protein Cottage Cheese Ice Cream (Chocolate Protein, No Churn) is the only frozen dessert recipe you’ll ever need when you want something rich, chocolatey, and actually good for you. I know that sounds like a big promise. But I’ve made this more times than I can count, and every single batch disappears within days. You get pure comfort on a plate — or in a bowl, technically — without sacrificing your protein goals or spending an hour in the kitchen. No ice cream maker. No heavy cream. No complicated steps. Just a blender, a freezer, and about ten minutes of your time. Learn more in our article about Cottage Cheese and Spinach Crustless Quiche.

Table of Contents
I hate the idea that healthy food has to taste like a compromise. Most “healthy” ice cream recipes I’ve tried were either chalky, icy, or so sweet they tasted artificial. This one is different. When you blend full-fat cottage cheese until it’s completely smooth, something almost magical happens — the lumpy, slightly tangy curd transforms into a silky, creamy base that picks up the deep chocolate flavor of protein powder and cocoa like a dream. The aroma of fresh herbs has its place in cooking, but this recipe belongs to a different kind of sensory joy: the rich, bittersweet smell of Dutch-process cocoa swirling through a cold, velvety mixture that honestly looks better than it has any right to. Pair that with real vanilla extract and just enough honey to balance the bitterness, and you’ve got something special. Learn more in our article about Tropical Strawberry Colada Smoothie.
And here’s my hot take? Most recipes use way too much salt and way too much sweetener, and they end up masking the natural flavors underneath. Less is more with this recipe. Let the chocolate and vanilla do the heavy lifting. Trust the process. If you can run a blender and set a timer, you can absolutely make this High Protein Cottage Cheese Ice Cream (Chocolate Protein, No Churn) — and your future self, standing at the freezer with a scoop at 9pm, will thank you for it.
Recipe At A Glance
- Prep Time: 10 minutes
- Freeze Time: 4–6 hours (or overnight)
- Total Time: 4 hours 10 minutes (minimum)
- Servings: 4 servings
- Serving Size: Approximately 1/2 cup
- Calories Per Serving: ~190–220 kcal (estimate)
- Protein Per Serving: ~20–25g
- Equipment Needed: High-speed blender or food processor, freezer-safe container
Why Cottage Cheese Makes the Perfect Ice Cream Base
If you’ve never blended cottage cheese before, I completely understand the skepticism. It doesn’t look like the base of anything delicious. But here’s what happens: the moment that lumpy, curd-filled texture hits a high-speed blender, everything changes. The curds break down completely, the whey incorporates, and within about 60 to 90 seconds you’re left with something so smooth and creamy it genuinely surprises people every time. I’ve watched skeptical family members taste the blended base before freezing and immediately ask for the recipe. That transformation is the entire reason this no-churn high protein ice cream works so well.
The science behind it makes sense once you understand what cottage cheese actually is. It’s packed with casein protein — the slow-digesting dairy protein that gels when cold. That natural gelling property is exactly what gives this frozen dessert its dense, mousse-like consistency after freezing, mimicking the texture of full-fat ice cream without a drop of heavy cream. A half-cup serving delivers somewhere between 20 and 25 grams of protein, depending on your cottage cheese brand and which protein powder you reach for. Compare that to traditional chocolate ice cream, which offers maybe 3 to 5 grams of protein per serving along with a long list of additives and added sugar, and the difference is pretty hard to argue with.
The flavor profile of cottage cheese is also surprisingly neutral once it’s blended. It has a very mild tanginess, but chocolate protein powder and unsweetened cocoa completely take over that profile. You’re not fighting the cottage cheese flavor — you’re building on top of a blank, creamy canvas. This High Protein Cottage Cheese Ice Cream (Chocolate Protein, No Churn) is proof that the best ingredients don’t always come from the dessert aisle. Sometimes the most powerful base is sitting quietly in the dairy section right next to the sour cream.
Ingredients You’ll Need
Main Ingredients
| Ingredient | Quantity | Notes |
|---|---|---|
| Full-fat cottage cheese | 2 cups | Full-fat (4% milkfat) yields the creamiest result; 2% works as a lighter option but may turn icier |
| Chocolate protein powder | 2 scoops (approximately 60g) | Whey or casein both work; casein creates a thicker, denser texture after freezing |
| Unsweetened cocoa powder | 2 tablespoons | Deepens and intensifies chocolate flavor; Dutch-process is recommended |
| Honey or pure maple syrup | 2–3 tablespoons | Adjust to taste; start with 2 tablespoons; can substitute a sugar-free sweetener |
| Pure vanilla extract | 1 teaspoon | Pure vanilla preferred; imitation extract works in a pinch |
| Unsweetened almond milk (or milk of choice) | 1/4 cup | Helps the blend reach a completely smooth consistency; add more one tablespoon at a time as needed |
Optional Mix-Ins & Toppings
| Ingredient | Quantity | Notes |
|---|---|---|
| Mini chocolate chips | 2 tablespoons | Fold in after blending, before freezing — do not blend |
| Peanut butter or almond butter | 2 tablespoons | Swirl in for a chocolate peanut butter variation; adds healthy fat and extra protein |
| Pinch of sea salt | 1/8 teaspoon | Enhances and rounds out the chocolate flavor beautifully |
| Crushed graham crackers | As desired | Use as a crunchy topping right before serving |
A quick note on the sweetener situation — and this is where I feel strongly. Most recipes use way too much sweetener, and it completely drowns the chocolate. Start with 2 tablespoons of honey or maple syrup. Taste the blended mixture. Add more only if you genuinely need it. Cold temperatures dull sweetness slightly, so the frozen result will taste a touch less sweet than the fresh blend, but you want to stay in control of the flavor balance from the start. This High Protein Cottage Cheese Ice Cream (Chocolate Protein, No Churn) doesn’t need to be candy-sweet to taste incredible — the cocoa and protein powder carry enormous flavor on their own.
Equipment You’ll Need
- High-speed blender OR food processor (blender preferred for the smoothest, creamiest result)
- Freezer-safe loaf pan or airtight container (an 8×4 inch loaf pan works perfectly)
- Plastic wrap or tight-fitting lid for covering during freezing
- Rubber spatula for scraping the blender and smoothing the surface
- Measuring cups and measuring spoons
- Ice cream scoop (run it under warm water for clean, easy scoops)
How To Make High Protein Cottage Cheese Ice Cream (Chocolate Protein, No Churn)
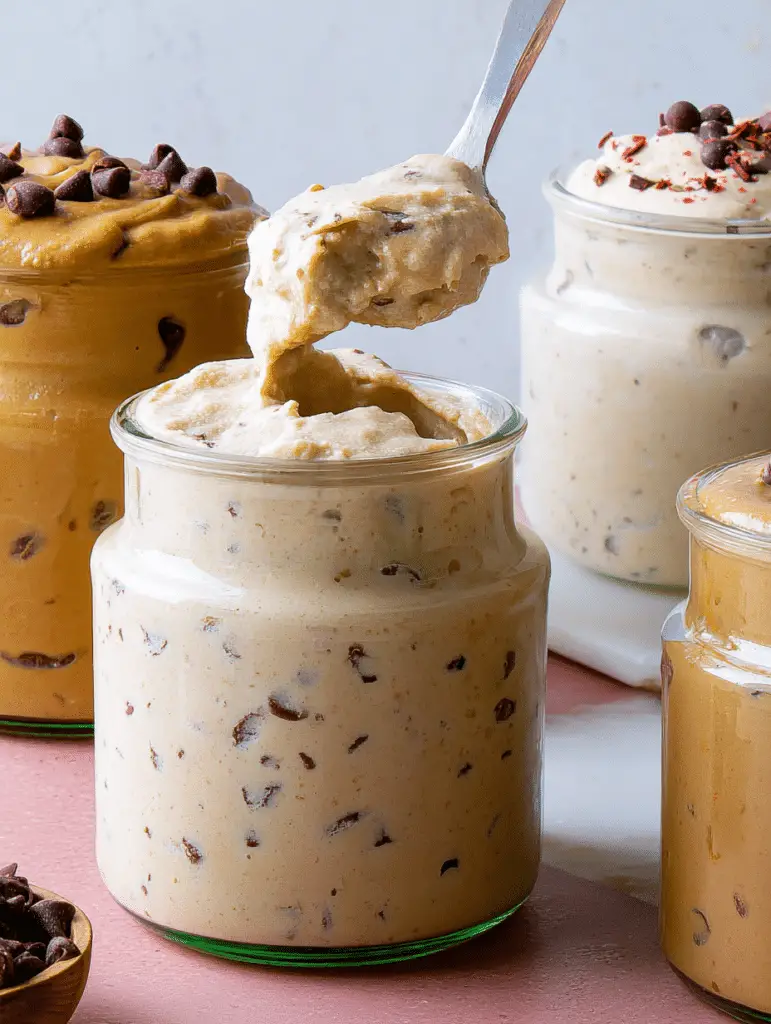
Start by adding everything to your blender in the right order — this makes a real difference. Pour in the 1/4 cup of almond milk first, then add the 2 cups of full-fat cottage cheese. Adding the liquid first protects your blender motor and gets things moving right away without straining the machine. On top of that, add your 2 scoops of chocolate protein powder, 2 tablespoons of unsweetened cocoa powder, 2 tablespoons of honey or maple syrup (start conservative — you can always add more), and the full teaspoon of pure vanilla extract. Secure the lid tightly. Take a breath. Now blend on high for a full 60 to 90 seconds without stopping. You want absolutely zero lumps remaining. Scrape down the sides once halfway through if your blender needs it, then finish the blend. What you’re looking for is a texture that resembles a thick, glossy chocolate mousse — smooth, uniform, and almost pourable.
The first batch looked like a science experiment gone wrong, but it actually tasted pretty decent. That’s the honest truth of how I discovered just how important the blending time is. I’d stopped too early, left visible curds in the mix, and the texture after freezing was slightly grainy. Since then, I always let it run the full 90 seconds without second-guessing myself. Once you nail the blend, taste the mixture and make any adjustments before you commit to freezing. Want more chocolate depth? Add another teaspoon of cocoa and blend for another 15 seconds. Need a touch more sweetness? Drizzle in a little extra honey. Remember — the flavor will mellow and the sweetness will fade slightly once frozen, so aim just a bit bolder than you think you need.
Now for the best part — the mix-ins. Feel free to get creative here. If you’re folding in mini chocolate chips, a peanut butter swirl, or anything chunky, this is the moment. Use your rubber spatula to gently fold them in — do not throw them back into the blender. You want texture contrast in the finished product, not a fully uniform blend. For a gorgeous peanut butter swirl, pour the blended base into your loaf pan first, then drop spoonfuls of peanut butter across the top and drag a knife through in long, lazy S-curves. It looks beautiful, and the contrast of rich chocolate with creamy, nutty peanut butter is absolutely worth the extra thirty seconds.
Meanwhile, get your freezer-safe loaf pan or airtight container ready. Pour or scrape the entire blended mixture into the container using your rubber spatula — get every last bit out of that blender. Smooth the top into an even layer so it freezes uniformly and scoops cleanly later. Now, and this step is non-negotiable: press a sheet of plastic wrap directly onto the surface of the mixture before you put the lid on or wrap the container. I mean directly on it, touching it completely, with no air gaps. This single step prevents the ice crystals that form when air comes into contact with the frozen surface, and it’s the difference between creamy and icy in the final texture. Seal the container and slide it into the freezer on a flat surface.
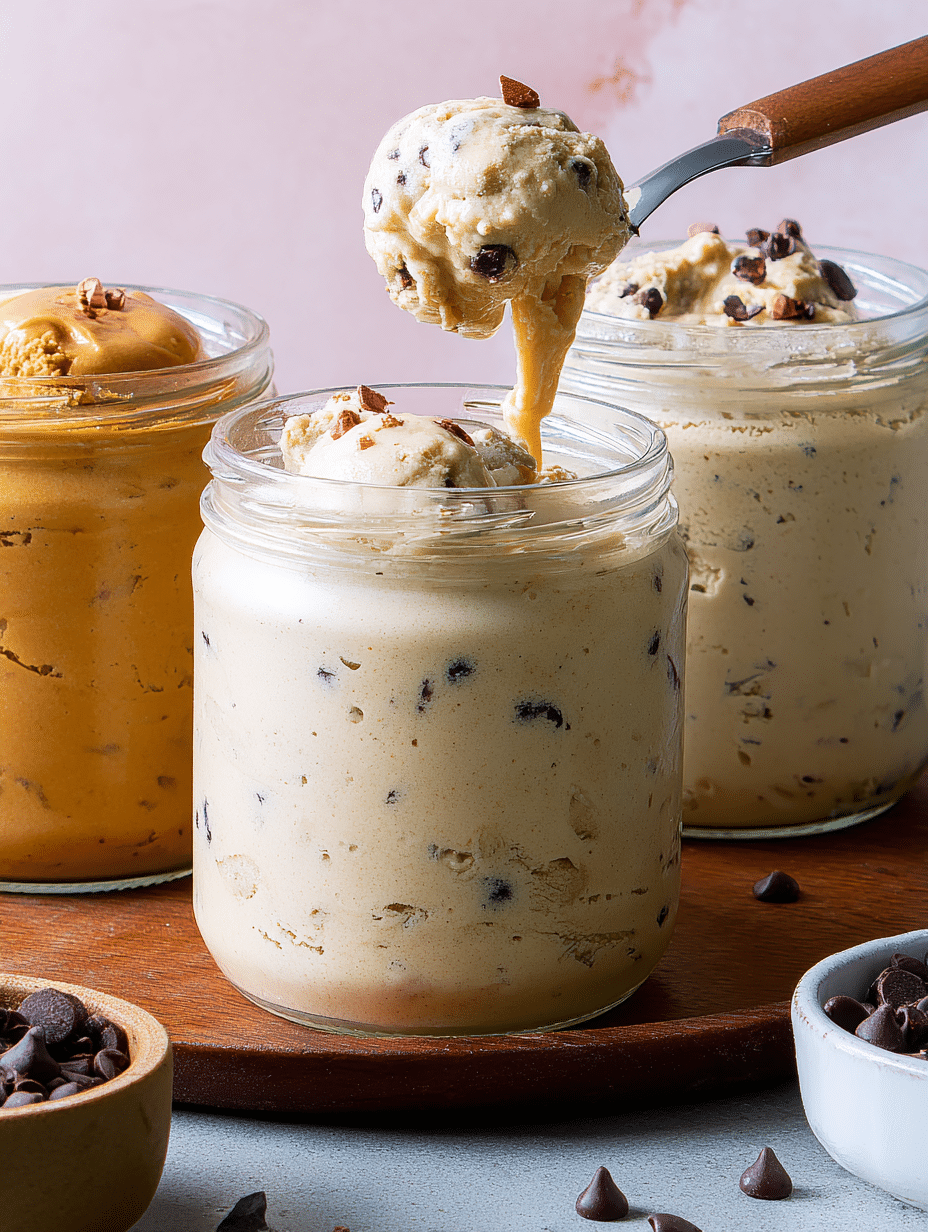
Freeze for a minimum of 4 to 6 hours, but overnight is where this High Protein Cottage Cheese Ice Cream (Chocolate Protein, No Churn) really shines. I always make it the night before I plan to serve it. The texture after a full overnight freeze is genuinely remarkable — dense, scoopable, and rich in a way that shorter freeze times just don’t achieve. When you’re ready to serve, pull the container out of the freezer and set it on your counter for 5 to 8 minutes. Don’t rush this step. Don’t try to scoop it straight from the freezer — you’ll end up with either a broken spoon or a pile of shaved ice that doesn’t resemble a scoop at all. Let it soften slightly, run your scoop under warm water, and then work around the edges of the container first. The scoops that come out are golden, tender, and creamy — pure comfort in a bowl, and honestly impressive enough to serve to guests who’d never guess the main ingredient is cottage cheese.
Pro Tips for the Best Cottage Cheese Ice Cream
I’ve made this recipe more times than I can count. Here’s what I’ve learned — the little things really do matter with this one.
- Always use full-fat cottage cheese. I know it’s tempting to grab the low-fat tub, but don’t. Full-fat (4% milkfat) is what gives you that rich, creamy scoop. Low-fat versions have less fat to fight off ice crystal formation, so you end up with something closer to a flavored ice block than actual ice cream.
- Blend longer than feels necessary. Seriously — push past 60 seconds. Go a full 90 seconds if you can. Every single curd needs to disappear before this goes into the freezer. Any lumps left behind will freeze solid and create a weird, grainy bite. You want the texture to look like thick chocolate mousse when you’re done blending. That’s your green light.
- Cold dulls sweetness — so be bold. Here’s my hot take: most recipes use way too much salt, but with sweetener, frozen desserts are a different story. The frozen product will taste noticeably less sweet than the fresh blend. Taste your mixture before it goes in the freezer and make it just a touch sweeter than you think you need. You’ll thank yourself later.
- Press plastic wrap directly on the surface. This single step separates creamy cottage cheese ice cream from icy cottage cheese ice cream. Air is your enemy here. Press the wrap right down onto the surface of the mixture before you seal the container. It blocks freezer air from touching the top layer and prevents that rough, frosty crust from forming.
- Try casein protein powder for an even denser scoop. Whey works great, but casein is worth trying if you want a texture that leans more toward traditional ice cream. Casein gels when it gets cold, which gives the frozen result a denser, almost custard-like feel. Feel free to get creative here — a chocolate-peanut butter casein blend is honestly incredible. While you’re experimenting with mix-ins, our Granola Clusters Make a fantastic crunchy topping when you’re ready to serve.
- Let it sit before you scoop. Pull the container out of the freezer and wait 5 to 8 minutes. I know it’s hard. But scooping straight from the freezer means wrestling with a rock-hard block and ending up with chunky shards instead of smooth, round scoops. Patience here pays off with a result that looks and feels just like the real thing.
- Portion into muffin molds for easy grab-and-go servings. This is a trick I use constantly for meal prep. Pour the blended mixture into a silicone muffin tray before freezing. Each cup sets into a perfect individual portion — roughly 1/2 cup each, hitting that 20–25g protein target per serving. No digging through a container, no guessing on portions. Just pop one out and let it thaw for a few minutes. If you’re building a high-protein routine, check out our Tropical Strawberry Colada Smoothie — it pairs beautifully with this kind of prep-ahead approach.
One more casual idea worth mentioning: if you want to skip the chocolate direction entirely, swap the cocoa and chocolate protein for vanilla protein powder plus an extra splash of vanilla extract. You get a totally different dessert — lighter, softer in flavor — with all the same protein. Less is more with this recipe sometimes, and the vanilla version is proof of that.
How To Store Cottage Cheese Ice Cream
Store your cottage cheese ice cream in an airtight, freezer-safe container with plastic wrap pressed firmly against the surface before sealing. It stays at its best for up to 2 weeks in the freezer — after that, ice crystals start to take over and the texture gets noticeably grainy. Do not let it fully thaw and then refreeze it. Once it’s fully liquid, the emulsion breaks and you’ll end up with an icy, watery mess the second time around. If you want to enjoy it over time without texture loss, the muffin mold trick from the tips section is your best bet — individual frozen portions hold up better than one large batch you’re repeatedly opening and closing.
You might also like
Discover more delicious recipes in our recipe collection.
Frequently Asked Questions
Does cottage cheese ice cream actually taste like real ice cream?
It does — more than you’d expect. Once the cottage cheese is fully blended, every trace of that lumpy, tangy dairy texture disappears. What you’re left with is a rich, smooth base that takes on the chocolate protein and cocoa beautifully. The final texture leans slightly denser than soft-serve, closer to a chocolate mousse that’s been frozen firm. It’s not identical to a Ben & Jerry’s pint, but it’s genuinely satisfying — not the sad, compromised “healthy” version you might be bracing for.
Why did my cottage cheese ice cream turn out icy instead of creamy?
There are three likely culprits. First: low-fat cottage cheese. The fat is what keeps ice crystals from dominating the texture — without enough of it, you get crunch instead of cream. Second: not blending long enough. Any curds left in the mixture freeze into hard, icy bits. Blend for a full 60–90 seconds until the texture looks like thick mousse. Third: skipping the plastic wrap step. If air touches the surface of the mixture in the freezer, you’ll get a rough, frosty top layer that bleeds into the rest. Press wrap directly on the surface before sealing — every single time.
How much protein does this recipe actually have per serving?
Each serving — approximately 1/2 cup — contains an estimated 20 to 25 grams of protein. That number comes from both the full-fat cottage cheese and the two scoops of chocolate protein powder. The exact amount depends on the specific brands you use, since cottage cheese and protein powder vary quite a bit by brand. If you want to push the protein higher, you can add a tablespoon of collagen peptides to the blend. Just don’t go overboard with extra protein powder — too much makes the texture chalky and dry.
Can I make this cottage cheese ice cream without a high-speed blender?
A food processor works as a solid backup — it will get the mixture smooth, though it may take a bit longer and require more scraping down the sides. A standard countertop blender can work too, but you’ll need to add almond milk gradually to keep things moving and blend in shorter bursts. What doesn’t work well is a hand mixer or an immersion blender alone — neither has enough power to break down the cottage cheese curds completely. The smoother your blend, the creamier your final scoop. If you love using cottage cheese in creative ways, our Cottage Cheese and Spinach Crustless Quiche Is another great example of how far this ingredient can go.
Can I make this recipe dairy-free or vegan?
Yes, with a few honest caveats. You’ll need a dairy-free cottage cheese alternative — tofu-based versions are the most widely available and blend reasonably well. Swap in a plant-based chocolate protein powder and use maple syrup as your sweetener. The result is still good, but the texture won’t be quite as creamy as the full-fat dairy version. Dairy-free cottage cheese tends to have a slightly different fat structure, which can make the frozen result a touch icier. It’s worth trying, especially if dairy isn’t an option for you — just go in with realistic expectations rather than expecting an identical result.
The Creamiest High Protein Cottage Cheese Ice Cream (Chocolate Protein, No Churn) You'll Ever Make
Ingredients
Method
- Add 1/4 cup almond milk to the blender first, then add 2 cups of full-fat cottage cheese, 2 scoops of chocolate protein powder, 2 tablespoons cocoa powder, 2–3 tablespoons honey or maple syrup, and 1 teaspoon vanilla extract.
- Blend on high for 60 to 90 seconds until completely smooth and glossy, resembling a thick chocolate mousse.
- Taste the mixture and adjust sweetness or chocolate flavor if needed before folding in any mix-ins like mini chocolate chips.
- Pour the mixture into a freezer-safe container, smoothing the top evenly and pressing plastic wrap directly onto the surface to prevent ice crystals.
- Freeze for at least 4 to 6 hours or overnight for the best texture, then let sit for 5 to 8 minutes before scooping.


