

Bounty Balls are the perfect treat for anyone with a sweet tooth, combining the tropical flavors of coconut with rich chocolate for an indulgent bite-sized snack. These homemade treats are incredibly simple to make and require minimal ingredients, making them ideal for beginners. Whether you’re looking for a quick dessert to satisfy your cravings or you want to impress your friends with a homemade snack, Bounty Balls are the answer. Their smooth chocolate coating, combined with a chewy coconut filling, is sure to become a favorite among family and friends.

Homemade Bounty Balls: A Simple and Irresistible Chocolate-Coconut Delight
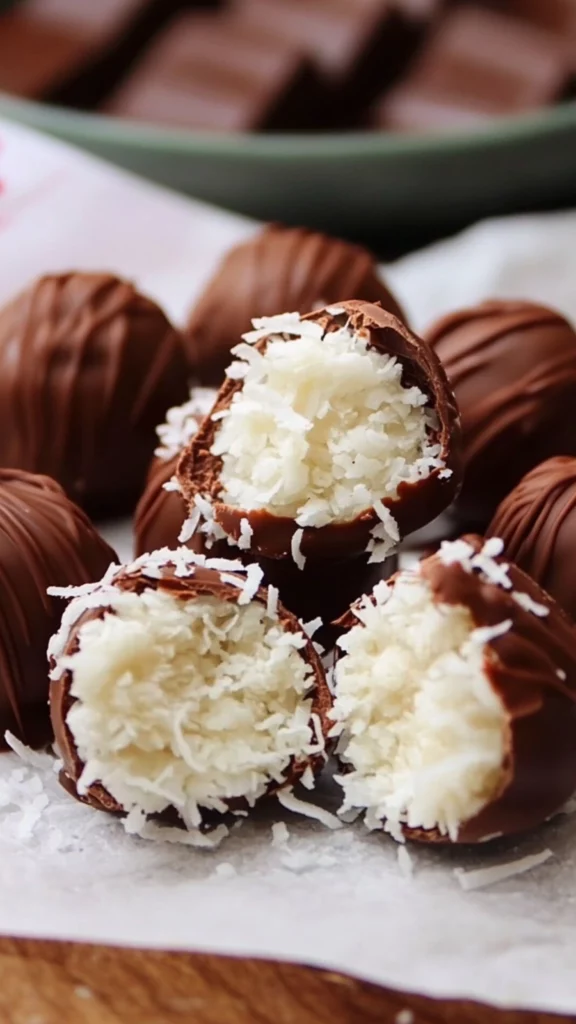
Looking for a simple, delicious treat? Bounty Balls are the perfect solution! With just three ingredients—shredded coconut, sweetened condensed milk, and chocolate—you can create bite-sized delights that are as easy as they are tasty. This beginner-friendly recipe requires no baking, making it ideal for a quick snack or homemade gift. In just a few simple steps, you’ll have a sweet indulgence that’s sure to impress!
- Total Time: 25 minutes
- Yield: 12–15 balls 1x
Ingredients
For the Coconut Filling:
- 2 cups of shredded coconut
- ½ to ¾ cup of sweetened condensed milk (adjust based on the consistency you prefer)
For the Chocolate Coating:
- 5 pieces of Galaxy chocolate bars (or any chocolate brand you prefer, such as Hershey’s or Lindt)
- Optional: 1/2 cup of additional shredded coconut for garnishing
Instructions
Step 1: Prepare the Coconut Filling
Start by preparing the coconut filling. In a large mixing bowl, add the shredded coconut and sweetened condensed milk. Begin by adding the condensed milk in small amounts, stirring as you go. It’s important to mix everything together slowly to ensure the coconut absorbs the milk evenly.
At first, you can use a spatula to stir the mixture. If you attempt to mix it with your hands too soon, the condensed milk might stick to your fingers. Once the mixture starts coming together, you can use your hands to fully mix the ingredients. The texture should be moist but not too wet. If the mixture feels too dry or crumbly, add more condensed milk until it reaches the right consistency. On the other hand, if it’s too wet or sticky, simply add more shredded coconut to firm it up.
The goal is to have a mixture that’s firm enough to mold into balls, but soft enough to be manageable. When you shape the mixture into balls, they should hold their shape without falling apart.
Step 2: Mold the Coconut Mixture into Balls
Once your coconut and condensed milk mixture is ready, begin shaping it into small balls. You can make them as big or small as you like, but aim for uniform sizes to ensure they cook evenly and look neat. You might want to use a tablespoon or a small scoop to portion out the mixture for consistency.
The key to molding the coconut balls is to press the mixture gently into a ball shape with your hands. If the mixture sticks to your hands too much, dampen your hands slightly with water to make it easier to handle.
If you prefer bite-sized snacks, you can make the balls small enough to fit in one bite. If you want a more decadent treat, feel free to make larger balls. The beauty of this recipe is that it’s completely customizable based on your preferences.
Step 3: Melt the Chocolate
Now, it’s time to melt the chocolate for the coating. Take four of the Galaxy chocolate bars and break them into smaller pieces. Place the chocolate in a heatproof bowl, and then create a double boiler setup. Fill a larger pot with a bit of water and heat it on the stove. Place the bowl with the chocolate on top of the pot, ensuring that the water doesn’t touch the bowl. Let the steam from the hot water gently melt the chocolate.
Stir the chocolate frequently to ensure it melts evenly and doesn’t burn. Once the chocolate has completely melted and is smooth, it’s ready to coat the coconut balls. If the chocolate becomes too thick during this process, add a little bit of vegetable oil to thin it out and make it easier to coat the balls.
Step 4: Coat the Coconut Balls with Chocolate
Lay out a piece of parchment paper or wax paper on a flat surface, such as a baking tray or countertop. Using two forks, carefully dip each coconut ball into the melted chocolate, ensuring that each ball is fully coated. Allow any excess chocolate to drip off before placing the ball onto the parchment paper. Try to space the balls a couple of inches apart so they don’t stick together as the chocolate hardens.
For a more polished look, you can use a spoon to drizzle extra chocolate over the top of the balls after dipping them. Be sure to remove any excess chocolate to avoid clumps.
Step 5: Let the Chocolate Harden
Once all the coconut balls are coated in chocolate, let them sit at room temperature for about 30 minutes to 1 hour to allow the chocolate to harden. If you’re in a hurry, you can place them in the fridge to speed up the process.
As the chocolate hardens, the Bounty Balls will become firm and set. Once they are hard enough to touch, they’re ready for the final touch.
Step 6: Garnish the Bounty Balls
For an extra touch of decoration, you can garnish the Bounty Balls with some melted chocolate. Take the fifth remaining chocolate bar and melt it using the same double boiler method as before. Once melted, pour the chocolate into a piping bag or a plastic bag with the tip cut off. Drizzle the melted chocolate over the top of the balls in a decorative pattern.
While the chocolate is still soft, sprinkle some shredded coconut on top for extra flavor and texture. The garnish not only enhances the appearance of the Bounty Balls but also adds more coconut flavor, making them even more delicious.
Step 7: Let the Garnish Set
Allow the garnished Bounty Balls to sit at room temperature for a few minutes until the chocolate garnish sets. If you’re in a rush, you can place them in the fridge to speed up the process.
Once the garnish has hardened, your Bounty Balls are ready to be served!
Notes
- If the coconut mixture feels too sticky, try dampening your hands with a little water to make it easier to shape the balls.
- Be patient while melting the chocolate. Keep the heat low and stir constantly to avoid burning it.
- If you don’t have parchment paper, you can use wax paper or a silicone baking mat to prevent the balls from sticking.
- If the chocolate coating becomes too thick, add a teaspoon of vegetable oil to thin it out and make it easier to dip the balls.
- Prep Time: 15 minutes
- Cook Time: 10 minutes
- Category: Dessert
- Method: No-Bake, Melting, Mixing
- Cuisine: International (General)
- Diet: Vegetarian
As a beginner, you may feel apprehensive about making desserts from scratch, but Bounty Balls take the stress out of baking and bring the joy of making something delicious right into your kitchen. The beauty of this recipe lies in its simplicity. With only a few basic ingredients, you can create these delectable bites in no time. Plus, the process is flexible—you can adjust the size of the balls, the type of chocolate, or even the garnish, allowing for personal customization while still keeping it easy.
Why Bounty Balls Are Perfect for Beginners
If you’ve never baked or made candies from scratch before, Bounty Balls are an excellent starting point. They don’t require special tools, precise temperatures, or complicated steps. With just a few ingredients—shredded coconut, sweetened condensed milk, and chocolate—you can create something that looks and tastes like it came from a professional bakery. It’s also a fun and hands-on recipe that lets you get creative by molding the coconut mixture into balls and coating them in melted chocolate.
Not only are these Bounty Balls easy to make, but they’re also incredibly versatile. You can make them smaller for bite-sized snacks or larger for a more decadent treat. You can customize the type of chocolate based on your preference, whether it’s milk chocolate, dark chocolate, or white chocolate. The possibilities are endless, and the recipe can be easily adjusted to suit your taste.
These homemade Bounty Balls are also a healthier alternative to store-bought candy bars. By making them yourself, you have control over the ingredients, so you can adjust the sweetness or use better-quality chocolate. They’re a great snack to have on hand for satisfying your sweet cravings without the guilt.
Ingredients and Preparation
Before you get started, it’s important to gather all the ingredients. This recipe only requires a handful of items, which you likely already have in your pantry. The ingredients for these Bounty Balls are simple but packed with flavor.
Ingredients:
For the Coconut Filling:
- 2 cups of shredded coconut
- ½ to ¾ cup of sweetened condensed milk (adjust based on the consistency you prefer)
For the Chocolate Coating:
- 5 pieces of Galaxy chocolate bars (or any chocolate brand you prefer, such as Hershey’s or Lindt)
- Optional: 1/2 cup of additional shredded coconut for garnishing
Alternative Ingredient Suggestions:
- If you prefer using a different type of chocolate, feel free to swap out the Galaxy bars for any other variety of milk chocolate, dark chocolate, or white chocolate. Dark chocolate can provide a richer taste and pair beautifully with the sweetness of the coconut filling.
- You could also try adding a little bit of vanilla extract to the coconut mixture for an extra layer of flavor. Some people like to add a pinch of sea salt to the chocolate coating for a sweet-salty twist.
Step-by-Step Instructions
Making Bounty Balls is incredibly easy, even for a beginner. With just a few simple steps, you’ll be able to enjoy these delightful treats in no time.
Step 1: Prepare the Coconut Filling
Start by preparing the coconut filling. In a large mixing bowl, add the shredded coconut and sweetened condensed milk. Begin by adding the condensed milk in small amounts, stirring as you go. It’s important to mix everything together slowly to ensure the coconut absorbs the milk evenly.
At first, you can use a spatula to stir the mixture. If you attempt to mix it with your hands too soon, the condensed milk might stick to your fingers. Once the mixture starts coming together, you can use your hands to fully mix the ingredients. The texture should be moist but not too wet. If the mixture feels too dry or crumbly, add more condensed milk until it reaches the right consistency. On the other hand, if it’s too wet or sticky, simply add more shredded coconut to firm it up.
The goal is to have a mixture that’s firm enough to mold into balls, but soft enough to be manageable. When you shape the mixture into balls, they should hold their shape without falling apart.
Step 2: Mold the Coconut Mixture into Balls
Once your coconut and condensed milk mixture is ready, begin shaping it into small balls. You can make them as big or small as you like, but aim for uniform sizes to ensure they cook evenly and look neat. You might want to use a tablespoon or a small scoop to portion out the mixture for consistency.
The key to molding the coconut balls is to press the mixture gently into a ball shape with your hands. If the mixture sticks to your hands too much, dampen your hands slightly with water to make it easier to handle.
If you prefer bite-sized snacks, you can make the balls small enough to fit in one bite. If you want a more decadent treat, feel free to make larger balls. The beauty of this recipe is that it’s completely customizable based on your preferences.
Step 3: Melt the Chocolate
Now, it’s time to melt the chocolate for the coating. Take four of the Galaxy chocolate bars and break them into smaller pieces. Place the chocolate in a heatproof bowl, and then create a double boiler setup. Fill a larger pot with a bit of water and heat it on the stove. Place the bowl with the chocolate on top of the pot, ensuring that the water doesn’t touch the bowl. Let the steam from the hot water gently melt the chocolate.
Stir the chocolate frequently to ensure it melts evenly and doesn’t burn. Once the chocolate has completely melted and is smooth, it’s ready to coat the coconut balls. If the chocolate becomes too thick during this process, add a little bit of vegetable oil to thin it out and make it easier to coat the balls.
Step 4: Coat the Coconut Balls with Chocolate
Lay out a piece of parchment paper or wax paper on a flat surface, such as a baking tray or countertop. Using two forks, carefully dip each coconut ball into the melted chocolate, ensuring that each ball is fully coated. Allow any excess chocolate to drip off before placing the ball onto the parchment paper. Try to space the balls a couple of inches apart so they don’t stick together as the chocolate hardens.
For a more polished look, you can use a spoon to drizzle extra chocolate over the top of the balls after dipping them. Be sure to remove any excess chocolate to avoid clumps.
Step 5: Let the Chocolate Harden
Once all the coconut balls are coated in chocolate, let them sit at room temperature for about 30 minutes to 1 hour to allow the chocolate to harden. If you’re in a hurry, you can place them in the fridge to speed up the process.
As the chocolate hardens, the Bounty Balls will become firm and set. Once they are hard enough to touch, they’re ready for the final touch.
Step 6: Garnish the Bounty Balls
For an extra touch of decoration, you can garnish the Bounty Balls with some melted chocolate. Take the fifth remaining chocolate bar and melt it using the same double boiler method as before. Once melted, pour the chocolate into a piping bag or a plastic bag with the tip cut off. Drizzle the melted chocolate over the top of the balls in a decorative pattern.
While the chocolate is still soft, sprinkle some shredded coconut on top for extra flavor and texture. The garnish not only enhances the appearance of the Bounty Balls but also adds more coconut flavor, making them even more delicious.
Step 7: Let the Garnish Set
Allow the garnished Bounty Balls to sit at room temperature for a few minutes until the chocolate garnish sets. If you’re in a rush, you can place them in the fridge to speed up the process.
Once the garnish has hardened, your Bounty Balls are ready to be served!
Beginner Tips and Notes
- If the coconut mixture feels too sticky, try dampening your hands with a little water to make it easier to shape the balls.
- Be patient while melting the chocolate. Keep the heat low and stir constantly to avoid burning it.
- If you don’t have parchment paper, you can use wax paper or a silicone baking mat to prevent the balls from sticking.
- If the chocolate coating becomes too thick, add a teaspoon of vegetable oil to thin it out and make it easier to dip the balls.
Serving Suggestions
Bounty Balls are perfect on their own, but you can serve them with a variety of accompaniments to elevate the experience. Try pairing them with a cold glass of milk, or serve them alongside fresh fruit like strawberries or raspberries for a refreshing contrast to the richness of the coconut and chocolate. You can also place them on a dessert platter with other homemade treats for a party or special occasion.
For a festive touch, consider using different types of chocolate or drizzling the Bounty Balls with colorful sprinkles. They make a great gift for friends and family, and everyone will love the personal touch of homemade treats.
Storage Tips for Leftovers
If you have any leftover Bounty Balls (though it’s hard to imagine that!), store them in an airtight container at room temperature for up to 3-4 days. If you want them to last longer, keep them in the refrigerator, where they’ll stay fresh for up to a week.
For long-term storage, you can freeze the Bounty Balls. Place them on a baking sheet in a single layer to freeze them individually before transferring them to a freezer-safe container. They’ll stay fresh in the freezer for up to 3 months. Just be sure to let them thaw for a few minutes before serving.

Conclusion
Making homemade Bounty Balls is a fun and easy way to create a delicious, chocolatey treat that everyone will enjoy. Whether you’re a beginner or an experienced baker, this recipe offers a simple yet indulgent snack that’s perfect for satisfying your sweet cravings. With just a few basic ingredients and a little bit of time, you can create a batch of these bite-sized delights that are guaranteed to impress. Whether you’re treating yourself or sharing with loved ones, Bounty Balls are a great way to enjoy the combination of chocolate and coconut in the comfort of your own home.


