
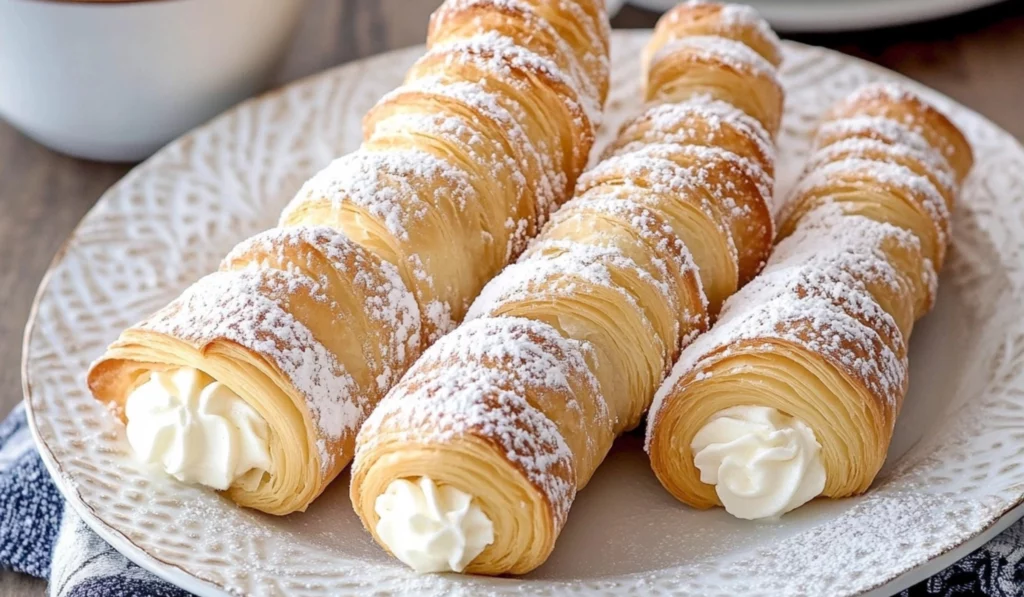
Imagine biting into a delicate, flaky pastry horn filled with a smooth, creamy filling. It’s a treat that’s both elegant and comforting, perfect for any occasion. That’s the magic of Mom’s Cream Horns. I remember the first time I tried to make cream horns. I was a bit intimidated by the idea of working with puff pastry and creating those perfect horn shapes. But with a little patience and practice, I was able to create beautiful, delicious cream horns that my family loved. This recipe is perfect for beginner bakers because it uses store-bought puff pastry, making it much easier to assemble. It’s a fantastic way to learn about working with puff pastry, creating shaped pastries, and making a smooth cream filling. Plus, these cream horns are incredibly versatile, allowing you to experiment with different fillings and toppings. If you’re looking for a delightful pastry that’s easier to make than it looks and sure to impress, Mom’s Cream Horns are the perfect choice. It’s a baking adventure that’s accessible to everyone, regardless of their baking experience. This recipe offers a great opportunity to build confidence in working with dough and creating visually appealing pastries, even for those new to baking.

Mom’s Cream Horns: A Sweet, Crispy Delight for Beginner Bakers
Mom’s Cream Horns are delicate, flaky pastries filled with a smooth cream. Perfect for beginner bakers, using store-bought puff pastry for ease.
- Total Time: 43 minutes
- Yield: 52 cream horns 1x
Ingredients
- 4 puff pastry sheets
- 16 oz cream cheese, softened
- 4 cups cold heavy cream OR 16 oz Cool Whip
- 1 cup powdered sugar
- ½ tsp vanilla extract
- Pinch of sea salt
Instructions
- Prepare the Puff Pastry: Preheat oven to 400°F. Unfold and place one thawed puff pastry sheet at a time onto a floured surface. Roll out the dough into a square. Use a pizza cutter to slice the dough into ¾ inch wide strips. A floured surface prevents sticking. A pizza cutter makes clean, even cuts. Use a rolling pin. Use a cutting board. Beginner Note: Roll out the puff pastry to an even thickness.
- Shape the Horns: Wrap the puff pastry strips around greased cream horn molds, overlapping slightly. Overlapping prevents gaps. Grease the molds well to prevent sticking. Use cream horn molds. Use cooking spray or butter to grease the molds. Beginner Note: Wrap the pastry strips tightly around the molds.
- Bake the Horns: Place the shaped horns onto a greased baking sheet. Bake in the preheated oven for 18 minutes or until light golden brown. Bake until golden brown for a crispy texture. Use a timer for accurate baking time. Use a greased baking sheet. Beginner Note: Bake until the pastry is golden brown and flaky.
- Cool the Horns: Remove each horn from the mold while hot to prevent sticking. Use a towel to hold the end of the mold to avoid burns. Let the horns cool completely before filling with cream. Cooling completely prevents melting the cream filling. Use a cooling rack. Use a towel or oven mitt. Beginner Note: Allow the horns to cool completely before filling to prevent the cream from melting.
- Make the Frosting (using Heavy Whipping Cream): Beat softened cream cheese until smooth and creamy. Add powdered sugar and mix until smooth. Scrape down the bowl and beat on high until thickens. Scrape down the bowl again and beat for 15 seconds. Add cold heavy whipping cream and beat on low, gradually increasing speed. Beat until the frosting holds its shape. Room temperature cream cheese blends smoothly. Scrape down the bowl to ensure even mixing. Do not overbeat the frosting. Use a hand mixer. Use a spatula. Use a mixing bowl. Beginner Note: Beat the cream cheese until it is smooth and lump-free.
- Make the Frosting (using Cool Whip): Beat softened cream cheese until smooth and creamy. Add powdered sugar and mix until smooth. Scrape down the bowl and beat on high until thickens. Scrape down the bowl again and beat for 15 seconds. Add thawed Cool Whip and whip until incorporated. Do not overbeat. Thaw the Cool Whip in the fridge for 24 hours before use. Mix until just combined. Use a hand mixer. Use a spatula. Use a mixing bowl. Beginner Note: Mix until the cream cheese and Cool Whip are fully incorporated.
- Assemble the Cream Horns: Fill a decorating bag fitted with a Wilton 32 attachment with cream. Pipe the cream into each end of the horn. Filling the bag halfway makes it easier to handle. Pipe the cream from both ends to ensure even filling. Use a piping bag. Use a Wilton 32 tip. Beginner Note: Fill the piping bag halfway for easier handling.
- Store the Cream Horns: Place them into an airtight container and refrigerate for at least 8 hours. Dust horns with powdered sugar before serving. For crunchy horns, omit refrigeration. Refrigeration allows the cream to set. Dust with powdered sugar just before serving. Use an airtight container. Use a refrigerator. Beginner Note: Store the cream horns in a single layer to prevent crushing.
Notes
- Thaw pastry in fridge.
- Use room-temp cream cheese.
- Don’t overbeat frosting.
- Cool horns before filling.
- Prep Time: 25 minutes
- Cook Time: 18 minutes
- Category: Dessert
- Method: Baking, Filling, Shaping
- Cuisine: Italian Inspired
Ingredients and Preparation: A Symphony of Flaky Pastry and Creamy Filling
This recipe uses readily available ingredients, making it easy for even the most novice bakers to assemble.
- 4 puff pastry sheets (e.g., Pepperidge Farm) – Alternative: You can make your own puff pastry from scratch, but store-bought is much easier for beginners. Ensure the puff pastry is thawed but still cold. Use a pizza cutter for slicing. Use a floured surface. Use a rolling pin to roll out the dough.
- Cream Horns Frosting Ingredients (using Heavy Whipping Cream):
- 16 oz cream cheese (softened at room temperature) – Alternative: You can use Neufchâtel cheese, but cream cheese provides a richer flavor. Ensure the cream cheese is at room temperature for smooth blending. Use a hand mixer for blending. Use a mixing bowl. Use a spatula to scrape the cream cheese from the package.
- 4 cups cold heavy cream – Alternative: You can use whipping cream, but heavy cream provides a richer, thicker frosting. Ensure the cream is cold for best results. Use a hand mixer for whipping. Use a chilled mixing bowl. Use a measuring cup for accurate measurements.
- 1 cup powdered sugar (or regular sugar) – Alternative: You can use granulated sugar, but powdered sugar dissolves more easily. Use a measuring cup for accurate measurements. Use a sifter for powdered sugar to prevent lumps.
- ½ tsp vanilla extract – Alternative: You can use almond extract or other flavor extracts. Vanilla extract adds a classic flavor. Use a measuring spoon for accurate measurements. Use a small bowl for measuring extracts.
- Pinch of sea salt – Alternative: You can use regular table salt. Salt balances the sweetness. Use a pinch. Use a salt shaker or pinch with fingers.
- Cream Horns Frosting Ingredients (using Cool Whip):
- 16 oz softened cream cheese – Alternative: You can use Neufchâtel cheese.
- 1 cup confectioner’s (powdered) sugar – Alternative: You can use granulated sugar.
- 16 oz Cool Whip (thawed in the fridge for 24 hrs before use) – Alternative: You can use homemade whipped cream, but Cool Whip provides a stable frosting. Thaw Cool Whip in the refrigerator.
Step-by-Step Instructions: Creating Your Cream Horn Masterpiece
These easy-to-follow instructions will guide you through each step of creating your delicious Mom’s Cream Horns:
- Prepare the Puff Pastry: Preheat oven to 400°F. Unfold and place one thawed puff pastry sheet at a time onto a floured surface. Roll out the dough into a square. Use a pizza cutter to slice the dough into ¾ inch wide strips. A floured surface prevents sticking. A pizza cutter makes clean, even cuts. Use a rolling pin. Use a cutting board. Beginner Note: Roll out the puff pastry to an even thickness.
- Shape the Horns: Wrap the puff pastry strips around greased cream horn molds, overlapping slightly. Overlapping prevents gaps. Grease the molds well to prevent sticking. Use cream horn molds. Use cooking spray or butter to grease the molds. Beginner Note: Wrap the pastry strips tightly around the molds.
- Bake the Horns: Place the shaped horns onto a greased baking sheet. Bake in the preheated oven for 18 minutes or until light golden brown. Bake until golden brown for a crispy texture. Use a timer for accurate baking time. Use a greased baking sheet. Beginner Note: Bake until the pastry is golden brown and flaky.
- Cool the Horns: Remove each horn from the mold while hot to prevent sticking. Use a towel to hold the end of the mold to avoid burns. Let the horns cool completely before filling with cream. Cooling completely prevents melting the cream filling. Use a cooling rack. Use a towel or oven mitt. Beginner Note: Allow the horns to cool completely before filling to prevent the cream from melting.
- Make the Frosting (using Heavy Whipping Cream): Beat softened cream cheese until smooth and creamy. Add powdered sugar and mix until smooth. Scrape down the bowl and beat on high until thickens. Scrape down the bowl again and beat for 15 seconds. Add cold heavy whipping cream and beat on low, gradually increasing speed. Beat until the frosting holds its shape. Room temperature cream cheese blends smoothly. Scrape down the bowl to ensure even mixing. Do not overbeat the frosting. Use a hand mixer. Use a spatula. Use a mixing bowl. Beginner Note: Beat the cream cheese until it is smooth and lump-free.
- Make the Frosting (using Cool Whip): Beat softened cream cheese until smooth and creamy. Add powdered sugar and mix until smooth. Scrape down the bowl and beat on high until thickens. Scrape down the bowl again and beat for 15 seconds. Add thawed Cool Whip and whip until incorporated. Do not overbeat. Thaw the Cool Whip in the fridge for 24 hours before use. Mix until just combined. Use a hand mixer. Use a spatula. Use a mixing bowl. Beginner Note: Mix until the cream cheese and Cool Whip are fully incorporated.
- Assemble the Cream Horns: Fill a decorating bag fitted with a Wilton 32 attachment with cream. Pipe the cream into each end of the horn. Filling the bag halfway makes it easier to handle. Pipe the cream from both ends to ensure even filling. Use a piping bag. Use a Wilton 32 tip. Beginner Note: Fill the piping bag halfway for easier handling.
- Store the Cream Horns: Place them into an airtight container and refrigerate for at least 8 hours. Dust horns with powdered sugar before serving. For crunchy horns, omit refrigeration. Refrigeration allows the cream to set. Dust with powdered sugar just before serving. Use an airtight container. Use a refrigerator. Beginner Note: Store the cream horns in a single layer to prevent crushing.
Beginner Tips and Notes: Your Baking Guide
Even simple recipes have a few tricks to make them even better:
- Thaw Puff Pastry Correctly: Thaw puff pastry in the refrigerator overnight for best results. This allows the dough to thaw evenly and prevents it from becoming too soft.
- Use Room Temperature Cream Cheese: Room temperature cream cheese blends smoothly and prevents lumps in the frosting. Remove the cream cheese from the refrigerator about 30 minutes before using.
- Chill Heavy Cream: Cold heavy cream whips up more easily and creates a thicker frosting. Chill the mixing bowl and beaters as well.
- Don’t Overbeat Frosting: Overbeating can cause the frosting to become grainy or separate. Mix until the frosting just holds its shape.
Serving Suggestions: Elevating Your Cream Horns
These Mom’s Cream Horns are delicious on their own, but you can also enhance them with some complementary toppings and pairings.
- Dusted with Powdered Sugar: A classic and simple topping, adding a touch of sweetness and a beautiful presentation.
- Drizzled with Chocolate Sauce: Adds a rich chocolate flavor, creating a decadent and indulgent treat. Use a high-quality chocolate sauce.
- Sprinkled with Chopped Nuts: Adds a crunchy texture and nutty flavor, complementing the creamy filling and flaky pastry. Use toasted nuts for added flavor.
- Topped with Fresh Berries: Adds a touch of freshness and acidity, balancing the sweetness of the cream and pastry. Use seasonal berries for the best flavor.
Storage Tips for Leftovers:
Store leftover Mom’s Cream Horns in an airtight container in the refrigerator for up to 3 days. For the best texture, consume them within 24 hours, as the pastry may soften over time. If you prefer a crunchy texture, do not refrigerate; store them in an airtight container at room temperature. Use an airtight container that is the appropriate size for the amount of leftover cream horns. Use parchment paper to separate layers of cream horns.

Conclusion: A Simple, Sweet, and Satisfying Treat for Home Bakers
These Mom’s Cream Horns are a quick, easy, and incredibly flavorful way to enjoy a classic pastry at home. They’re a fantastic way to impress your family and friends with your baking skills without spending hours in the kitchen. I encourage you to try this recipe and make it your own. Don’t be afraid to experiment with different fillings, toppings, and garnishes to create your perfect cream horn masterpiece. Share your culinary creations and experiences in the comments below – I’d love to see your variations! This easy and versatile recipe is a game-changer for casual gatherings, holiday desserts, or any time you need a sweet and satisfying treat. It’s a flavorful way to get a delicious and impressive pastry on the table without any fuss. And the best part? It’s so easy to customize! You can adjust the fillings to your liking, pair it with a variety of toppings, and even make it ahead of time.
These Mom’s Cream Horns are more than just a recipe; they’re an experience. It’s a celebration of flavor, texture, and the joy of creating a delicious and satisfying treat. It’s a perfect blend of flaky pastry and creamy filling, a delightful way to nourish your body and your soul. It’s a testament to the fact that baking doesn’t have to be complicated or intimidating; it can be fun, creative, and incredibly rewarding. It’s a reminder that even the simplest ingredients, when combined with a little creativity and love, can create something truly special. It’s a chance to explore new flavors and create your own pastry masterpieces. It’s an invitation to gather around the table with loved ones and share a treat that’s both comforting and delicious. So, what are you waiting for? Get baking and create some cream horn magic!


