
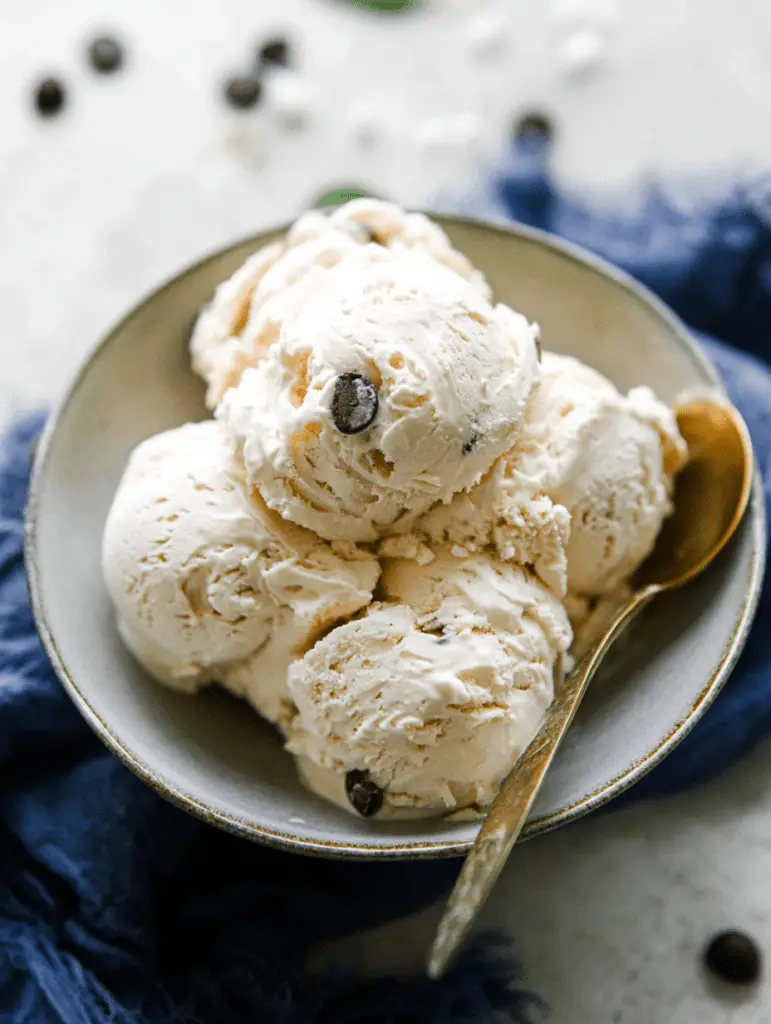
What Is Cottage Cheese Ice Cream?
Cottage cheese ice cream is the frozen dessert I never knew I needed — and now I make it almost every single week. If you’ve been scrolling TikTok lately, you’ve probably seen it everywhere. People blending tubs of cottage cheese into something silky, golden, and creamy, then scooping it out like it’s the real deal. And here’s the thing: it Is The real deal. This isn’t some sad, diet-food substitute that leaves you wishing for the genuine article. It’s rich. It’s smooth. It’s genuinely satisfying. And I am completely obsessed with it. Learn more in our article about High Protein Cottage Cheese Ice Cream (Chocolate Protein No Churn).

Table of Contents
So what makes it different from traditional ice cream? Classic ice cream is built on a heavy cream and egg yolk base, churned to perfection, and packed with sugar and fat. Cottage cheese ice cream skips all of that. No churning. No cooking a custard. No special equipment beyond a blender. You’re working with cottage cheese as your creamy base — and once it’s fully blended, those little white curds completely disappear into something smooth and velvety that will genuinely surprise you. The texture lands somewhere between soft-serve and a classic scoop, and the flavor is mild, slightly tangy, and totally delicious with the right mix-ins. Learn more in our article about Creamy Cottage Cheese Bake.
The biggest reason people are going wild for this recipe is the nutrition profile. We’re talking roughly 13 to 15 grams of protein per half-cup serving, with significantly less sugar and fat than traditional ice cream. It’s gluten-free friendly, endlessly customizable, and takes less than five minutes of active prep time. My family asks for this every week now, and I don’t blame them one bit. Once you try it, you’ll understand exactly why.
Why You’ll Love This Recipe
I’ll be honest with you — I was skeptical the first time I heard about blending cottage cheese into ice cream. It sounded like the kind of thing a nutritionist would recommend and nobody would actually enjoy. I was wrong. Dead wrong. This recipe is foolproof and delicious, and it checks every single box I care about in a home kitchen dessert. Let me tell you exactly why it’s earned a permanent spot in my freezer.
First, you only need a handful of ingredients. We’re talking four pantry staples for the base, and then whatever fun mix-ins you feel like throwing in. No fancy stabilizers, no obscure ingredients, no grocery store treasure hunt. Second, there’s no ice cream maker involved. I hate gadgets that only do one job — but this recipe only needs a good blender, a loaf pan, and your freezer. That’s it. Third, the protein content is genuinely impressive for a frozen dessert. At 13 to 15 grams per serving, this is a treat you can feel good about. It keeps you full, it satisfies that sweet tooth, and it doesn’t send your blood sugar on a roller coaster.
And then there’s the flexibility. You can go fruity with fresh strawberries and a crumble of graham crackers. You can go indulgent with peanut butter and chocolate chips. You can go bright and refreshing with mango and lime. The base is a blank canvas, and that’s exactly how I like my recipes. This one’s a keeper, full stop — and I think once you make it once, you’re going to be riffing on it for months.
Ingredients
Keep it simple. That’s my whole philosophy in this kitchen. Here’s everything you need for the base recipe, plus the optional mix-ins I reach for most often.
For the Base
| Ingredient | Amount |
|---|---|
| Full-fat cottage cheese (4% milkfat) | 2 cups |
| Honey or pure maple syrup | 3 tablespoons |
| Pure vanilla extract | 1 teaspoon |
| Salt | 1 pinch |
Optional Mix-Ins
| Mix-In | Amount |
|---|---|
| Fresh or frozen berries | 1/2 cup |
| Peanut butter | 2 tablespoons |
| Chocolate chips | 1/4 cup |
| Crushed graham crackers | 1/4 cup |
Ingredient Notes & Substitutions
Full-fat vs. Low-fat cottage cheese: Please, please use full-fat here. I know it’s tempting to grab the low-fat tub, but the fat content is what gives your cottage cheese ice cream that creamy, scoopable texture. Low-fat versions have more water and less richness, which means your final product will be icier and grainier — more like a slushy than a proper frozen dessert. Stick with 4% milkfat cottage cheese and you’ll thank yourself later.
Sweetener options: Honey is my personal favorite because it blends in beautifully and adds a warm, floral note. Pure maple syrup is a close second and gives a slightly deeper, almost caramel-like sweetness. If you’re watching sugar intake, agave works well, and sugar-free monk fruit sweetener or a liquid stevia blend will keep things low-carb without sacrificing the flavor balance.
Dairy-free adaptation: I haven’t personally tested this with dairy-free cottage cheese alternatives, but several readers have reported great results using Kite Hill’s almond-based ricotta-style cheese blended with a couple of tablespoons of coconut cream. The texture is slightly different but still genuinely enjoyable.
Best brands for creamiest results: In my kitchen, Good Culture and Daisy have consistently produced the smoothest, most luxurious cottage cheese ice cream. Both are widely available at most major grocery stores and have a cleaner ingredient list than many other brands.
A note on salt: I know it seems counterintuitive to add salt to a dessert, but don’t skip it. My hot take? Most recipes use way too much salt in savory dishes and nowhere near enough in sweet ones. That tiny pinch here works like magic — it sharpens the vanilla, rounds out the sweetness, and makes the whole thing taste more complex and satisfying. Trust me on this one.
Equipment You’ll Need
- High-powered blender or food processor (a Vitamix, NutriBullet Pro, or similar works beautifully)
- Freezer-safe loaf pan or airtight container (8×4 inches recommended)
- Rubber spatula
- Plastic wrap or parchment paper (for pressing directly onto the surface before freezing)
How to Make Cottage Cheese Ice Cream
This whole recipe comes together in about five minutes of active work, and then your freezer does the heavy lifting for you. Total time is roughly four hours minimum — or ideally overnight — but hands-on time is barely anything. Here’s exactly how I make it every single time, and I promise it’s as easy as it sounds.
Start by adding your two cups of full-fat cottage cheese to the blender, followed by your three tablespoons of honey or maple syrup, the teaspoon of pure vanilla extract, and that crucial pinch of salt. Put the lid on and blend on the highest setting for a full 60 to 90 seconds. Don’t rush this step. This is where the magic actually happens — those lumpy white curds transform into something completely smooth, creamy, and almost silky-looking when you lift the lid. Scrape down the sides of the blender with your rubber spatula halfway through if you need to, and then blend again until there is genuinely not a single lump left. The mixture should look almost pourable and perfectly glossy. That’s when you know you’re ready to move on. The first time I made this, I accidentally doubled the salt. My family still brings it up at every holiday dinner. Learn from my mistakes and measure carefully — that one pinch is doing important work, and more is absolutely not better here.
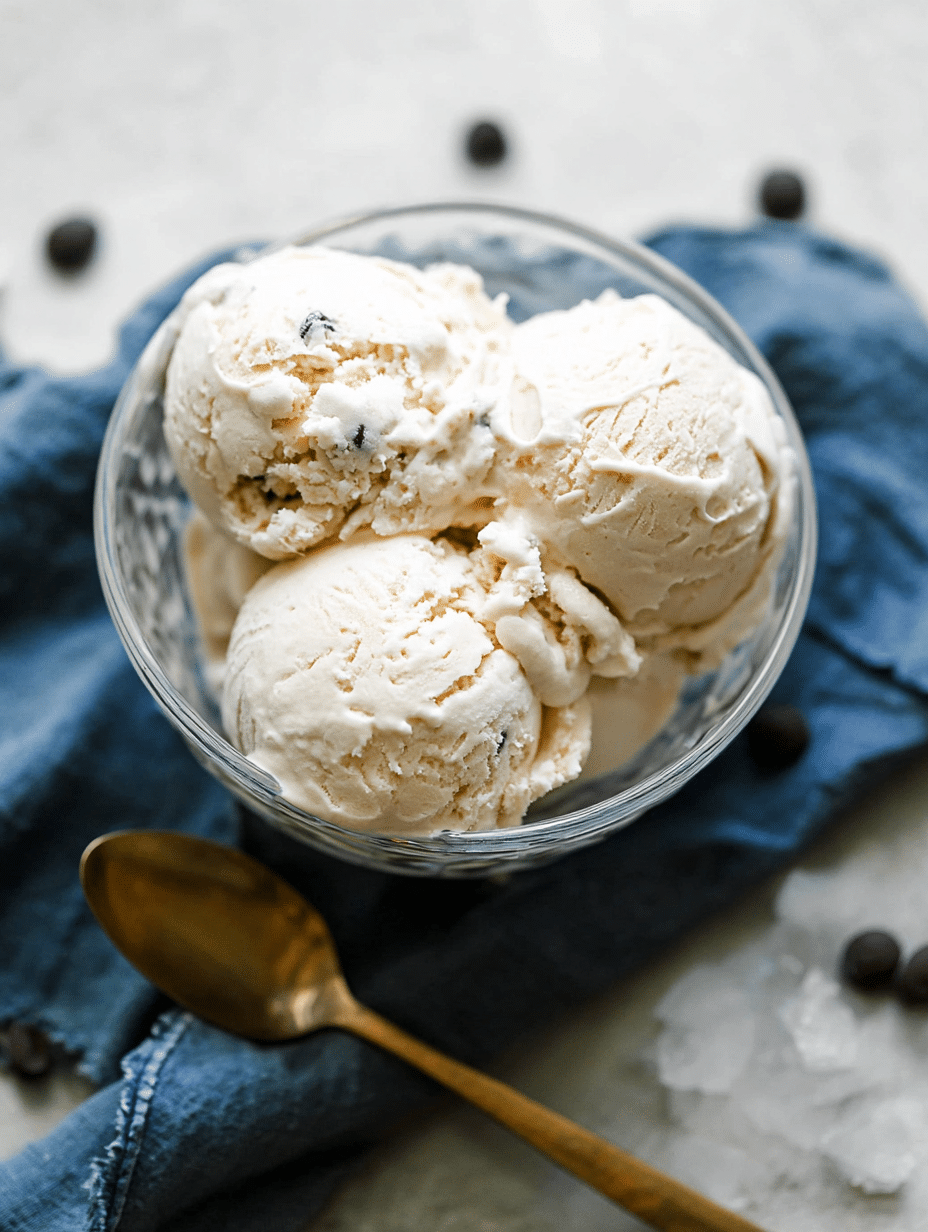
Next up, if you’re adding mix-ins, now is the time. Do not put them in the blender. I repeat — do not blend your mix-ins. Pour the smooth cottage cheese base into a large bowl first, and then fold in your chocolate chips, crushed graham crackers, berries, or peanut butter using your rubber spatula with slow, gentle strokes. You want those pieces to stay whole and distinct so that every spoonful has a little surprise in it. If you’re making the strawberry cheesecake version, this is where you’d fold in your sliced fresh strawberries and those golden, buttery graham cracker crumbles. If you’re going peanut butter chocolate, drop in spoonfuls of peanut butter and swirl them through without fully incorporating — those ribbons of nutty, rich peanut butter running through the frozen base are absolutely incredible.
Now for the best part. Transfer your blended base — with or without mix-ins — into your 8×4 inch loaf pan or airtight container. Use your rubber spatula to smooth the top into an even layer. Then tear off a piece of plastic wrap and press it directly down onto the surface of the mixture, making sure it’s touching the cottage cheese ice cream with no air gaps. This step is non-negotiable. Without it, you’ll get a thick layer of freezer burn and ice crystals on top, and your first scoop will be ruined. Press that plastic wrap down firmly, smooth it out, and make sure every inch of the surface is covered.
Meanwhile, make sure your freezer is cleared out enough to hold the pan flat — you need it sitting level so the ice cream freezes evenly across the whole surface. Slide it in carefully and walk away. Set a timer for at least four hours, but I genuinely recommend leaving it overnight if you can. The longer it freezes, the firmer and more scoopable the texture becomes. A partial freeze will give you something soft and almost mousse-like, which is actually delicious in its own way, but if you want proper cottage cheese ice cream that you can scoop into a bowl with a satisfying curl, give it the full overnight treatment. When you’re ready to serve, pull the pan out of the freezer and let it sit on your counter for five to eight minutes. Run your ice cream scoop under hot water, dry it off, and then press it into the surface for the most beautifully smooth, tender, golden scoops you’ve ever seen come out of your own kitchen.
Tips for the Creamiest Cottage Cheese Ice Cream
I’ve made this recipe more times than I can count. And I’ve learned a few things along the way. Here’s what actually makes the difference between a creamy, scoopable treat and a sad, icy brick.
-
Always go full-fat. I hate to be bossy, but this one is non-negotiable. Full-fat (4% milkfat) cottage cheese is what gives your Cottage cheese ice cream That rich, creamy texture. Low-fat versions have too much water content. They freeze icier and taste thinner. Trust me on this one.
-
Blend longer than you think. Seriously. Most people stop blending too soon. You want to run that blender on high for a full 60 to 90 seconds — maybe even longer. Scrape down the sides halfway through. You are looking for a completely smooth, silky base with zero lumps. It should look like a thick, creamy milkshake before it ever hits the freezer.
-
Go easy on the sweetener. Here’s my hot take: most recipes use way too much salt AND too much sugar. A little honey goes a long way here. Start with 2 tablespoons, taste the blended base, and add more only if you need it. Remember, freezing dulls sweetness slightly, so you can afford to be a touch generous — but 3 tablespoons is really the sweet spot for most palates.
-
Press plastic wrap directly onto the surface. Don’t skip this step. Air is the enemy. When you transfer your blended mixture to the container, press plastic wrap or parchment paper flat against the surface before putting the lid on. This prevents ice crystals from forming on top and keeps your Cottage cheese ice cream Smooth right to the very last scoop. This one tip alone is foolproof and delicious in its results.
-
Let it thaw before you scoop. Pull your container out of the freezer and let it sit on the counter for 5 to 10 minutes before you try to scoop. If you go in straight from the freezer, you’ll either get a crumbly mess or a bent spoon. A warm ice cream scoop (run it under hot water first) makes this even easier. Patience here means perfect scoops every single time.
-
Try a mix-in variation. Once you nail the base, get creative. A swirl of peanut butter and a handful of mini chocolate chips folded in after blending makes this feel like a totally indulgent dessert — but you’re still getting that 13 to 15 grams of protein per serving. Or try blending in half a cup of fresh strawberries with a crumble of graham crackers on top for a cheesecake-style treat. My family asks for this every week in the summer, and the strawberry version disappears first every single time.
-
Add a spoonful of cream cheese for extra body. I hate unnecessary gadgets and extra steps, but this one trick actually saves the texture. One tablespoon of softened cream cheese blended into the base makes your Cottage cheese ice cream Noticeably richer and denser — closer to the real thing. It’s optional, but if you want that ultra-creamy, indulgent result, it’s worth it. And if you love cottage cheese in creamy recipes, you’ll want to check out this Creamy Cottage Cheese Bake Too — same cozy, satisfying energy.
How to Store Cottage Cheese Ice Cream
Store your Cottage cheese ice cream In an airtight, freezer-safe container — a loaf pan with a tight lid or a standard freezer container both work great. It keeps well in the freezer for up to 1 to 2 weeks. After each scoop, press a fresh piece of plastic wrap directly back onto the surface before sealing the lid. This keeps ice crystals from building up and ruining the texture. If your ice cream becomes rock solid after a few days (totally normal), just let it sit at room temperature for 8 to 10 minutes before scooping again. One important note: if your ice cream has fully melted — say it was left out on the counter too long — do not refreeze it. The texture will become grainy and icy, and it just won’t be the same. Make a fresh batch instead. It only takes five minutes of active prep, so it’s really no hardship.
You might also like
- High Protein Cottage Cheese Ice Cream (Chocolate Protein No Churn)
- Creamy Cottage Cheese Bake
- Cottage Cheese and Spinach Crustless Quiche
Discover more delicious recipes in our recipe collection.
Frequently Asked Questions
Does cottage cheese ice cream actually taste like real ice cream?
Honestly? Pretty close. When you blend full-fat cottage cheese until completely smooth, it loses that lumpy, tangy quality and becomes remarkably creamy and mild. With vanilla extract, honey, and your favorite mix-ins, most people genuinely cannot tell the difference on first taste. It’s slightly tangier than traditional ice cream, but in a pleasant way — almost like a frozen cheesecake. This one’s a keeper for anyone who’s skeptical at first bite.
Why did my cottage cheese ice cream turn out icy and grainy?
Three likely culprits. First, you used low-fat or fat-free cottage cheese. The lower the fat content, the more water in the mix, and water freezes into ice crystals. Second, you didn’t blend long enough — under-blending leaves curds that freeze solid and rough. Third, you skipped pressing plastic wrap onto the surface before freezing, which lets air in and creates a frosty, icy top layer. Fix all three, and you’ll get a smooth, creamy result every time. If you want to go deeper on why texture matters in cottage cheese recipes, this High Protein Cottage Cheese Ice Cream (Chocolate Protein No Churn) Post covers a great variation with similar technique tips.
How long does it need to freeze before I can eat it?
A minimum of 4 hours is required to get a firm, scoopable texture. But if you can freeze it overnight, do it. The overnight freeze gives you that dense, firm consistency that actually scoops into neat balls rather than crumbling apart. Don’t try to rush it with a partial 2-hour freeze — you’ll end up with something closer to soft-serve, which isn’t bad, but it’s not what this recipe is going for.
Can I make this without a blender?
You can try, but I don’t recommend it. Cottage cheese curds will not break down with just a fork or a hand whisk. You need the power of a high-speed blender or food processor to fully emulsify the curds into a smooth, creamy base. Without that step, your Cottage cheese ice cream Will freeze with a grainy, uneven texture that’s genuinely unpleasant. A NutriBullet, a Vitamix, or a standard food processor all work perfectly well — you don’t need anything fancy.
Is this recipe good for high-protein diets?
Yes, and that’s honestly one of the best things about it. Each half-cup serving delivers approximately 13 to 15 grams of protein, depending on the brand of cottage cheese you use and any mix-ins you add. That’s dramatically more than traditional ice cream, which typically offers less than 3 grams per serving. It also comes in at around 150 to 180 calories per serving with the base recipe. If you’re already exploring high-protein cottage cheese recipes, you might also enjoy this Cottage Cheese and Spinach Crustless Quiche — a completely different dish, but another great way to get serious protein out of a simple, whole-food ingredient.
Cottage Cheese Ice Cream
Ingredients
Method
- Add 2 cups of full-fat cottage cheese, 3 tablespoons of honey or maple syrup, 1 teaspoon of pure vanilla extract, and a pinch of salt to the blender. Blend on high for 60 to 90 seconds until the mixture is smooth.
- If using mix-ins, transfer the blended mixture to a large bowl and gently fold in chocolate chips, berries, crushed graham crackers, or peanut butter.
- Transfer the mixture to a freezer-safe loaf pan, pressing plastic wrap directly onto the surface to prevent freezer burn. Freeze for at least 4 hours or overnight.
- For serving, let the ice cream sit at room temperature for 5-10 minutes before scooping. Run your scoop under hot water for best results.


