

Who can resist the irresistible sweetness of a Krispy Kreme donut? The soft, light texture, coupled with the mouthwatering glaze, has made these donuts a classic breakfast treat for years. But what if you could recreate this iconic indulgence in your own kitchen, with a simple recipe that doesn’t require any special skills or equipment? Well, you’re in luck because today, we’re making Krispy Kreme-style glazed donuts from scratch!

How to Make Glazed Donuts: A Krispy Kreme Copycat Recipe for Beginners
There’s nothing like a warm, freshly glazed donut—soft, airy, and perfectly sweet. If you love Krispy Kreme, you’ll be thrilled to make these at home! This easy recipe is perfect for beginners, requiring just simple ingredients and a little patience. Follow along to create light, chewy donuts with a glossy glaze that rivals any bakery. Let’s get started!
- Total Time: 1 hour 30 minutes
- Yield: 18 donuts Category 1x
Ingredients
For the Donuts:
- 1 ¼ cups whole milk (300 milliliters)
- 2 ¼ teaspoons instant (quick-rise) yeast (7 grams, or one packet)
- 2 large eggs
- 8 tablespoons unsalted butter (113 grams), melted and cooled
- ¼ cup granulated sugar (50 grams)
- 1 teaspoon salt
- 4 ¼ cups bread flour (535 grams), plus more for rolling out the dough
- Oil (for frying)
For the Glaze:
- 4 cups powdered sugar (500 grams)
- ½ cup milk (120 milliliters)
- 1 pinch salt
Instructions
1. Activate the Yeast
Start by heating the milk in the microwave until it’s warm to the touch, about 45 seconds. You want it to be just warm enough to activate the yeast—don’t let it get too hot or it could kill the yeast. Once warmed, add the instant yeast to the milk and stir gently. Let it sit for about 5 minutes until it becomes foamy on top. This step is crucial to make sure your donuts rise properly.
2. Mix the Dough
In the bowl of a stand mixer, combine the activated yeast mixture, eggs, melted butter, sugar, and salt. Mix until well combined. Gradually add half of the bread flour, mixing until incorporated. Then add the remaining flour and mix again. At this point, the dough will begin to form into a sticky ball.
Pro Tip: If the dough feels too wet, don’t panic! You can add a little extra flour, one tablespoon at a time, until it reaches a soft, but manageable consistency.
3. Knead the Dough
Once the dough is mixed, it’s time to knead. If you’re using a stand mixer, switch to the dough hook attachment and let it knead for about 5 minutes. If you don’t have a stand mixer, you can knead the dough by hand on a floured surface. You want to knead until the dough becomes smooth and elastic.
4. Let the Dough Rise
Cover the dough with a kitchen towel and place it in a warm spot to rise. Let it sit for about 1 hour, or until it has doubled in size. This is the part where patience comes in. The dough needs time to rise and develop that airy, light texture that makes these donuts so special.
5. Shape the Donuts
Once the dough has risen, punch it down to release the air. Turn it out onto a well-floured surface and roll it out to about a ½-inch thickness. Using a donut cutter or two round cookie cutters (one large and one small), cut out the donuts. Don’t forget to save the donut holes—they’re just as tasty!
Pro Tip: To make the shaping process easier, place each donut onto a small piece of parchment paper. This makes it simple to transfer the donuts into the hot oil later.
6. Let the Donuts Rise Again
After cutting out the donuts, cover them again with a towel and let them rise for about 45 minutes. You’ll notice they puff up nicely during this second rise.
7. Heat the Oil
While the donuts are rising, heat your oil. You’ll want the oil to reach 375°F (190°C) in a deep fryer or large heavy-bottomed pot. Having the oil at the right temperature is key to achieving that golden-brown color and crispy texture.
Pro Tip: Use a candy thermometer to monitor the temperature. If the oil is too hot, the donuts will brown too quickly on the outside while staying raw inside. If it’s not hot enough, the donuts will absorb too much oil and become greasy.
8. Fry the Donuts
Carefully lower the donuts into the hot oil, a few at a time. You can use the parchment paper method—drop the donut along with the paper into the oil, then carefully remove the paper with tongs. Fry the donuts for about 45 seconds on each side, until golden brown.
9. Make the Glaze
While the donuts are frying, prepare the glaze. In a large bowl, whisk together the powdered sugar, milk, and a pinch of salt until smooth. If you like a thinner glaze, you can add a little more milk, one teaspoon at a time.
10. Glaze the Donuts
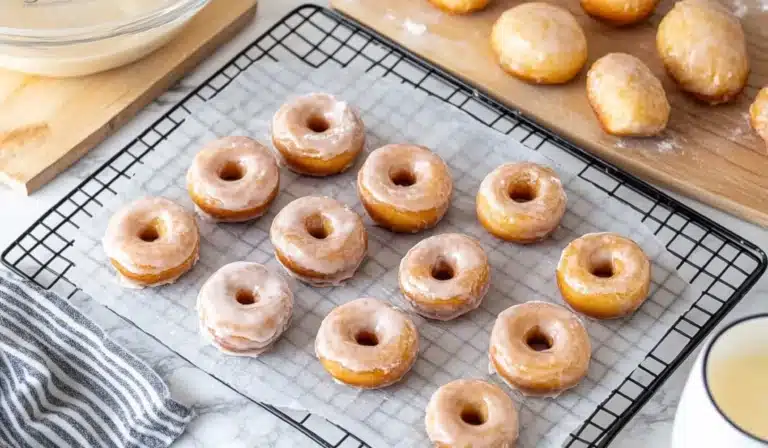
Once the donuts are golden brown and crisp, carefully remove them from the oil using tongs or a slotted spoon. Place them on a cooling rack set over paper towels to drain any excess oil. While still warm, dip one side of each donut into the glaze. Flip it over carefully using a fork and place it back on the rack to let the glaze set.
Notes
- Troubleshooting: If your dough is too sticky, don’t worry! Just add a little flour, one tablespoon at a time, until it’s manageable. If your donuts cook too quickly and burn on the outside, lower the oil temperature slightly.
- Make Ahead: You can make the dough a day ahead and let it rise in the refrigerator overnight. In the morning, let it come to room temperature before frying.
- No Donut Cutter? Use two round cookie cutters—one large and one small—to cut out the donut shape. The larger one should be about 3 inches in diameter.
- Glaze Variations: Feel free to experiment with different flavors of glaze! Try adding vanilla extract, cinnamon, or even cocoa powder to the glaze for a fun twist.
- Prep Time: 30 minutes
- Cook Time: 1 hour
- Category: Dessert
- Method: Frying
- Cuisine: American
- Diet: Vegetarian
I still remember the first time I bit into a Krispy Kreme donut. The warm glaze melted in my mouth, and the fluffy dough seemed to vanish in an instant. It was pure bliss. While getting a fresh batch from the store is always tempting, I decided to try my hand at making them at home. The result? Absolutely amazing! These homemade glazed donuts have that same light, chewy texture and sweet glaze, making them a perfect breakfast treat or an afternoon snack.
This recipe is perfect for beginners who want to impress family and friends with a homemade batch of donuts. With just a few key ingredients, some patience, and a bit of attention, you’ll create a batch of homemade glazed donuts that are so good, they could rival the best donut shop in town. Plus, there’s something magical about making donuts from scratch—it’s a satisfying experience that brings a sense of accomplishment.
Let’s dive into this deliciously simple recipe and break it down step by step so that anyone, even those with little baking experience, can follow along.
Ingredients and Preparation
For these donuts, you’ll need the following ingredients:
For the Donuts:
- 1 ¼ cups whole milk (300 milliliters)
- 2 ¼ teaspoons instant (quick-rise) yeast (7 grams, or one packet)
- 2 large eggs
- 8 tablespoons unsalted butter (113 grams), melted and cooled
- ¼ cup granulated sugar (50 grams)
- 1 teaspoon salt
- 4 ¼ cups bread flour (535 grams), plus more for rolling out the dough
- Oil (for frying)
For the Glaze:
- 4 cups powdered sugar (500 grams)
- ½ cup milk (120 milliliters)
- 1 pinch salt
These ingredients will yield about 18 donuts. The beauty of this recipe is its simplicity. The key is using quality ingredients like fresh yeast and bread flour, which help the donuts achieve that soft and chewy texture we all love.
Ingredient Alternatives:
- Milk: If you prefer a dairy-free version, you can swap the whole milk for almond milk or oat milk. Just ensure the milk is warm when activating the yeast.
- Butter: For a dairy-free option, you can use vegetable oil or melted coconut oil instead of butter.
- Bread Flour: While bread flour gives these donuts their signature chewiness, you can substitute all-purpose flour if that’s what you have on hand. The texture might be slightly less chewy but still delicious.
Step-by-Step Instructions
Now that we have everything ready, let’s get started on making these delicious homemade glazed donuts. Don’t worry—I’ll break down each step to make it as easy as possible.
1. Activate the Yeast
Start by heating the milk in the microwave until it’s warm to the touch, about 45 seconds. You want it to be just warm enough to activate the yeast—don’t let it get too hot or it could kill the yeast. Once warmed, add the instant yeast to the milk and stir gently. Let it sit for about 5 minutes until it becomes foamy on top. This step is crucial to make sure your donuts rise properly.
2. Mix the Dough
In the bowl of a stand mixer, combine the activated yeast mixture, eggs, melted butter, sugar, and salt. Mix until well combined. Gradually add half of the bread flour, mixing until incorporated. Then add the remaining flour and mix again. At this point, the dough will begin to form into a sticky ball.
Pro Tip: If the dough feels too wet, don’t panic! You can add a little extra flour, one tablespoon at a time, until it reaches a soft, but manageable consistency.
3. Knead the Dough
Once the dough is mixed, it’s time to knead. If you’re using a stand mixer, switch to the dough hook attachment and let it knead for about 5 minutes. If you don’t have a stand mixer, you can knead the dough by hand on a floured surface. You want to knead until the dough becomes smooth and elastic.
4. Let the Dough Rise
Cover the dough with a kitchen towel and place it in a warm spot to rise. Let it sit for about 1 hour, or until it has doubled in size. This is the part where patience comes in. The dough needs time to rise and develop that airy, light texture that makes these donuts so special.
5. Shape the Donuts
Once the dough has risen, punch it down to release the air. Turn it out onto a well-floured surface and roll it out to about a ½-inch thickness. Using a donut cutter or two round cookie cutters (one large and one small), cut out the donuts. Don’t forget to save the donut holes—they’re just as tasty!
Pro Tip: To make the shaping process easier, place each donut onto a small piece of parchment paper. This makes it simple to transfer the donuts into the hot oil later.
6. Let the Donuts Rise Again
After cutting out the donuts, cover them again with a towel and let them rise for about 45 minutes. You’ll notice they puff up nicely during this second rise.
7. Heat the Oil
While the donuts are rising, heat your oil. You’ll want the oil to reach 375°F (190°C) in a deep fryer or large heavy-bottomed pot. Having the oil at the right temperature is key to achieving that golden-brown color and crispy texture.
Pro Tip: Use a candy thermometer to monitor the temperature. If the oil is too hot, the donuts will brown too quickly on the outside while staying raw inside. If it’s not hot enough, the donuts will absorb too much oil and become greasy.
8. Fry the Donuts
Carefully lower the donuts into the hot oil, a few at a time. You can use the parchment paper method—drop the donut along with the paper into the oil, then carefully remove the paper with tongs. Fry the donuts for about 45 seconds on each side, until golden brown.
9. Make the Glaze
While the donuts are frying, prepare the glaze. In a large bowl, whisk together the powdered sugar, milk, and a pinch of salt until smooth. If you like a thinner glaze, you can add a little more milk, one teaspoon at a time.
10. Glaze the Donuts
Once the donuts are golden brown and crisp, carefully remove them from the oil using tongs or a slotted spoon. Place them on a cooling rack set over paper towels to drain any excess oil. While still warm, dip one side of each donut into the glaze. Flip it over carefully using a fork and place it back on the rack to let the glaze set.
Beginner Tips and Notes
- Troubleshooting: If your dough is too sticky, don’t worry! Just add a little flour, one tablespoon at a time, until it’s manageable. If your donuts cook too quickly and burn on the outside, lower the oil temperature slightly.
- Make Ahead: You can make the dough a day ahead and let it rise in the refrigerator overnight. In the morning, let it come to room temperature before frying.
- No Donut Cutter? Use two round cookie cutters—one large and one small—to cut out the donut shape. The larger one should be about 3 inches in diameter.
- Glaze Variations: Feel free to experiment with different flavors of glaze! Try adding vanilla extract, cinnamon, or even cocoa powder to the glaze for a fun twist.
Serving Suggestions
These glazed donuts are perfect on their own, but you can also serve them with a side of fresh fruit, like berries or sliced bananas, for a refreshing contrast. For a true indulgent treat, enjoy them with a hot cup of coffee or a glass of milk.
If you have leftovers (which, let’s be honest, might be rare!), store them in an airtight container at room temperature for up to 2 days. You can also freeze them for up to a month—just make sure to wrap them tightly in plastic wrap and foil.

Why You Should Try Homemade Glazed Donuts
Congratulations! You’ve just made a batch of homemade glazed donuts that are sure to rival the famous Krispy Kreme. The process may take a bit of time and patience, but the results are absolutely worth it. These light, chewy donuts with their sweet, glossy glaze are perfect for any occasion—from a casual weekend breakfast to a special treat for a holiday morning.
I hope you enjoy making these donuts as much as I did! Feel free to experiment with different glazes and toppings to make them your own. And don’t forget to share your experience in the comments below—I’d love to hear how they turned out!


