
Fall is the season of cozy flavors, pumpkin-spiced everything, and decadent desserts. One of my favorite fall treats is pumpkin cheesecake, but I’ve found a way to make it even more delightful and bite-sized—3-Layer Caramel Pecan Pumpkin Cheesecake Bites. These little cheesecakes are a perfect blend of creamy, crunchy, sweet, and spiced. If you’ve been searching for a simple, yet impressive dessert that’s perfect for any occasion, these cheesecake bites are just the recipe for you. Not only are they easy to make, but they’re also sure to impress your guests, especially with the beautiful layers and combination of flavors.

How to Make 3-Layer Caramel Pecan Pumpkin Cheesecake Bites: A Sweet Treat for Fall and Special Occasions
When the crisp autumn air settles in and the days get a little shorter, there’s nothing quite as comforting as the rich, warm flavors of fall. One treat that always makes its way to my kitchen is pumpkin cheesecake. But rather than the usual large slices, I’ve found a fun and more bite-sized way to enjoy it: 3-Layer Caramel Pecan Pumpkin Cheesecake Bites. These little delights are packed with everything we love about fall—spices, pumpkin, caramel, and crunchy pecans—making them perfect for any occasion.
- Total Time: 5 hr (includes cooling time)
- Yield: 24 mini cheesecake bites 1x
Ingredients
For the Crust:
- 1 cup Cinnamon Toast Crunch™ cereal, crumbled
- 2 tablespoons unsalted butter (melted)
For the Cheesecake Filling:
- 1 1/3 cup cream cheese, at room temperature
- 1/2 cup granulated sugar
- 1 large egg
For the Pumpkin Layer:
- 1/3 cup canned pumpkin (not pumpkin pie mix)
- 1 teaspoon pumpkin pie spice
Topping:
- 1/4 cup chopped pecans
- 1/2 cup caramel sauce (store-bought or homemade)
Instructions
Step 1: Preheat Your Oven and Prepare Your Muffin Pan
Start by preheating your oven to 300°F (150°C). Line a mini muffin pan with paper liners. This will help ensure that your cheesecake bites come out easily after they’ve baked.
Step 2: Prepare the Cinnamon-Crunch Crust
In a small bowl, mix together the crumbled Cinnamon Toast Crunch™ cereal and melted butter. Stir until the cereal crumbs are evenly coated with the butter. Spoon the mixture into each muffin liner, dividing it evenly among the 12 muffin cups. Press the mixture down gently with your fingers, a spoon, or a tamper to ensure it’s compact. The crust will form the base of the cheesecake bite and will give each piece a nice crunchy texture.
Step 3: Make the Cheesecake Filling
Using a stand mixer or hand mixer, beat the cream cheese on medium speed until it’s smooth and creamy. Be sure not to overmix the cream cheese, as that can cause the texture to become too soft. Once the cream cheese is smooth, reduce the speed to low and gradually add in the sugar. Beat in the egg until well combined, scraping down the sides and bottom of the bowl as needed. Be sure to beat for about 30 seconds after adding the egg to ensure everything is well incorporated.
Step 4: Add the Cheesecake Filling to the Crust
Spoon 1 1/2 tablespoons of the cream cheese mixture evenly into each muffin liner, over the cinnamon crust. It should fill up most of the liner, leaving room for the pumpkin layer on top. Once filled, set the muffin pan aside while you prepare the pumpkin layer.
Step 5: Prepare the Pumpkin Layer
In a separate bowl, stir together the canned pumpkin and pumpkin pie spice until smooth. You can add more pumpkin spice to taste if you prefer a stronger spice flavor. Then, fold this mixture into the remaining cheesecake filling, mixing until the pumpkin and spices are well blended into the cream cheese mixture. The pumpkin layer will give these bites that warm fall flavor that everyone loves.
Step 6: Layer the Pumpkin Mixture
Spoon the pumpkin cheesecake mixture on top of the first layer, dividing it evenly among all the mini cheesecake cups. You should fill each cup almost to the top, but not quite. The pumpkin layer will bake into the cheesecake, creating beautiful layers once everything is baked and cooled.
Step 7: Bake the Cheesecake Bites
Place the muffin pan in the oven and bake at 300°F for 25-30 minutes. The cheesecake bites are done when they are puffed up and slightly golden on the edges, but they should still have a slight jiggle in the center. This jiggle means they’re set, but not overcooked. Once done, remove the muffin pan from the oven and allow the bites to cool completely at room temperature. It’s important to let them cool down slowly, as this helps avoid cracks from forming on the top.
Step 8: Chill and Refrigerate
Once cooled to room temperature, transfer the cheesecake bites to the refrigerator. Let them chill for at least two hours, but if you have time, overnight chilling is even better. The longer the cheesecake bites chill, the firmer and smoother the texture will be.
Step 9: Top with Caramel and Pecans
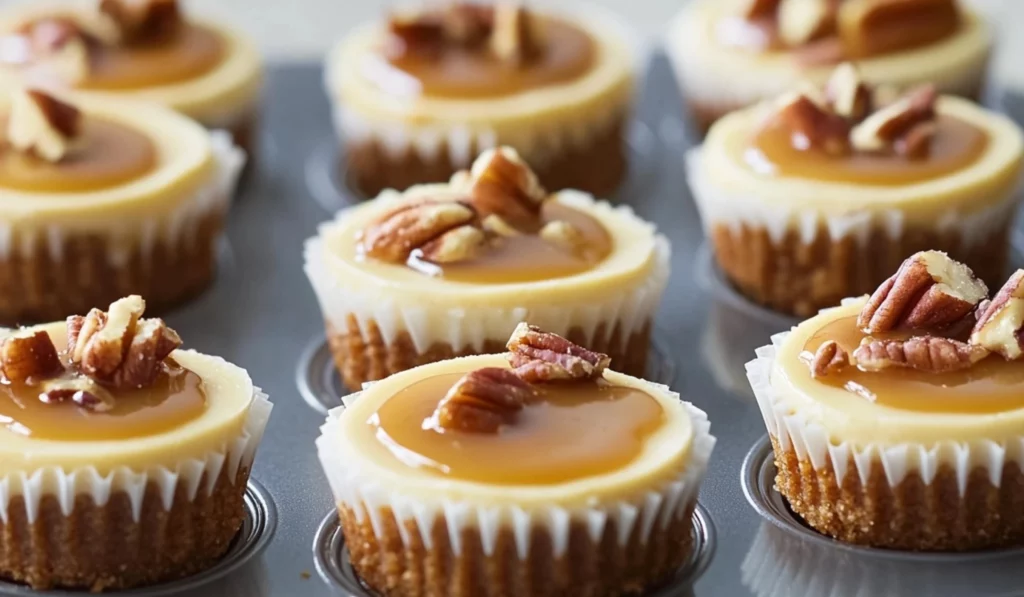
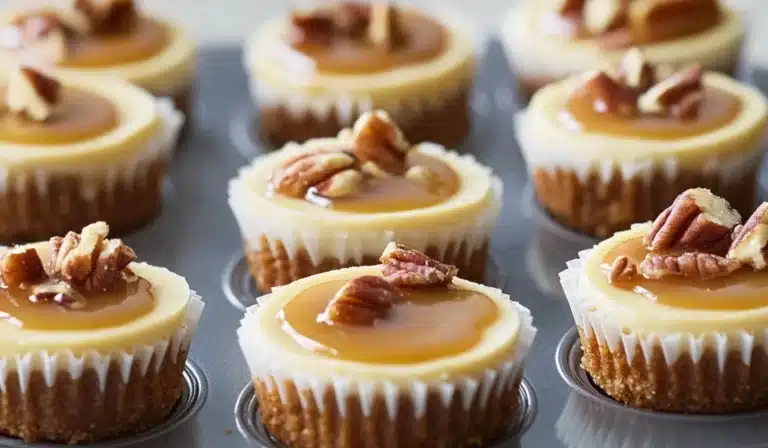
Before serving, drizzle caramel sauce on top of each cheesecake bite. Then, sprinkle the chopped pecans on top for an extra crunch. If you prefer, you can even dip the bites in the caramel sauce before serving for a bit of extra indulgence.
Notes
How to Avoid Overmixing the Cheesecake Filling: One common issue beginners face when making cheesecakes is overmixing the batter. Overmixing can cause the cheesecake to become too soft or even crack during baking. To avoid this, mix your ingredients just until combined and stop when everything looks smooth and creamy. You don’t need to keep mixing once the batter is smooth.
How to Check for Doneness: As mentioned earlier, the cheesecake bites should have a slight jiggle in the center. This is important because it ensures the cheesecakes will firm up as they cool, creating that perfect creamy texture. If they seem too firm when you take them out of the oven, they may be overbaked.
Prevent Cracks on the Surface: If you notice cracks forming on the top of your cheesecakes after baking, you can reduce the oven temperature next time or even bake in a water bath to maintain moisture levels in the oven.
Make Ahead Tips: These cheesecake bites can be made up to 2 days ahead of time. Just store them in an airtight container in the fridge, and they’ll stay fresh and delicious. If you need to make them further in advance, they can be frozen as well. Just let them thaw in the fridge overnight before serving.
- Prep Time: 30 minutes
- Cook Time: 25-30 min
- Category: Dessert
- Method: Baking
- Cuisine: American
- Diet: Vegetarian
Whether you’re planning a Thanksgiving feast, a family gathering, or a casual get-together, these cheesecake bites are the perfect size for a little indulgence. With a buttery cinnamon-crunch crust, a creamy cheesecake center, and a spiced pumpkin layer, topped with rich caramel and crunchy pecans, these bites are the ultimate fall dessert. The great thing about these bites is that they’re not only easy to prepare but also allow for flexibility in terms of ingredients, making it a beginner-friendly recipe that anyone can make!
Let’s dive into this 3-Layer Caramel Pecan Pumpkin Cheesecake Bites recipe that’s sure to become a fall favorite in your kitchen!
Ingredients and Preparation
To start, you’ll need just a few simple ingredients. The recipe calls for:
For the Crust:
- 1 cup Cinnamon Toast Crunch™ cereal, crumbled
- 2 tablespoons unsalted butter (melted)
For the Cheesecake Filling:
- 1 1/3 cup cream cheese, at room temperature
- 1/2 cup granulated sugar
- 1 large egg
For the Pumpkin Layer:
- 1/3 cup canned pumpkin (not pumpkin pie mix)
- 1 teaspoon pumpkin pie spice
Topping:
- 1/4 cup chopped pecans
- 1/2 cup caramel sauce (store-bought or homemade)
The great thing about this recipe is the versatility it offers. If you prefer, you can substitute the Cinnamon Toast Crunch™ with graham crackers or even a gluten-free cereal for a different flavor profile. For the caramel sauce, you can either use store-bought sauce or make your own. If you want to try a different nut topping, pecans can easily be swapped out for walnuts or almonds.
Tips for Ingredient Substitutions:
- For a more indulgent flavor, you can add a teaspoon of vanilla extract to the cheesecake filling.
- If you’re not a fan of caramel sauce, you could use a drizzle of chocolate syrup or fruit preserves.
- You can also opt for a dairy-free version by using non-dairy cream cheese and a dairy-free caramel sauce.
Step-by-Step Instructions
Step 1: Preheat Your Oven and Prepare Your Muffin Pan
Start by preheating your oven to 300°F (150°C). Line a mini muffin pan with paper liners. This will help ensure that your cheesecake bites come out easily after they’ve baked.
Step 2: Prepare the Cinnamon-Crunch Crust
In a small bowl, mix together the crumbled Cinnamon Toast Crunch™ cereal and melted butter. Stir until the cereal crumbs are evenly coated with the butter. Spoon the mixture into each muffin liner, dividing it evenly among the 12 muffin cups. Press the mixture down gently with your fingers, a spoon, or a tamper to ensure it’s compact. The crust will form the base of the cheesecake bite and will give each piece a nice crunchy texture.
Step 3: Make the Cheesecake Filling
Using a stand mixer or hand mixer, beat the cream cheese on medium speed until it’s smooth and creamy. Be sure not to overmix the cream cheese, as that can cause the texture to become too soft. Once the cream cheese is smooth, reduce the speed to low and gradually add in the sugar. Beat in the egg until well combined, scraping down the sides and bottom of the bowl as needed. Be sure to beat for about 30 seconds after adding the egg to ensure everything is well incorporated.
Step 4: Add the Cheesecake Filling to the Crust
Spoon 1 1/2 tablespoons of the cream cheese mixture evenly into each muffin liner, over the cinnamon crust. It should fill up most of the liner, leaving room for the pumpkin layer on top. Once filled, set the muffin pan aside while you prepare the pumpkin layer.
Step 5: Prepare the Pumpkin Layer
In a separate bowl, stir together the canned pumpkin and pumpkin pie spice until smooth. You can add more pumpkin spice to taste if you prefer a stronger spice flavor. Then, fold this mixture into the remaining cheesecake filling, mixing until the pumpkin and spices are well blended into the cream cheese mixture. The pumpkin layer will give these bites that warm fall flavor that everyone loves.
Step 6: Layer the Pumpkin Mixture
Spoon the pumpkin cheesecake mixture on top of the first layer, dividing it evenly among all the mini cheesecake cups. You should fill each cup almost to the top, but not quite. The pumpkin layer will bake into the cheesecake, creating beautiful layers once everything is baked and cooled.
Step 7: Bake the Cheesecake Bites
Place the muffin pan in the oven and bake at 300°F for 25-30 minutes. The cheesecake bites are done when they are puffed up and slightly golden on the edges, but they should still have a slight jiggle in the center. This jiggle means they’re set, but not overcooked. Once done, remove the muffin pan from the oven and allow the bites to cool completely at room temperature. It’s important to let them cool down slowly, as this helps avoid cracks from forming on the top.
Step 8: Chill and Refrigerate
Once cooled to room temperature, transfer the cheesecake bites to the refrigerator. Let them chill for at least two hours, but if you have time, overnight chilling is even better. The longer the cheesecake bites chill, the firmer and smoother the texture will be.
Step 9: Top with Caramel and Pecans
Before serving, drizzle caramel sauce on top of each cheesecake bite. Then, sprinkle the chopped pecans on top for an extra crunch. If you prefer, you can even dip the bites in the caramel sauce before serving for a bit of extra indulgence.
Beginner Tips and Notes
How to Avoid Overmixing the Cheesecake Filling: One common issue beginners face when making cheesecakes is overmixing the batter. Overmixing can cause the cheesecake to become too soft or even crack during baking. To avoid this, mix your ingredients just until combined and stop when everything looks smooth and creamy. You don’t need to keep mixing once the batter is smooth.
How to Check for Doneness: As mentioned earlier, the cheesecake bites should have a slight jiggle in the center. This is important because it ensures the cheesecakes will firm up as they cool, creating that perfect creamy texture. If they seem too firm when you take them out of the oven, they may be overbaked.
Prevent Cracks on the Surface: If you notice cracks forming on the top of your cheesecakes after baking, you can reduce the oven temperature next time or even bake in a water bath to maintain moisture levels in the oven.
Make Ahead Tips: These cheesecake bites can be made up to 2 days ahead of time. Just store them in an airtight container in the fridge, and they’ll stay fresh and delicious. If you need to make them further in advance, they can be frozen as well. Just let them thaw in the fridge overnight before serving.
Serving Suggestions
These cheesecake bites are perfect on their own, but they can also be paired with a variety of other treats to create a complete dessert spread. Here are a few ideas:
- Fresh Whipped Cream: Serve these cheesecake bites with a dollop of freshly whipped cream for an extra touch of richness.
- Fruit Compote: A raspberry or blueberry compote adds a burst of tartness that contrasts beautifully with the sweet cheesecake and caramel topping.
- Hot Chocolate or Coffee: Serve these bites alongside a hot drink like coffee, hot chocolate, or even a spiced apple cider for the perfect fall dessert pairing.
Storing Leftovers
If you have any leftovers (which is unlikely with how delicious these are!), store them in an airtight container in the refrigerator for up to 5 days. If you want to keep them for longer, you can freeze them for up to 2 months. When ready to serve, just thaw them in the fridge for several hours before enjoying.

Conclusion
These 3-Layer Caramel Pecan Pumpkin Cheesecake Bites are a simple, yet impressive dessert perfect for beginners and seasoned bakers alike. With just a few ingredients and minimal effort, you can create a beautiful and delicious fall treat that will wow your guests. Whether you’re hosting a holiday gathering, a dinner party, or just want a sweet snack to enjoy, these mini cheesecakes are sure to please. Don’t forget to top them with caramel and pecans for that perfect finishing touch. I hope you enjoy making and sharing these cheesecake bites as much as I do!
Let me know how it turns out for you! Feel free to leave a comment below with your thoughts or questions. Happy baking!


