
As the days grow shorter and the crisp air of fall rolls in, there’s nothing quite like the aroma of freshly baked pumpkin desserts filling the kitchen. One particular dessert that has earned its place as a fall favorite is Pumpkin Crisp. This easy-to-make treat combines the rich, creamy flavor of pumpkin pie with a golden, cinnamon streusel topping, offering the perfect balance of texture and flavor. Served warm with a scoop of ice cream or a dollop of whipped cream, it’s a cozy indulgence everyone will love.


Pumpkin Crisp Recipe: The Ultimate Fall Dessert
When fall rolls around, there’s no better way to celebrate the season than with the warm, comforting flavors of pumpkin. One dessert that never fails to impress is Pumpkin Crisp—a perfect blend of creamy pumpkin pie filling and a cinnamon streusel topping that adds a satisfying crunch. If you love the flavors of pumpkin pie but want something a little easier to make, this recipe is for you. With simple steps and minimal ingredients, it’s perfect for beginners looking to dive into the world of baking. Plus, the combination of creamy pumpkin, buttery streusel, and the option of topping it off with ice cream makes this a dessert everyone will adore. Whether you’re a beginner or an experienced baker, this Pumpkin Crisp will quickly become a fall favorite!
- Total Time: 55 minutes
- Yield: 8 servings 1x
Ingredients
Pumpkin Pie Layer:
- 1 (15 oz) can pumpkin puree
- 1 cup granulated sugar
- 3 large eggs
- 2 teaspoons pumpkin pie spice
- ½ teaspoon salt
- 2 teaspoons vanilla extract
- ⅔ cup heavy cream
Cinnamon Streusel Topping:
- 2 cups all-purpose flour
- 1 ½ cups granulated sugar
- 2 teaspoons ground cinnamon
- ½ teaspoon salt
- 12 tablespoons (1 ½ sticks) unsalted butter, melted
Instructions
Step 1: Preheat and Prepare Your Baking Dish
Start by preheating your oven to 375°F (190°C). While the oven heats up, butter a 12-inch cast iron skillet or a medium casserole dish. Buttering the dish ensures the crisp will release easily once it’s baked and adds flavor to the crust. If you don’t have a cast iron skillet, any medium-sized, oven-safe dish will work.
Step 2: Mix the Pumpkin Pie Layer
In a large mixing bowl, whisk together the pumpkin puree, sugar, eggs, pumpkin pie spice, salt, and vanilla extract. You’ll want to ensure these ingredients are thoroughly combined into a smooth mixture. Whisking the eggs into the pumpkin puree helps create a creamy texture for the filling.
Next, add the heavy cream and continue whisking until the mixture is smooth. The cream will give the filling its velvety texture and prevent it from becoming too thick. Pour the pumpkin mixture into your prepared dish, spreading it evenly to form a smooth base.
Step 3: Prepare the Cinnamon Streusel Topping
In a separate medium-sized bowl, combine the flour, granulated sugar, cinnamon, and salt for the streusel topping. Whisk these ingredients together until they are well combined. Once mixed, add the melted butter and stir until the mixture becomes crumbly. Use a fork to break up the butter into smaller pieces, or you can even use a hand mixer to make the topping more uniform.
The streusel topping is what gives the Pumpkin Crisp its signature crunch. Spread the crumbly topping evenly over the pumpkin filling. Try to cover the entire surface to ensure you get a uniform texture throughout the crisp. Don’t worry if some pieces are larger or smaller—it will still bake beautifully.
Step 4: Bake the Pumpkin Crisp
Place the baking dish in the preheated oven and bake for 40 to 45 minutes. The top should turn golden brown, and the filling should be set. To check for doneness, insert a toothpick into the center of the crisp—if it comes out clean or with just a few crumbs attached, it’s ready. Keep an eye on the topping during the last few minutes of baking; if it begins to brown too quickly, loosely cover the top with aluminum foil to prevent burning.
Step 5: Cool and Serve
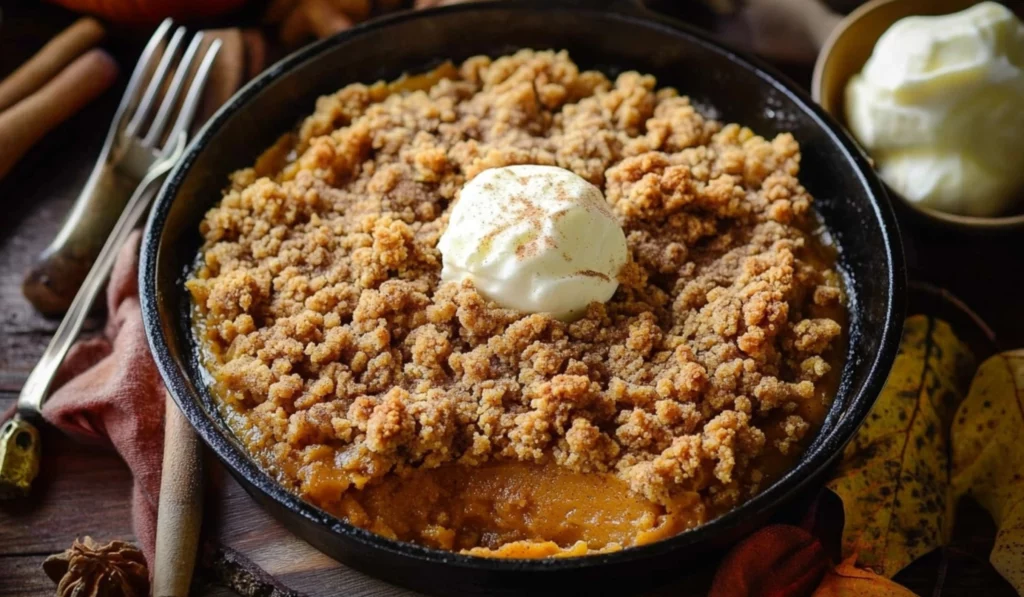
Once the crisp is done baking, remove it from the oven and let it cool for about 10 minutes. This allows the pumpkin filling to firm up slightly and makes it easier to serve. After cooling, scoop generous servings of the Pumpkin Crisp into bowls or onto plates. Top each serving with a scoop of vanilla ice cream or whipped cream for an extra indulgence.
If you want to add a special touch, drizzle warm caramel sauce over the top for a sweet contrast to the spiced pumpkin filling. Another delicious option is sprinkling some chopped pecans or walnuts on top for a bit of crunch.
Step 6: Enjoy!
Serve your Pumpkin Crisp warm and watch as it disappears in no time. Its comforting flavors are perfect for fall gatherings, whether it’s a cozy dinner with family or a holiday celebration with friends.
Notes
- Don’t overmix the streusel: When making the streusel topping, be careful not to overmix it. The goal is to create crumbly pieces, so don’t worry if some parts are a little larger than others. The uneven texture is what makes the topping so delicious and crunchy.
- Toothpick test: For beginners, it can be tricky to know when a dessert like this is done. If you’re unsure, the toothpick test is your best friend. Insert a toothpick into the center of the crisp; if it comes out clean, the dessert is done.
- Room temperature ingredients: To make mixing easier and to prevent lumps, use room temperature eggs and heavy cream. Cold ingredients can sometimes cause the batter to seize up, making it harder to mix.
- Prep Time: 15 minutes
- Cook Time: 40 minutes
- Category: Dessert
- Method: Baking
- Cuisine: American
- Diet: Vegetarian
For years, my family has been making Pumpkin Crisp during the autumn months, and it has become a staple at our gatherings. It’s a dessert that’s simple to prepare, yet always leaves a lasting impression. Whether you’re a seasoned baker or just starting out, this recipe is perfect for beginners. The step-by-step instructions make it easy to follow, and the end result is a show-stopping dessert that will make you feel like an expert in the kitchen.
Why This Recipe Is Perfect for Beginners
What makes this Pumpkin Crisp ideal for beginners is its simplicity. Unlike a traditional pumpkin pie, which requires a pre-made or homemade pie crust and careful crimping, Pumpkin Crisp skips the crust altogether. Instead, you get a creamy pumpkin filling topped with a buttery, cinnamon-spiced streusel. The recipe is a great introduction to baking because it doesn’t require any special skills or equipment. You don’t need to worry about precise measurements for a crust or fancy decorating techniques—this recipe is all about mixing, layering, and baking.
Moreover, this dessert is a one-pan wonder, which means less mess and cleanup. Everything goes into a single dish, and the result is a rich, comforting dessert that’s bound to impress. For those who are just learning how to bake, Pumpkin Crisp is forgiving and simple. It’s also versatile, meaning you can easily make adjustments based on what ingredients you have on hand, or even add a creative twist to make it your own.
Ingredients and Preparation
Pumpkin Pie Layer:
- 1 (15 oz) can pumpkin puree
- 1 cup granulated sugar
- 3 large eggs
- 2 teaspoons pumpkin pie spice
- ½ teaspoon salt
- 2 teaspoons vanilla extract
- ⅔ cup heavy cream
Cinnamon Streusel Topping:
- 2 cups all-purpose flour
- 1 ½ cups granulated sugar
- 2 teaspoons ground cinnamon
- ½ teaspoon salt
- 12 tablespoons (1 ½ sticks) unsalted butter, melted
Ingredient Alternatives:
Pumpkin Crisp is a forgiving recipe, and there are several easy substitutions you can make based on dietary preferences or what ingredients you have on hand:
- Pumpkin puree: If you don’t have canned pumpkin puree, you can substitute it with homemade pumpkin puree made by roasting a sugar pumpkin and pureeing it. Another great option is using butternut squash puree, which offers a slightly different flavor but still complements the cinnamon and nutmeg spices perfectly.
- Heavy cream: For a dairy-free alternative, you can use coconut cream or almond milk instead of heavy cream. Coconut cream will give you a slightly richer, tropical flavor, while almond milk will create a lighter texture.
- Granulated sugar: If you prefer a less sugary dessert, you can replace the granulated sugar with a sugar substitute like stevia, monk fruit, or erythritol. Just make sure to follow the conversion rates for the sugar substitute to get the right sweetness level.
- Butter: If you’re looking for a dairy-free or vegan version, use plant-based butter or a neutral oil like vegetable or coconut oil in place of the unsalted butter.
Tips for Easy Preparation:
- Measuring ingredients: For the most accurate results, use a kitchen scale to weigh your ingredients, especially for the flour and sugar. This will ensure you have the right proportions, which can make a big difference in the texture of your dessert.
- Room temperature ingredients: To achieve a smoother filling, it’s helpful to bring your eggs and heavy cream to room temperature before mixing. This ensures the ingredients combine more easily and prevents any lumps from forming in the batter.
Step-by-Step Instructions
Step 1: Preheat and Prepare Your Baking Dish
Start by preheating your oven to 375°F (190°C). While the oven heats up, butter a 12-inch cast iron skillet or a medium casserole dish. Buttering the dish ensures the crisp will release easily once it’s baked and adds flavor to the crust. If you don’t have a cast iron skillet, any medium-sized, oven-safe dish will work.
Step 2: Mix the Pumpkin Pie Layer
In a large mixing bowl, whisk together the pumpkin puree, sugar, eggs, pumpkin pie spice, salt, and vanilla extract. You’ll want to ensure these ingredients are thoroughly combined into a smooth mixture. Whisking the eggs into the pumpkin puree helps create a creamy texture for the filling.
Next, add the heavy cream and continue whisking until the mixture is smooth. The cream will give the filling its velvety texture and prevent it from becoming too thick. Pour the pumpkin mixture into your prepared dish, spreading it evenly to form a smooth base.
Step 3: Prepare the Cinnamon Streusel Topping
In a separate medium-sized bowl, combine the flour, granulated sugar, cinnamon, and salt for the streusel topping. Whisk these ingredients together until they are well combined. Once mixed, add the melted butter and stir until the mixture becomes crumbly. Use a fork to break up the butter into smaller pieces, or you can even use a hand mixer to make the topping more uniform.
The streusel topping is what gives the Pumpkin Crisp its signature crunch. Spread the crumbly topping evenly over the pumpkin filling. Try to cover the entire surface to ensure you get a uniform texture throughout the crisp. Don’t worry if some pieces are larger or smaller—it will still bake beautifully.
Step 4: Bake the Pumpkin Crisp
Place the baking dish in the preheated oven and bake for 40 to 45 minutes. The top should turn golden brown, and the filling should be set. To check for doneness, insert a toothpick into the center of the crisp—if it comes out clean or with just a few crumbs attached, it’s ready. Keep an eye on the topping during the last few minutes of baking; if it begins to brown too quickly, loosely cover the top with aluminum foil to prevent burning.
Step 5: Cool and Serve
Once the crisp is done baking, remove it from the oven and let it cool for about 10 minutes. This allows the pumpkin filling to firm up slightly and makes it easier to serve. After cooling, scoop generous servings of the Pumpkin Crisp into bowls or onto plates. Top each serving with a scoop of vanilla ice cream or whipped cream for an extra indulgence.
If you want to add a special touch, drizzle warm caramel sauce over the top for a sweet contrast to the spiced pumpkin filling. Another delicious option is sprinkling some chopped pecans or walnuts on top for a bit of crunch.
Step 6: Enjoy!
Serve your Pumpkin Crisp warm and watch as it disappears in no time. Its comforting flavors are perfect for fall gatherings, whether it’s a cozy dinner with family or a holiday celebration with friends.
Beginner Tips and Notes
- Don’t overmix the streusel: When making the streusel topping, be careful not to overmix it. The goal is to create crumbly pieces, so don’t worry if some parts are a little larger than others. The uneven texture is what makes the topping so delicious and crunchy.
- Toothpick test: For beginners, it can be tricky to know when a dessert like this is done. If you’re unsure, the toothpick test is your best friend. Insert a toothpick into the center of the crisp; if it comes out clean, the dessert is done.
- Room temperature ingredients: To make mixing easier and to prevent lumps, use room temperature eggs and heavy cream. Cold ingredients can sometimes cause the batter to seize up, making it harder to mix.
Serving Suggestions
Pumpkin Crisp is wonderful on its own, but there are plenty of ways to elevate the dish:
- Serve with ice cream: Vanilla ice cream is a classic topping, but you can also try cinnamon or caramel ice cream for an extra twist.
- Whipped cream: A dollop of whipped cream adds a light, airy touch to balance the rich pumpkin filling.
- Nuts: Chopped pecans or walnuts sprinkled on top can give the crisp a crunchy texture that pairs wonderfully with the smooth filling.
- Caramel sauce: For a luxurious touch, drizzle warm caramel sauce over each serving.
- Cranberries: Add a handful of fresh or dried cranberries to the top for a pop of color and a tart contrast to the sweet pumpkin.
Leftover Storage Tips:
If you have leftovers (which is unlikely, given how delicious this dessert is), store the Pumpkin Crisp in an airtight container in the fridge for up to 3 days. To reheat, simply place a serving in the microwave for 20-30 seconds or reheat it in the oven at 350°F (175°C) for about 5-10 minutes.

Conclusion
Pumpkin Crisp is the perfect dessert to celebrate the flavors of fall. Whether you’re a beginner or an experienced baker, this recipe offers simplicity and satisfaction in every bite. The combination of the creamy pumpkin filling and the sweet, crunchy streusel topping makes for a dessert that everyone will love. Serve it warm with ice cream or whipped cream, and you’ll have a dessert that’s sure to impress. Give this easy recipe a try, and it might just become a new tradition in your fall dessert repertoire.


